Source Filters
What You'll Learn
You'll discover how to use Knack's source filter system to precisely control which records appear in your elements. This knowledge will help you create more targeted interfaces that show exactly the information your users need, making your app more intuitive and effective.
Source Filters Overview
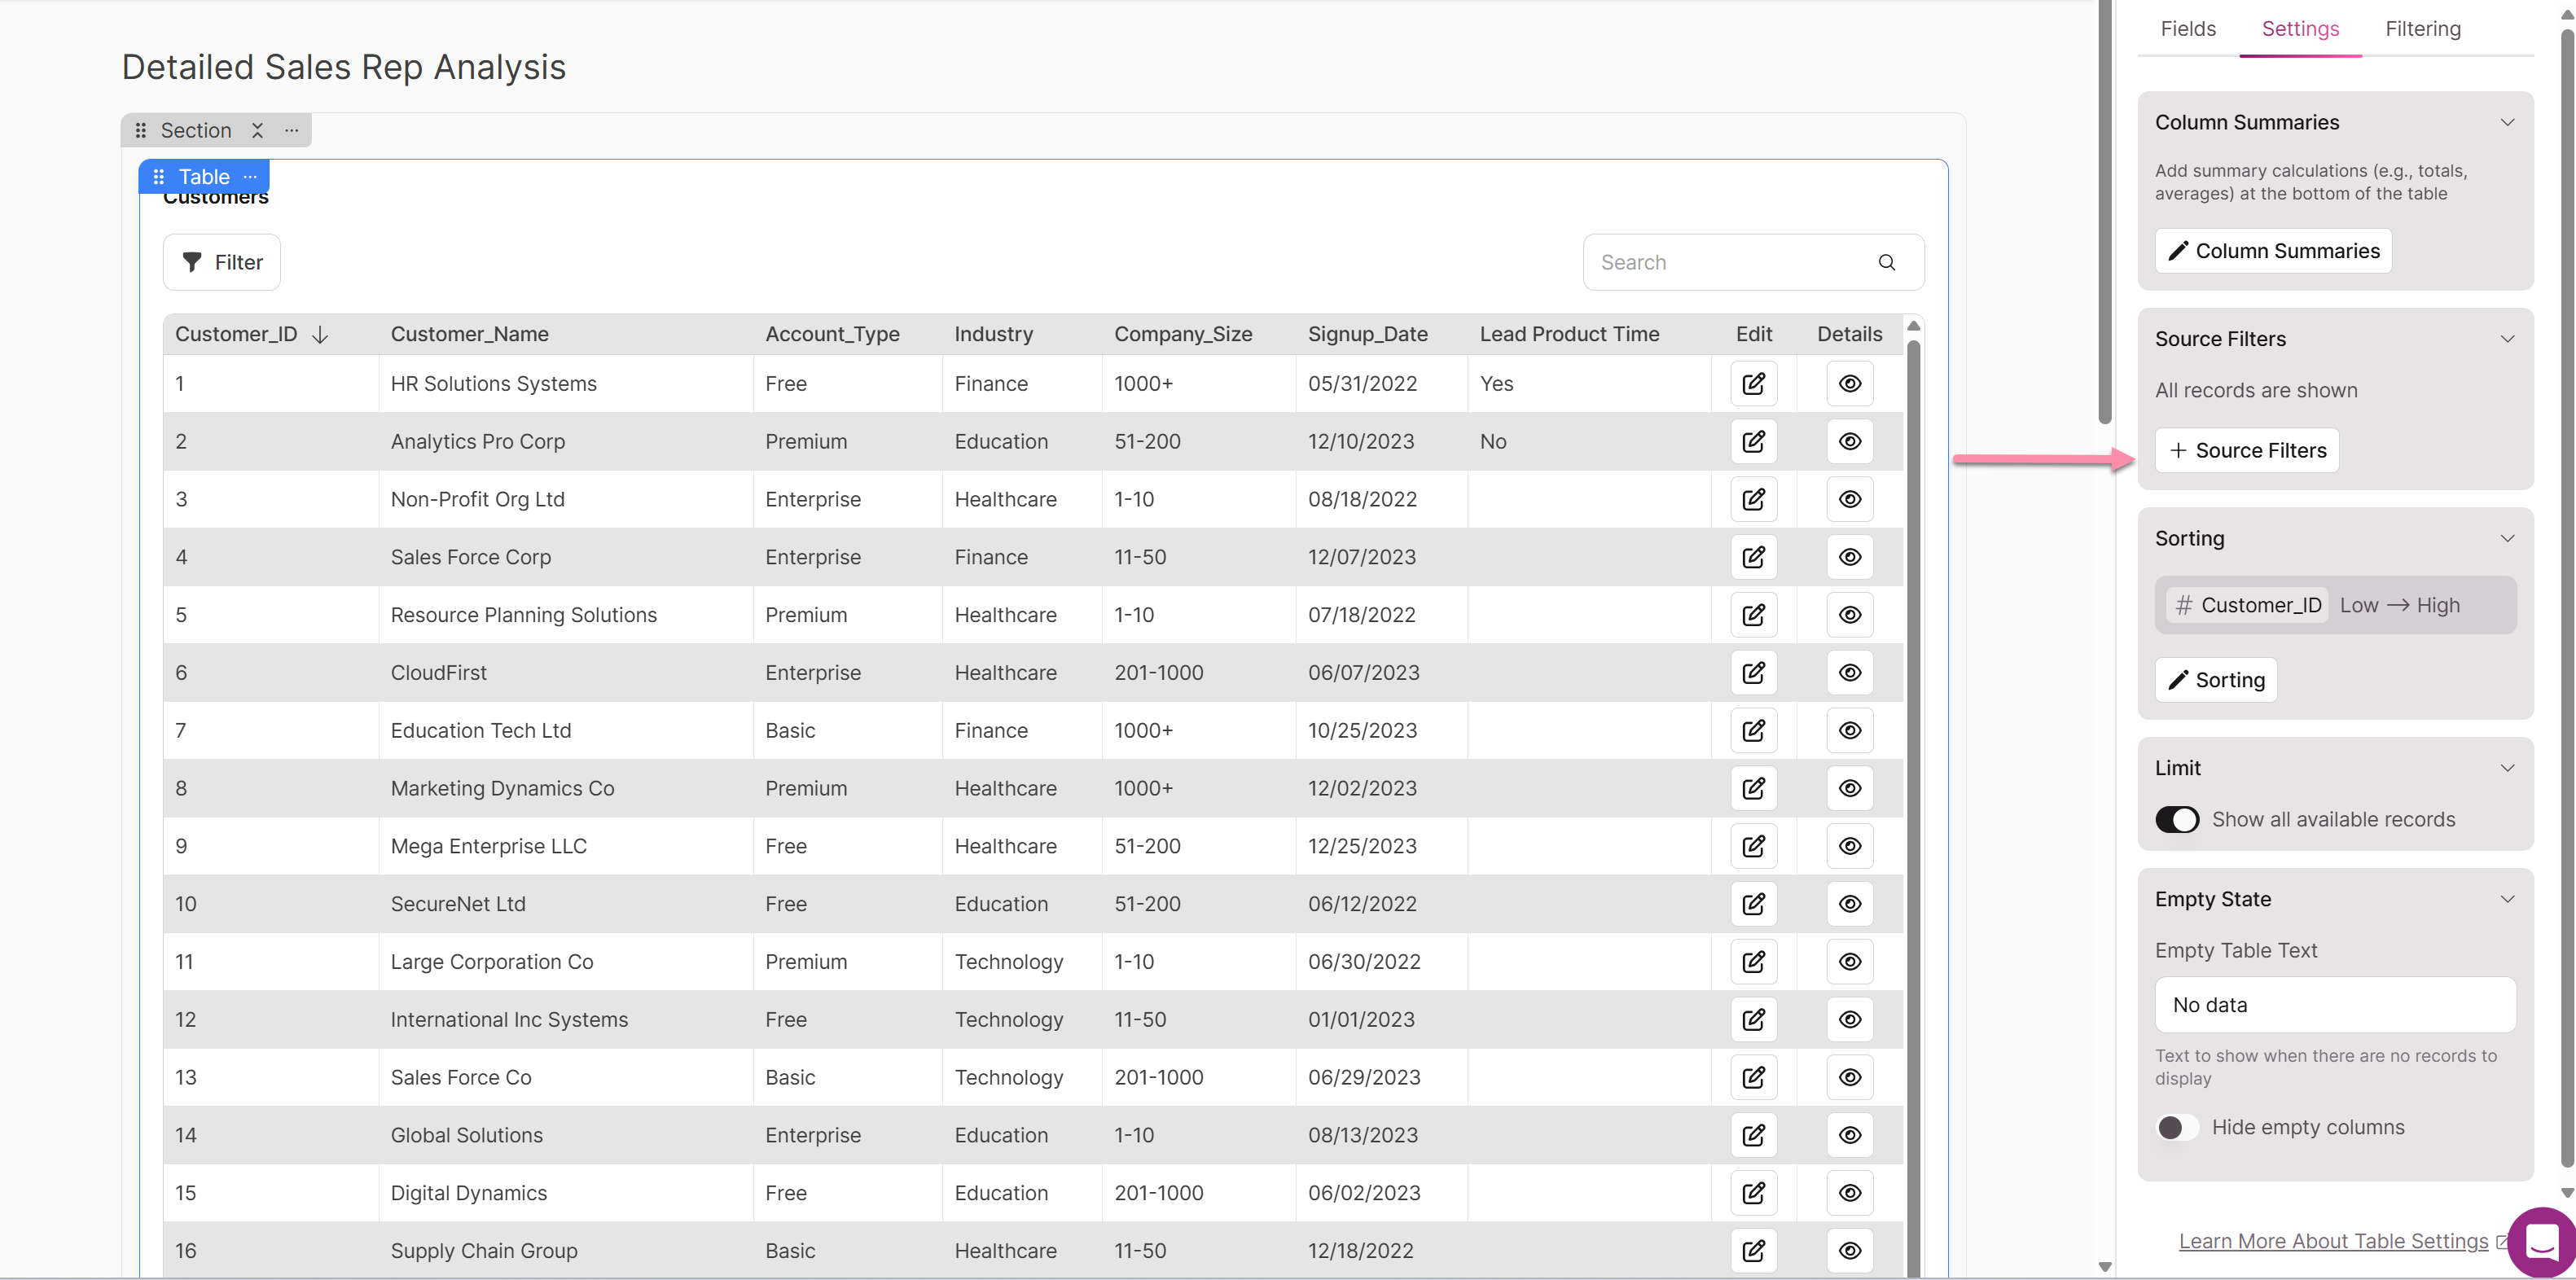
All elements indicate which records are being shown in the element editor. For elements that display multiple records, you can customize exactly which records appear.
In the "Data" tab within the element's settings, you have options to add filters that determine which records are shown. By default, elements will display every record from the selected table if no source filters are applied.
Understanding Data Source Filters
The Data Settings section indicates which table's records the element is displaying. Here, you can create filter groups from the source table that restrict which records will appear in the element.
How Source Filters Work
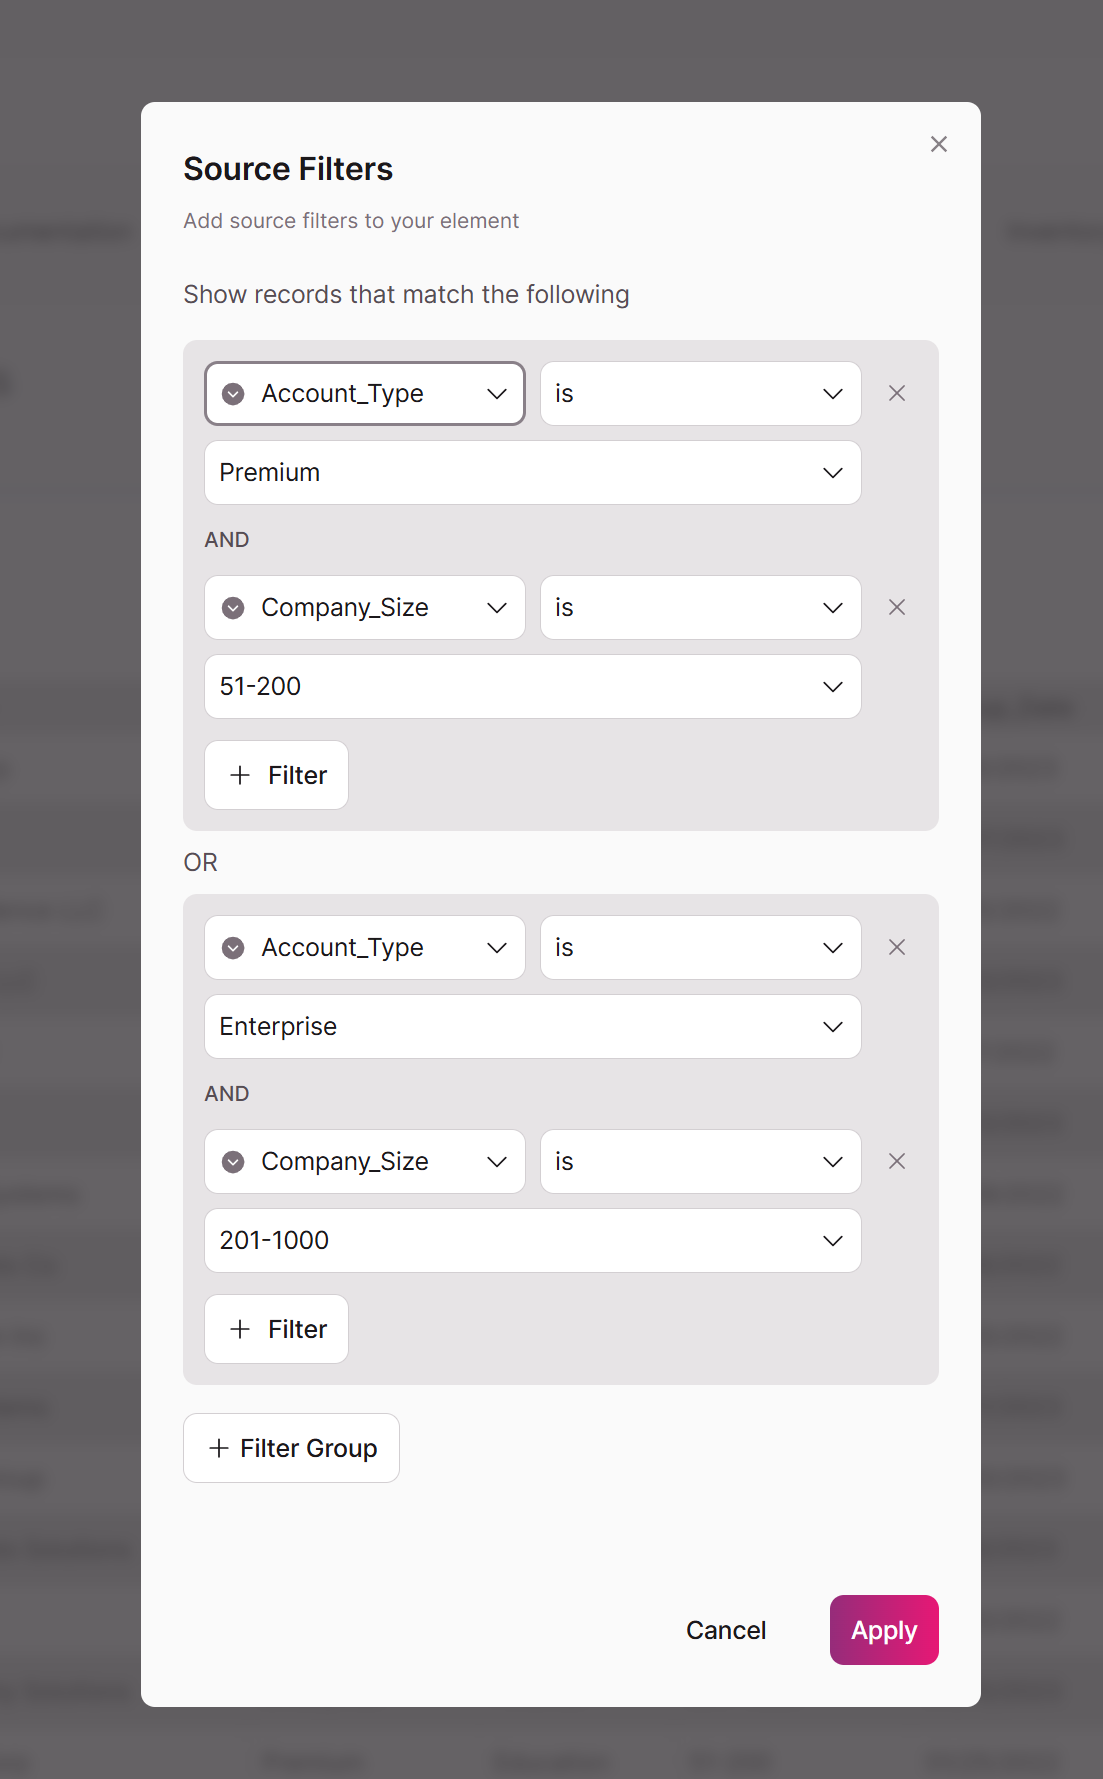
Source filters use a consistent and powerful "OR of ANDs" logic:
- Within each filter group, conditions are joined by AND. A record must match ALL conditions inside a group to be considered a match for that group.
- Between filter groups, the connection is OR. A record will be included if it matches ANY of the filter groups.
The order of source filter groups does not matter. All groups are treated as equal alternatives.
- Each group is evaluated independently.
- A record will be included if it matches ALL conditions within ANY single group.
This consistent logic makes your filters predictable and easy to understand, no matter how complex they become.
Elements That Use Source Filters
Source filters can be applied to:
- Table Elements
- List Elements
- Search Elements
- Map Elements
- Calendar Elements
- Chart Elements (Bar, Pie, Line, Area)
Creating Filter Groups
To add your first condition to an element:
- In the element editor, go to the Data Display section, then the Settings tab.
- Under Source Filters, click the + Source Filters button.
- Choose a field from the dropdown.
- Select an operator (e.g.,
is,is not,is greater than). - Enter a value if required.
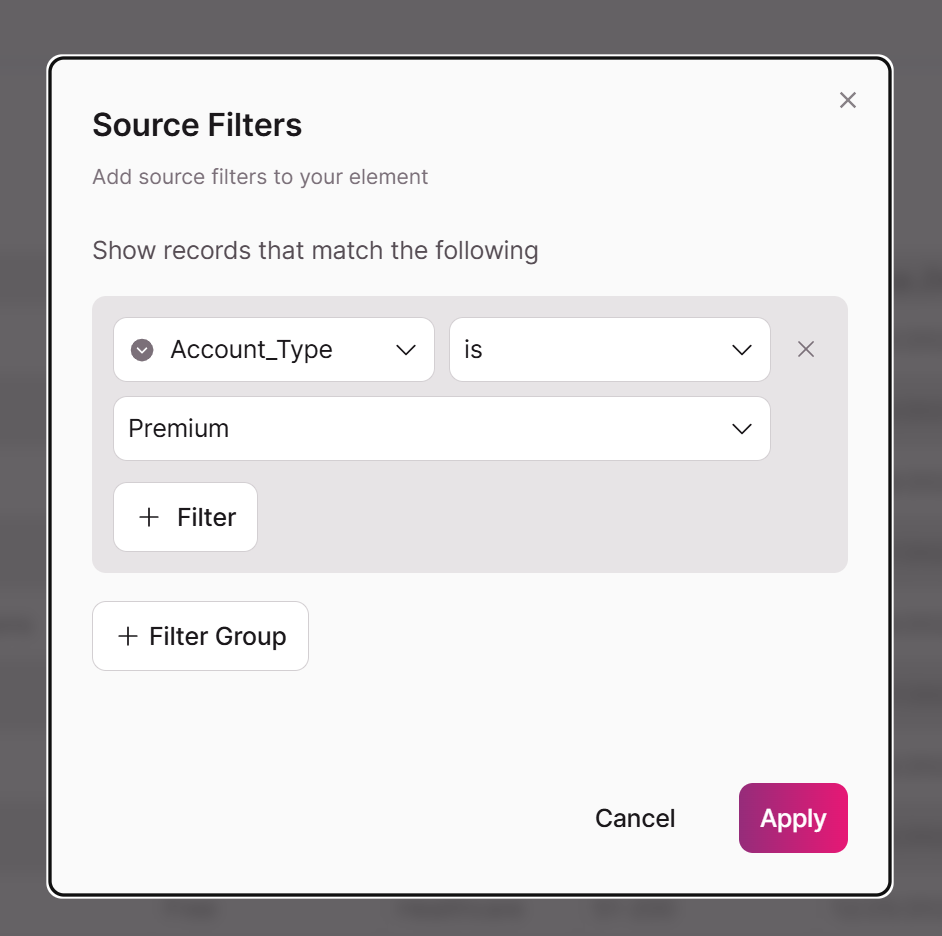
Adding Multiple Conditions
- To add another AND condition, click + Filter within the same group.
- To add an OR condition, click + Filter Group to create a new, alternative group.
Filter Update Required for Classic "All" Mode
If you have an element with a filter created in our Classic builder, you may see a "Filter Update Required" notice. This happens when the filter uses a logic mode that needs to be converted to the new system, if you want to edit it.
If you do nothing, don't worry. The records being shown in the Next-Gen have not changed.
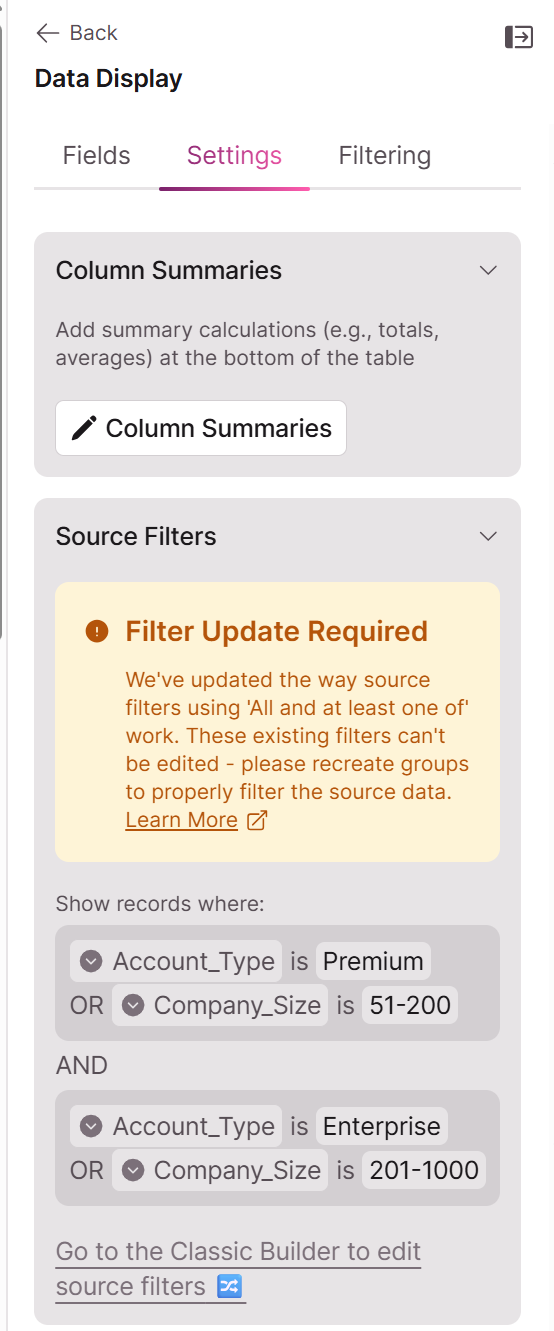
Why Is an Update Needed?
The filter logic has been standardized in the Next-Gen version of Knack for greater consistency. Here’s a breakdown of Classic and Next-Gen:
Next-Gen: One New Standard: "OR of ANDs"
The new filter system exclusively uses a structure known as Disjunctive Normal Form (DNF), or more simply, "OR of ANDs."
- Conditions within a group are joined by AND.
- Groups themselves are joined by OR.
This is like saying: "Show records that meet all criteria in Set A, OR all criteria in Set B."
Classic Knack: "All" Mode: "AND of ORs" and "Any" Mode: "OR of ANDs"
Our Classic builder had an "All" mode that used a different logic called Conjunctive Normal Form (CNF). It returned records that matched at least one condition from every single group.
This "AND of ORs" logic is no longer supported for editing in the Next-Gen Builder.
Because the "All" mode logic is not available, you must manually convert these filters to the new "OR of ANDs" structure before you can edit them.
How to Convert Your "All" Filter
You can perfectly replicate the results of any classic "All" filter by converting its logic. This involves creating new groups that represent every possible valid combination of the old rules.
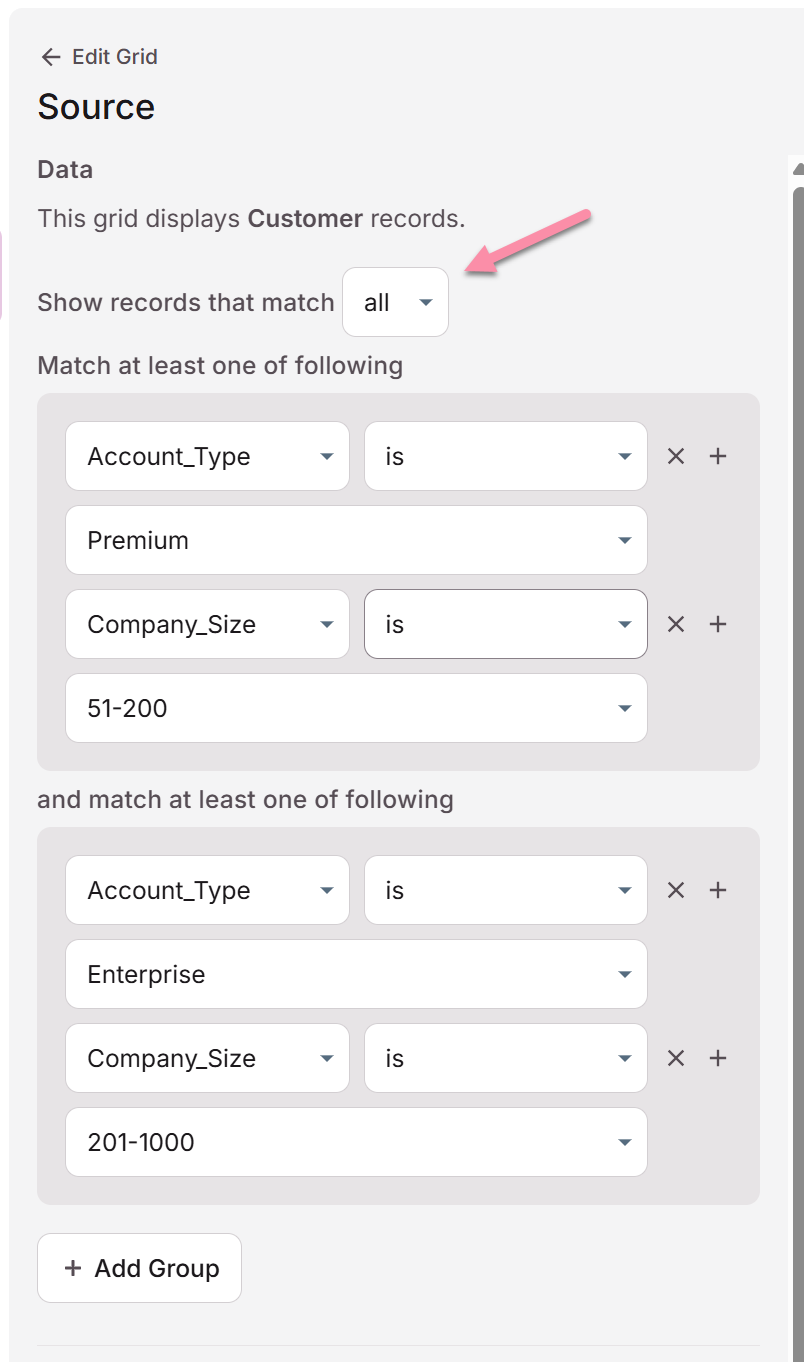
Let's use this classic "All" filter as our example:
- Group 1 (Match at least one):
Account_Typeis "Premium"Company_Sizeis "51-200"
- AND
- Group 2 (Match at least one):
Account_Typeis "Enterprise"Company_Sizeis "201-1000"
Step 1: Find All Logical Combinations
To convert this, for the purpose of editing or creating new source filters for that element in Next-Gen, you must create a new filter group for every combination of conditions across the original groups.
- Combine Group 1, Condition 1 with all conditions in Group 2:
Account_Typeis "Premium" ANDAccount_Typeis "Enterprise"Account_Typeis "Premium" ANDCompany_Sizeis "201-1000"
- Combine Group 1, Condition 2 with all conditions in Group 2:
Company_Sizeis "51-200" ANDAccount_Typeis "Enterprise"Company_Sizeis "51-200" ANDCompany_Sizeis "201-1000"
Step 2: Remove Impossible Combinations
Some of these combinations are not logical. A record should not have two different account types or two different company sizes at the same time. We can safely remove them.
Account_Typeis "Premium" ANDAccount_Typeis "Enterprise" (Not Logical)Account_Typeis "Premium" ANDCompany_Sizeis "201-1000" (Possible)Company_Sizeis "51-200" ANDAccount_Typeis "Enterprise" (Possible)Company_Sizeis "51-200" ANDCompany_Sizeis "201-1000" (Not Logical)
This leaves us with two valid combinations.
Step 3: Build the New Filter
Finally, build a new filter where ANY of the valid combinations can be true. Each valid combination becomes its own group.
Show records that matchany of the following:
- (Group 1) Match all of the following:
Account_Typeis "Premium"Company_Sizeis "201-1000"
- OR
- (Group 2) Match all of the following:
Account_Typeis "Enterprise"Company_Sizeis "51-200"
By setting up your filter this way, you will get the exact same records as your original "All" filter, while using the new, compatible "OR of ANDs" structure.
Example: A Common Filter Scenario to Recreate in Next-Gen
Here is another common filter that you may want to recreate in Next-Gen.
Original "All" Filter:
In Classic, this filter shows records where Active is "Yes" AND the record has either a phone number or an email.
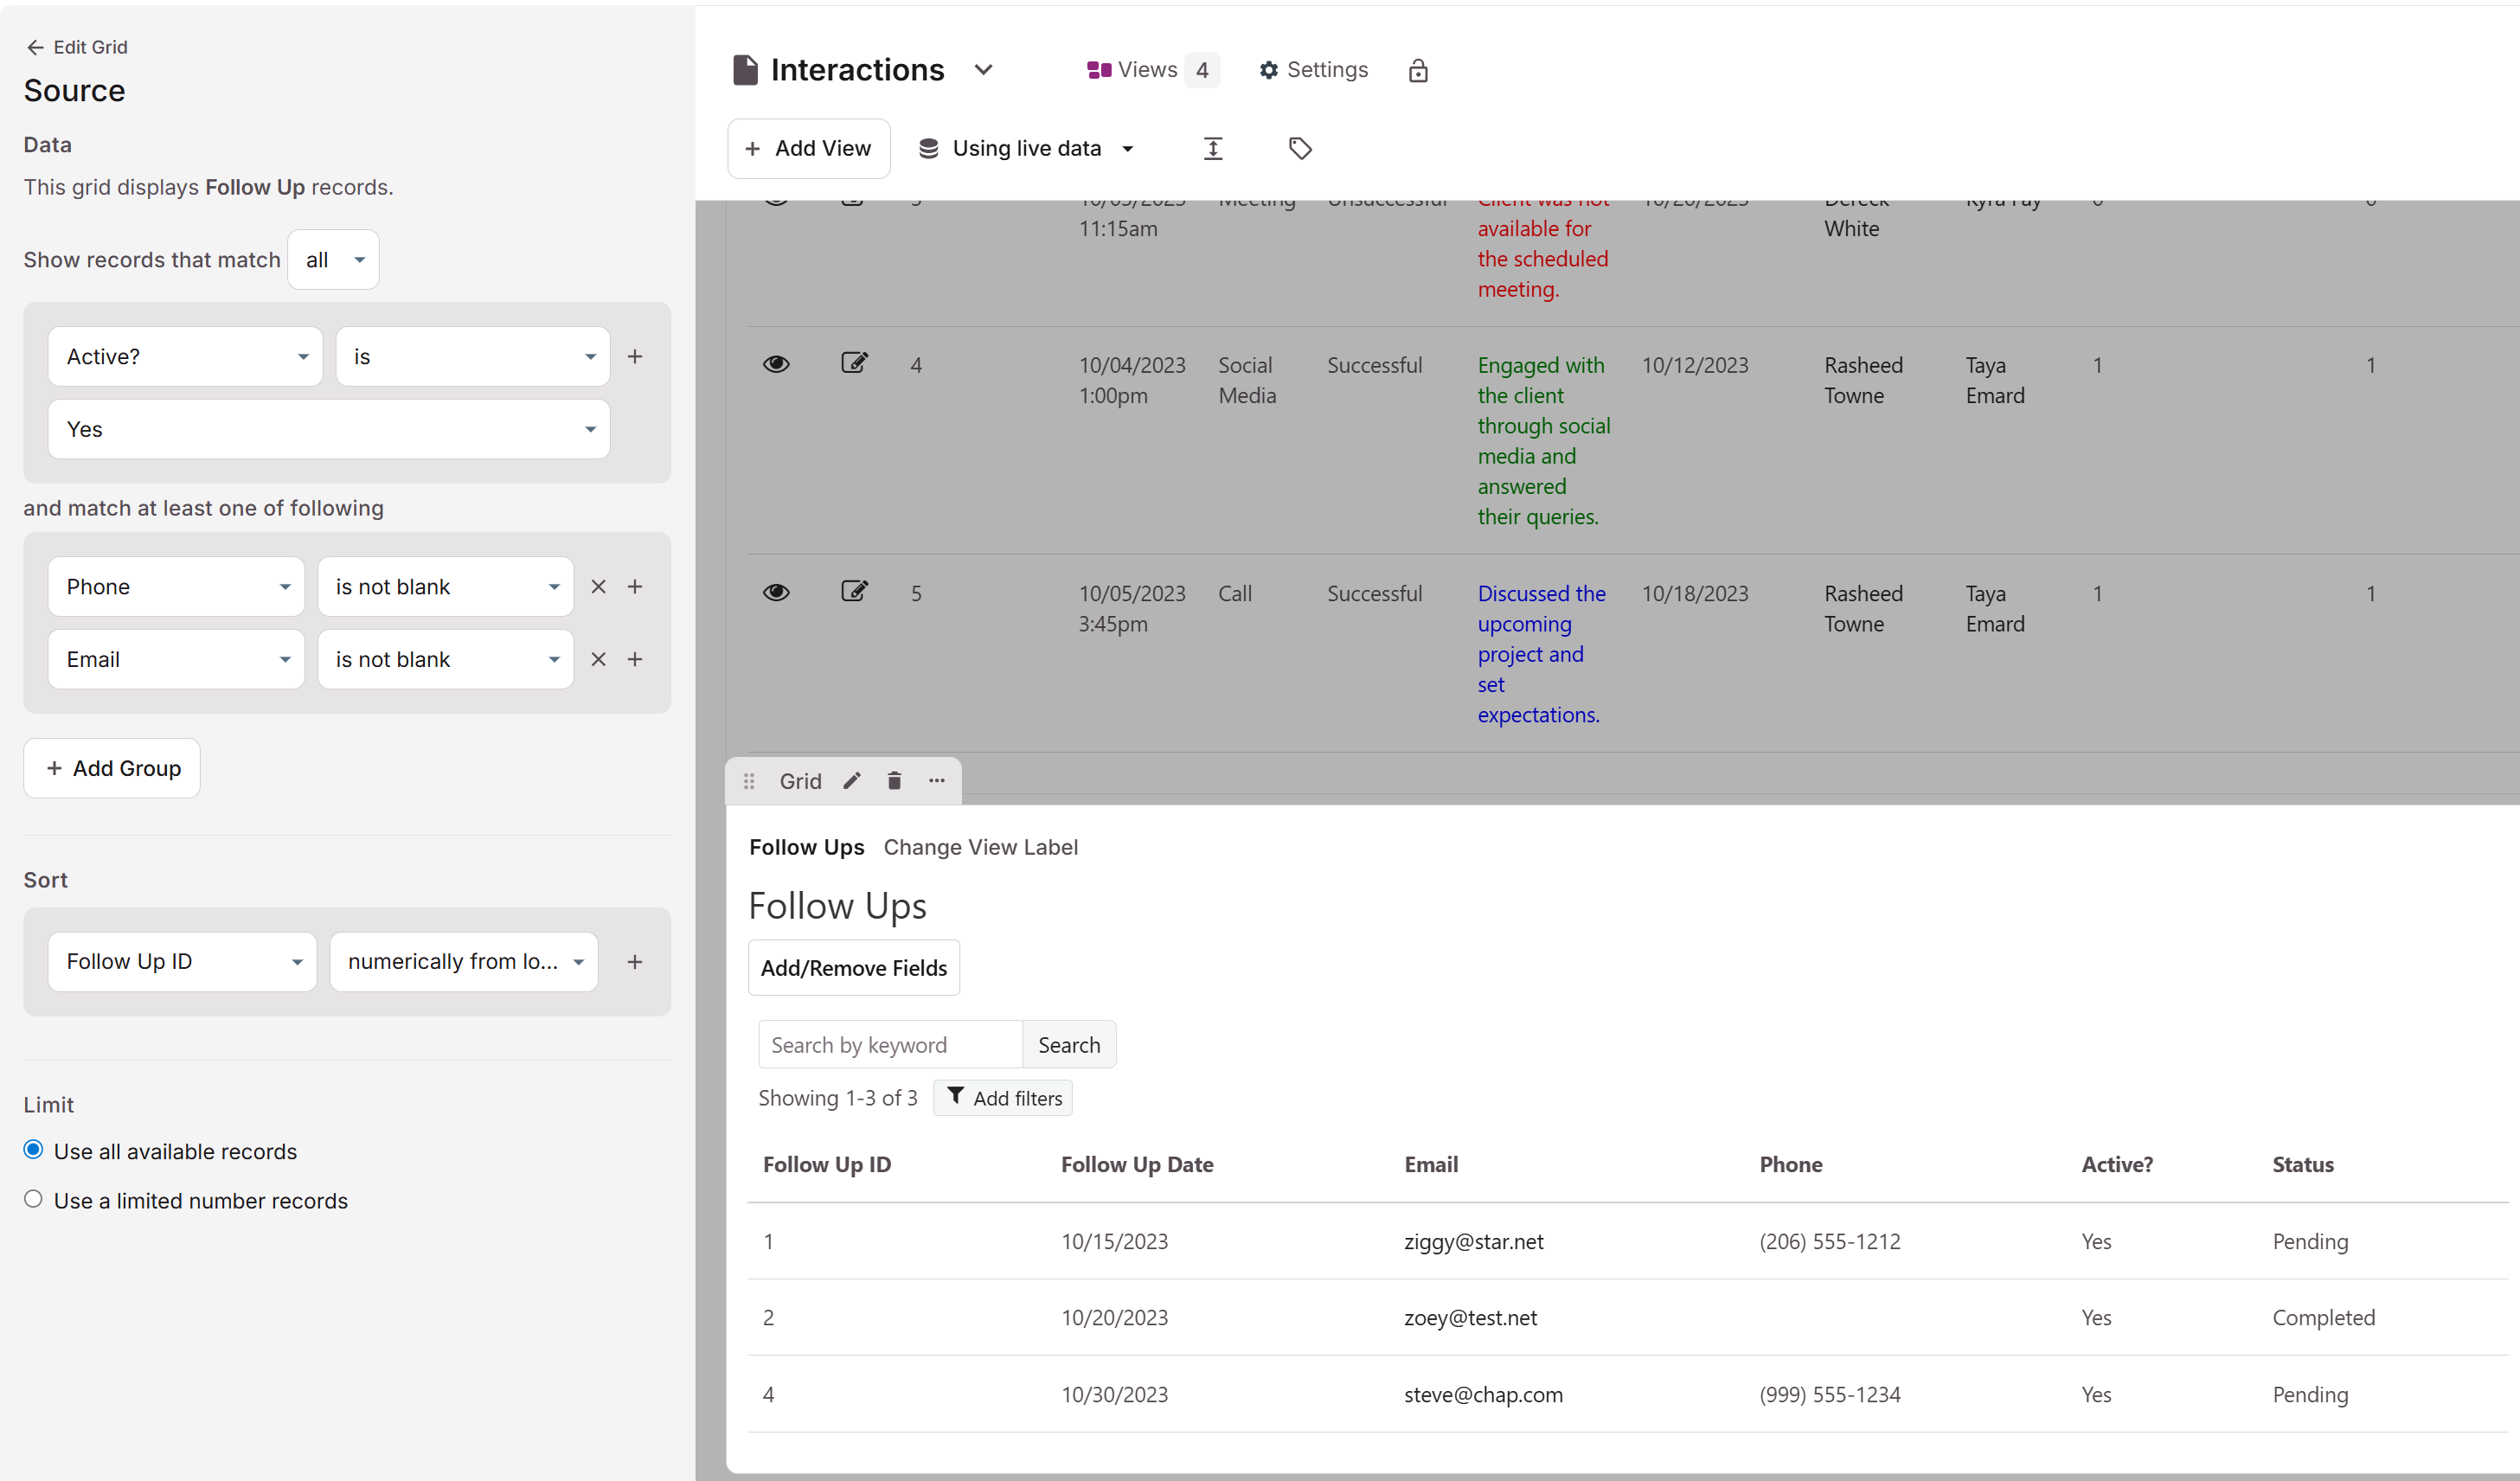
- Group 1 (Match all):
Activeis "Yes"
- AND
- Group 2 (Match at least one):
Phoneis not blankEmailis not blank
Conversion Steps:
To recreate this same filter in Next-Gen, we distribute the condition from Group 1 (Active is "Yes") across both conditions in Group 2.
Activeis "Yes" ANDPhoneis not blankActiveis "Yes" ANDEmailis not blank
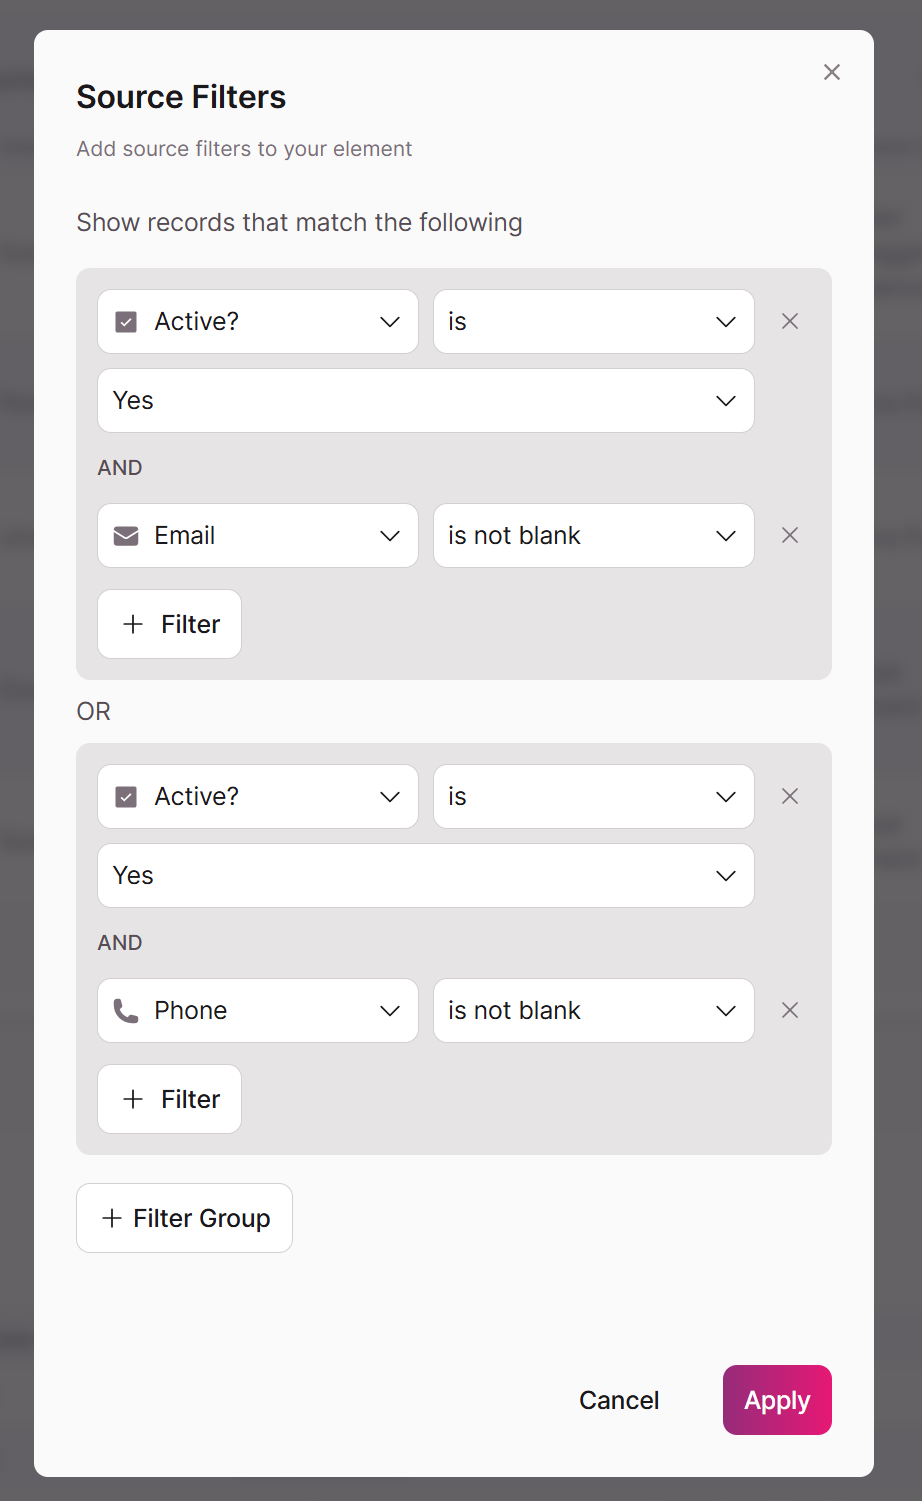
Resulting New Filter:
These two combinations become your new groups.
Show records that matchany of the following:
- (Group 1) Match all of the following:
Activeis "Yes"Phoneis not blank
- OR
- (Group 2) Match all of the following:
Activeis "Yes"Emailis not blank
By setting up your filter this way, you will get the exact same records as your original "All" filter, while using the new, compatible "OR of ANDs" structure.