How to Create Protected Pages
Learn how to secure your app content by creating login-protected pages, managing user access, and configuring registration settings in the Knack Builder.
Overview
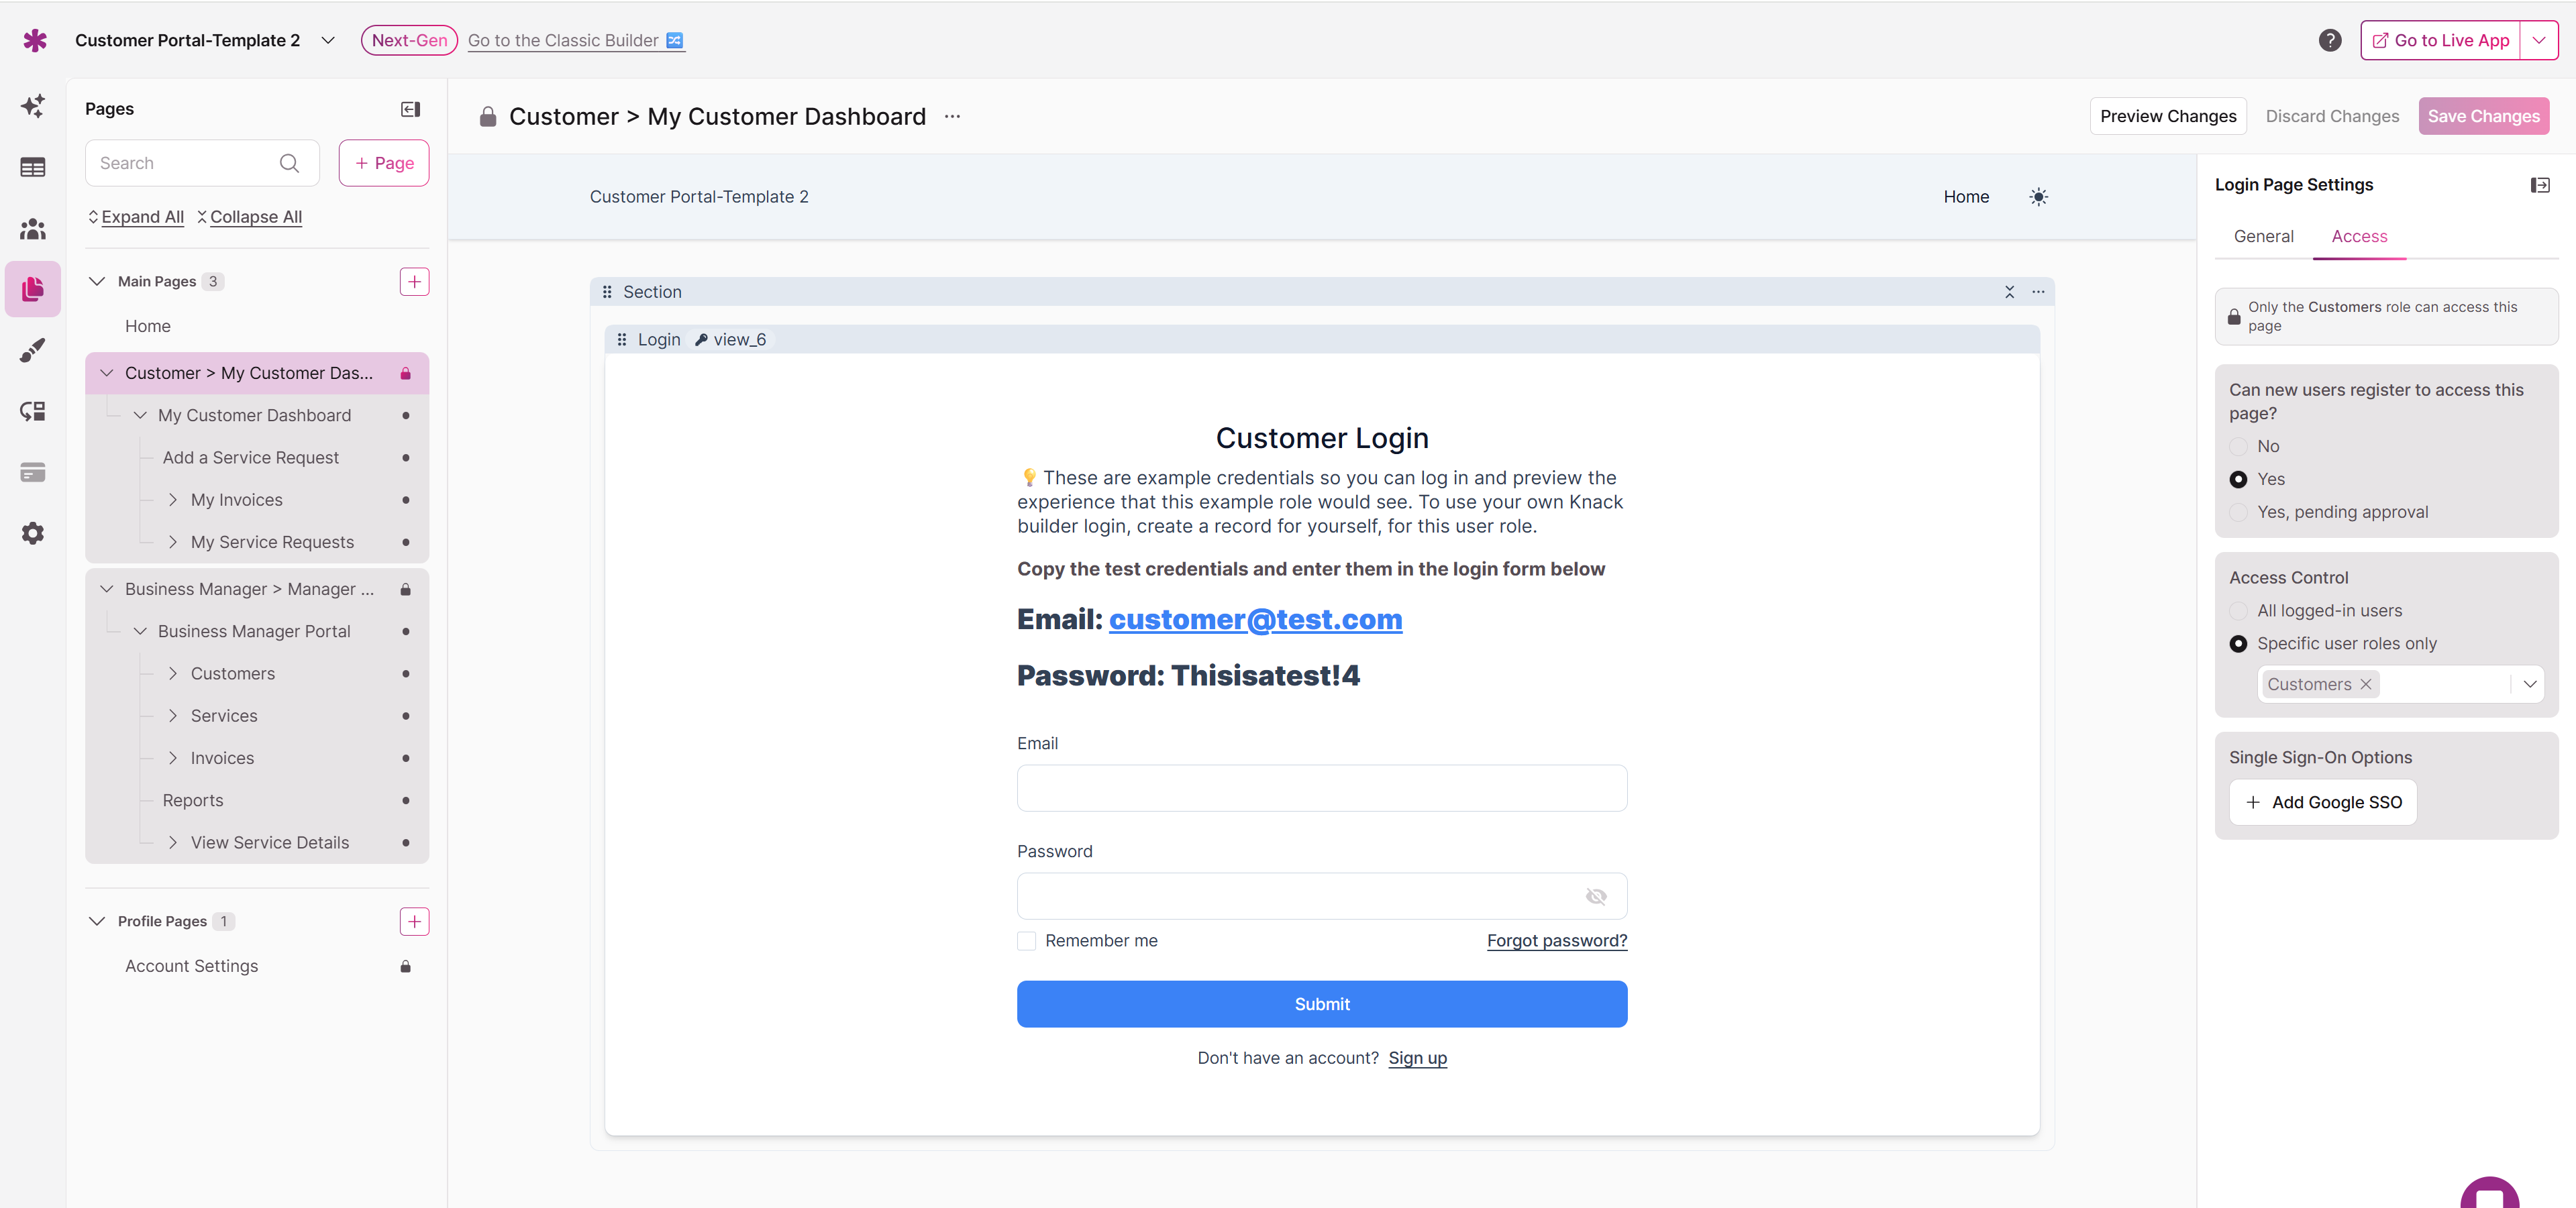
Protected pages in Knack allow you to control who can access specific content in your application by requiring users to log in with valid credentials. When you create a protected page, Knack automatically generates a parent login page that manages access for all child pages underneath it. This hierarchical protection system ensures that sensitive content remains secure while providing a seamless user experience.
The Page Editor provides an intuitive interface for setting up page protection during the initial page creation process or adding protection to existing pages. You can configure registration settings, define user access levels, and integrate single sign-on options all within the same workflow.
Understanding Login Page Structure
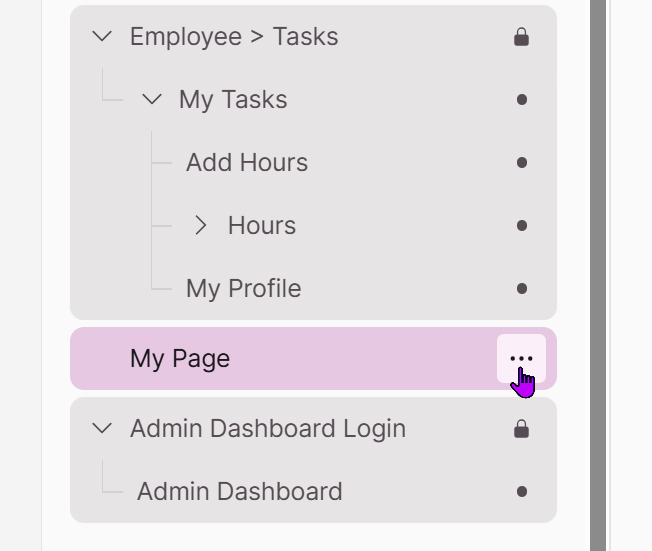
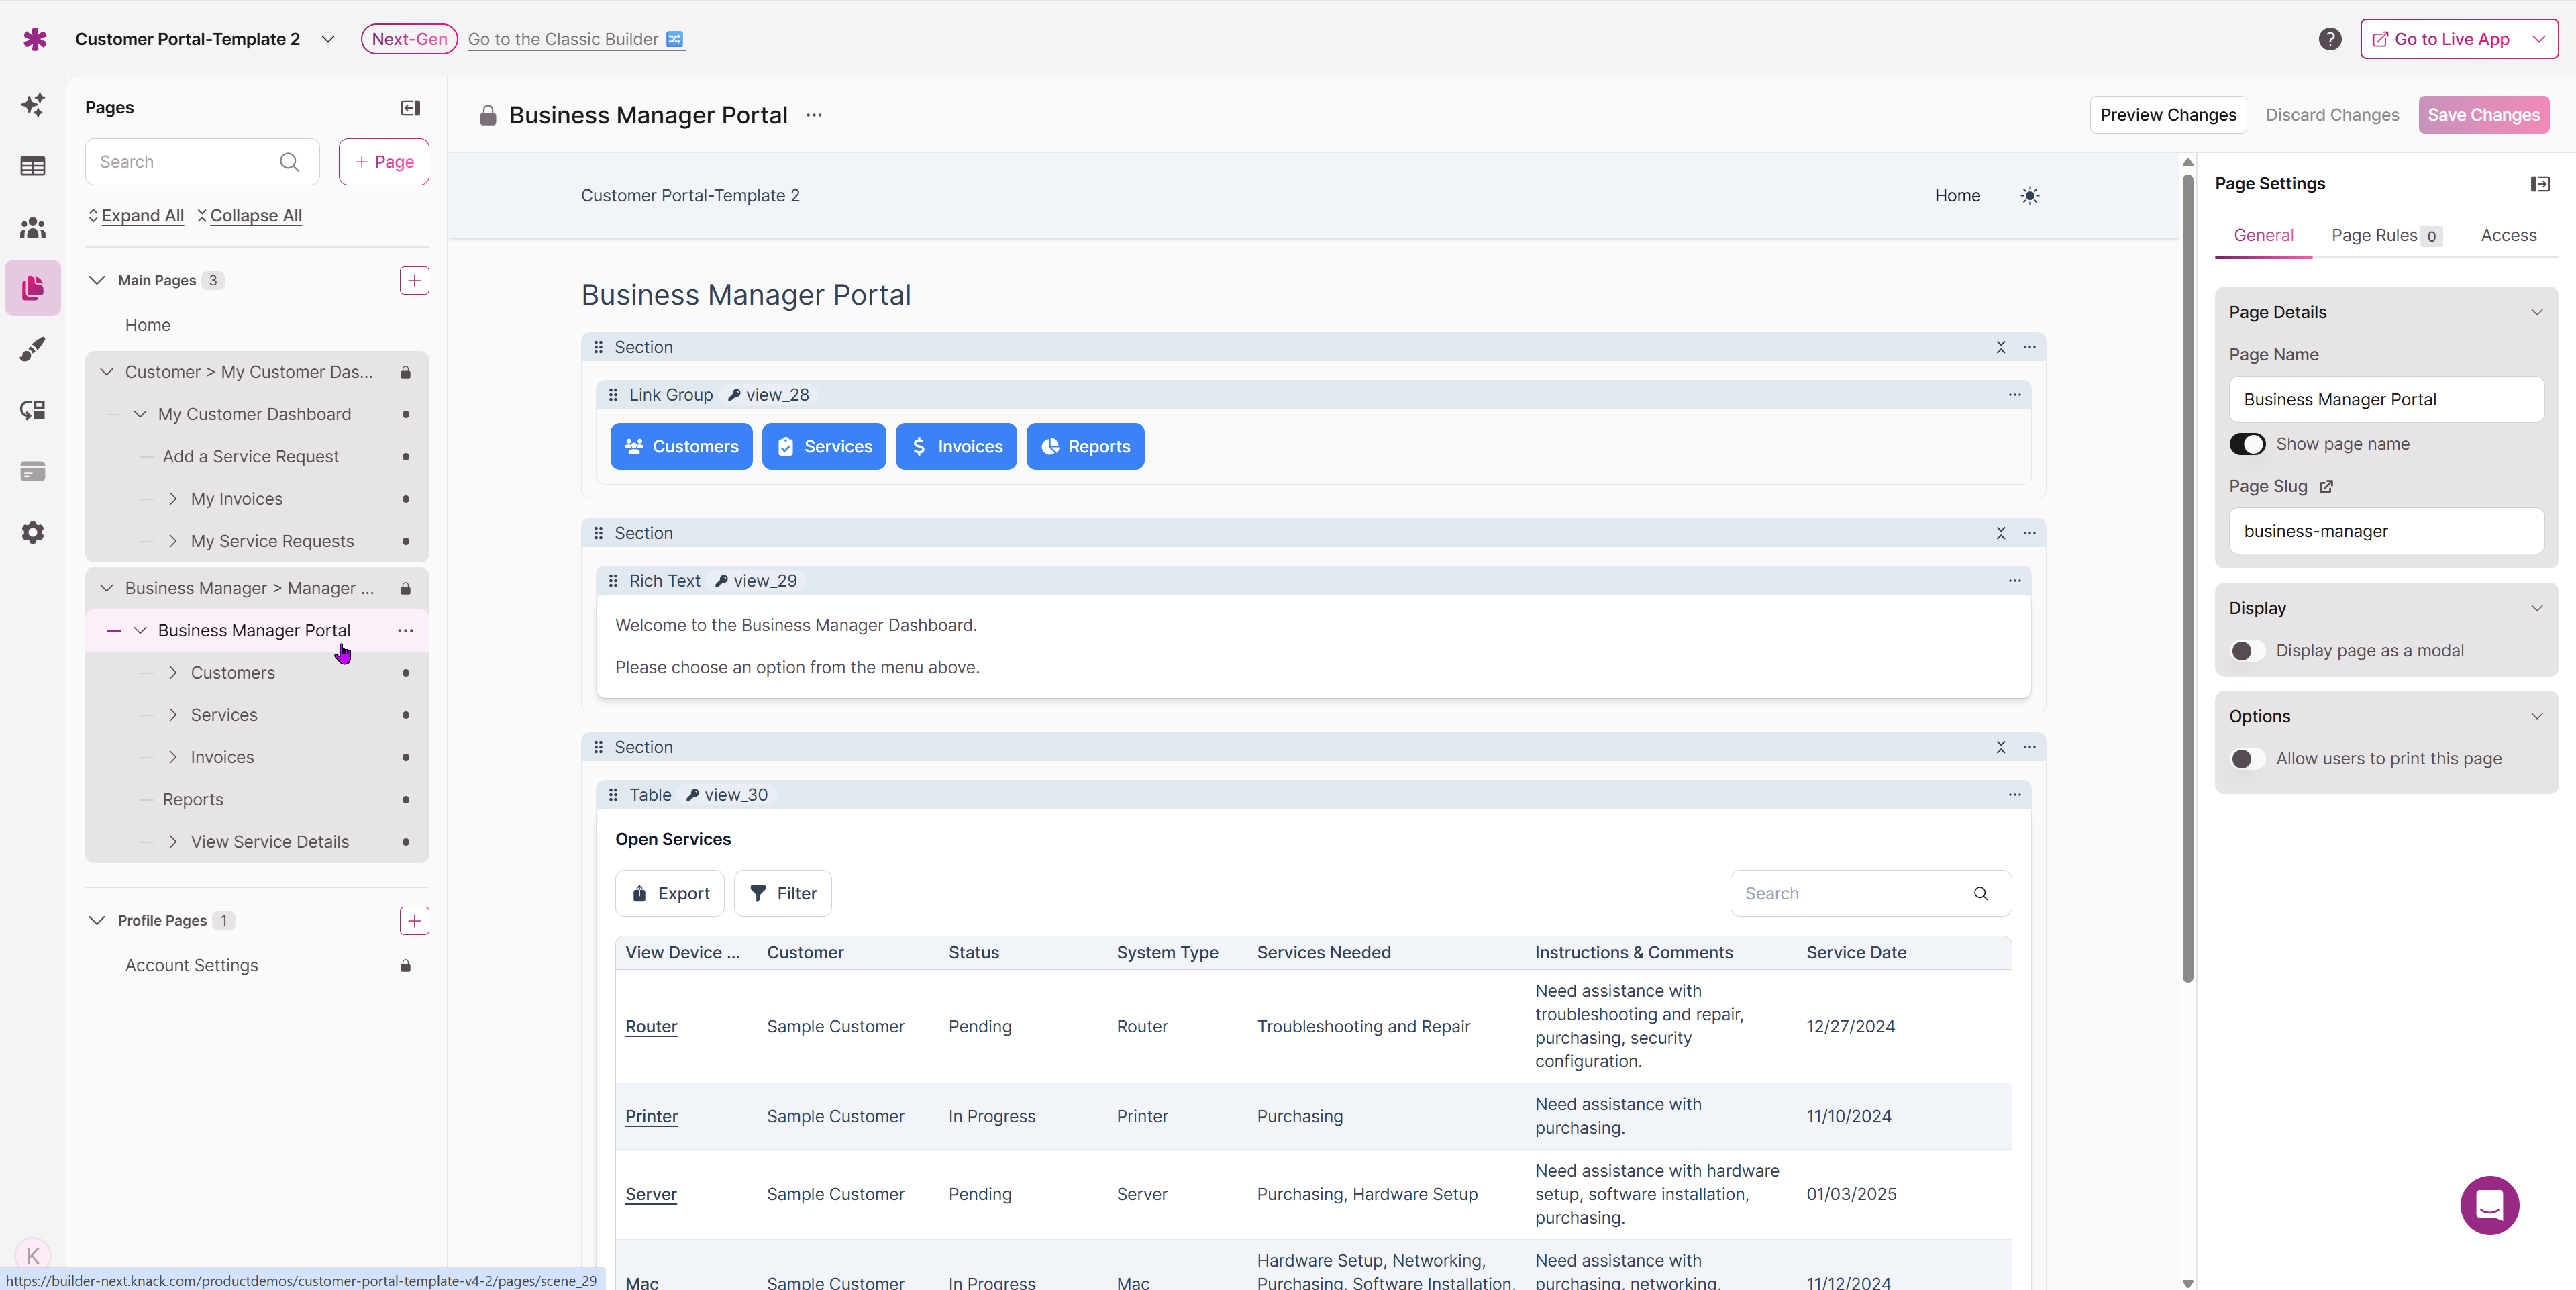
When you protect a page in Knack, the system creates a hierarchical structure where the protected page is wrapped under a parent login, and all child pages are protected as well. This design ensures that users must authenticate once to access all related content within that page of your app.
The visual structure in the Pages panel clearly indicates which pages are protected through lock icons next to the page names. When you expand the page hierarchy, you can see how child pages inherit protection from their parent login pages. This inheritance model means that once a user successfully logs into a protected page, they can navigate freely among the child pages without needing to authenticate again.
For example, if you create a protected page called "My Customer Dashboard," all pages you add underneath it, such as "Add a Service Request," "My Invoices," and "My Service Requests" will automatically require the same login credentials. This approach simplifies both the setup process for builders and the user experience for your app visitors.
Creating New Protected Pages
The process for creating a new protected page in Knack is streamlined into a single dialog where you can configure all protection settings upfront. This approach eliminates the need for multiple steps and ensures that your security settings are properly configured from the start.
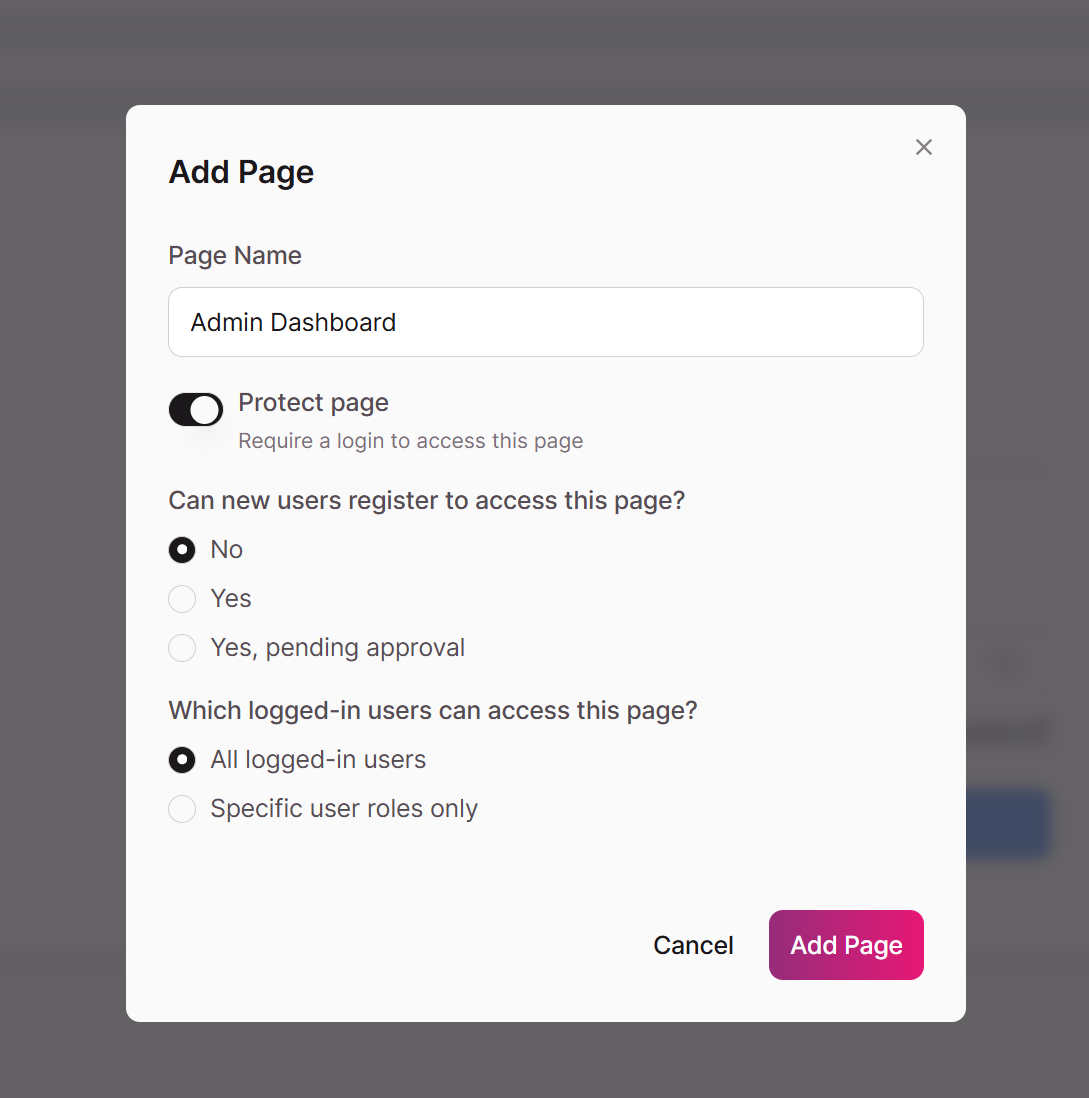
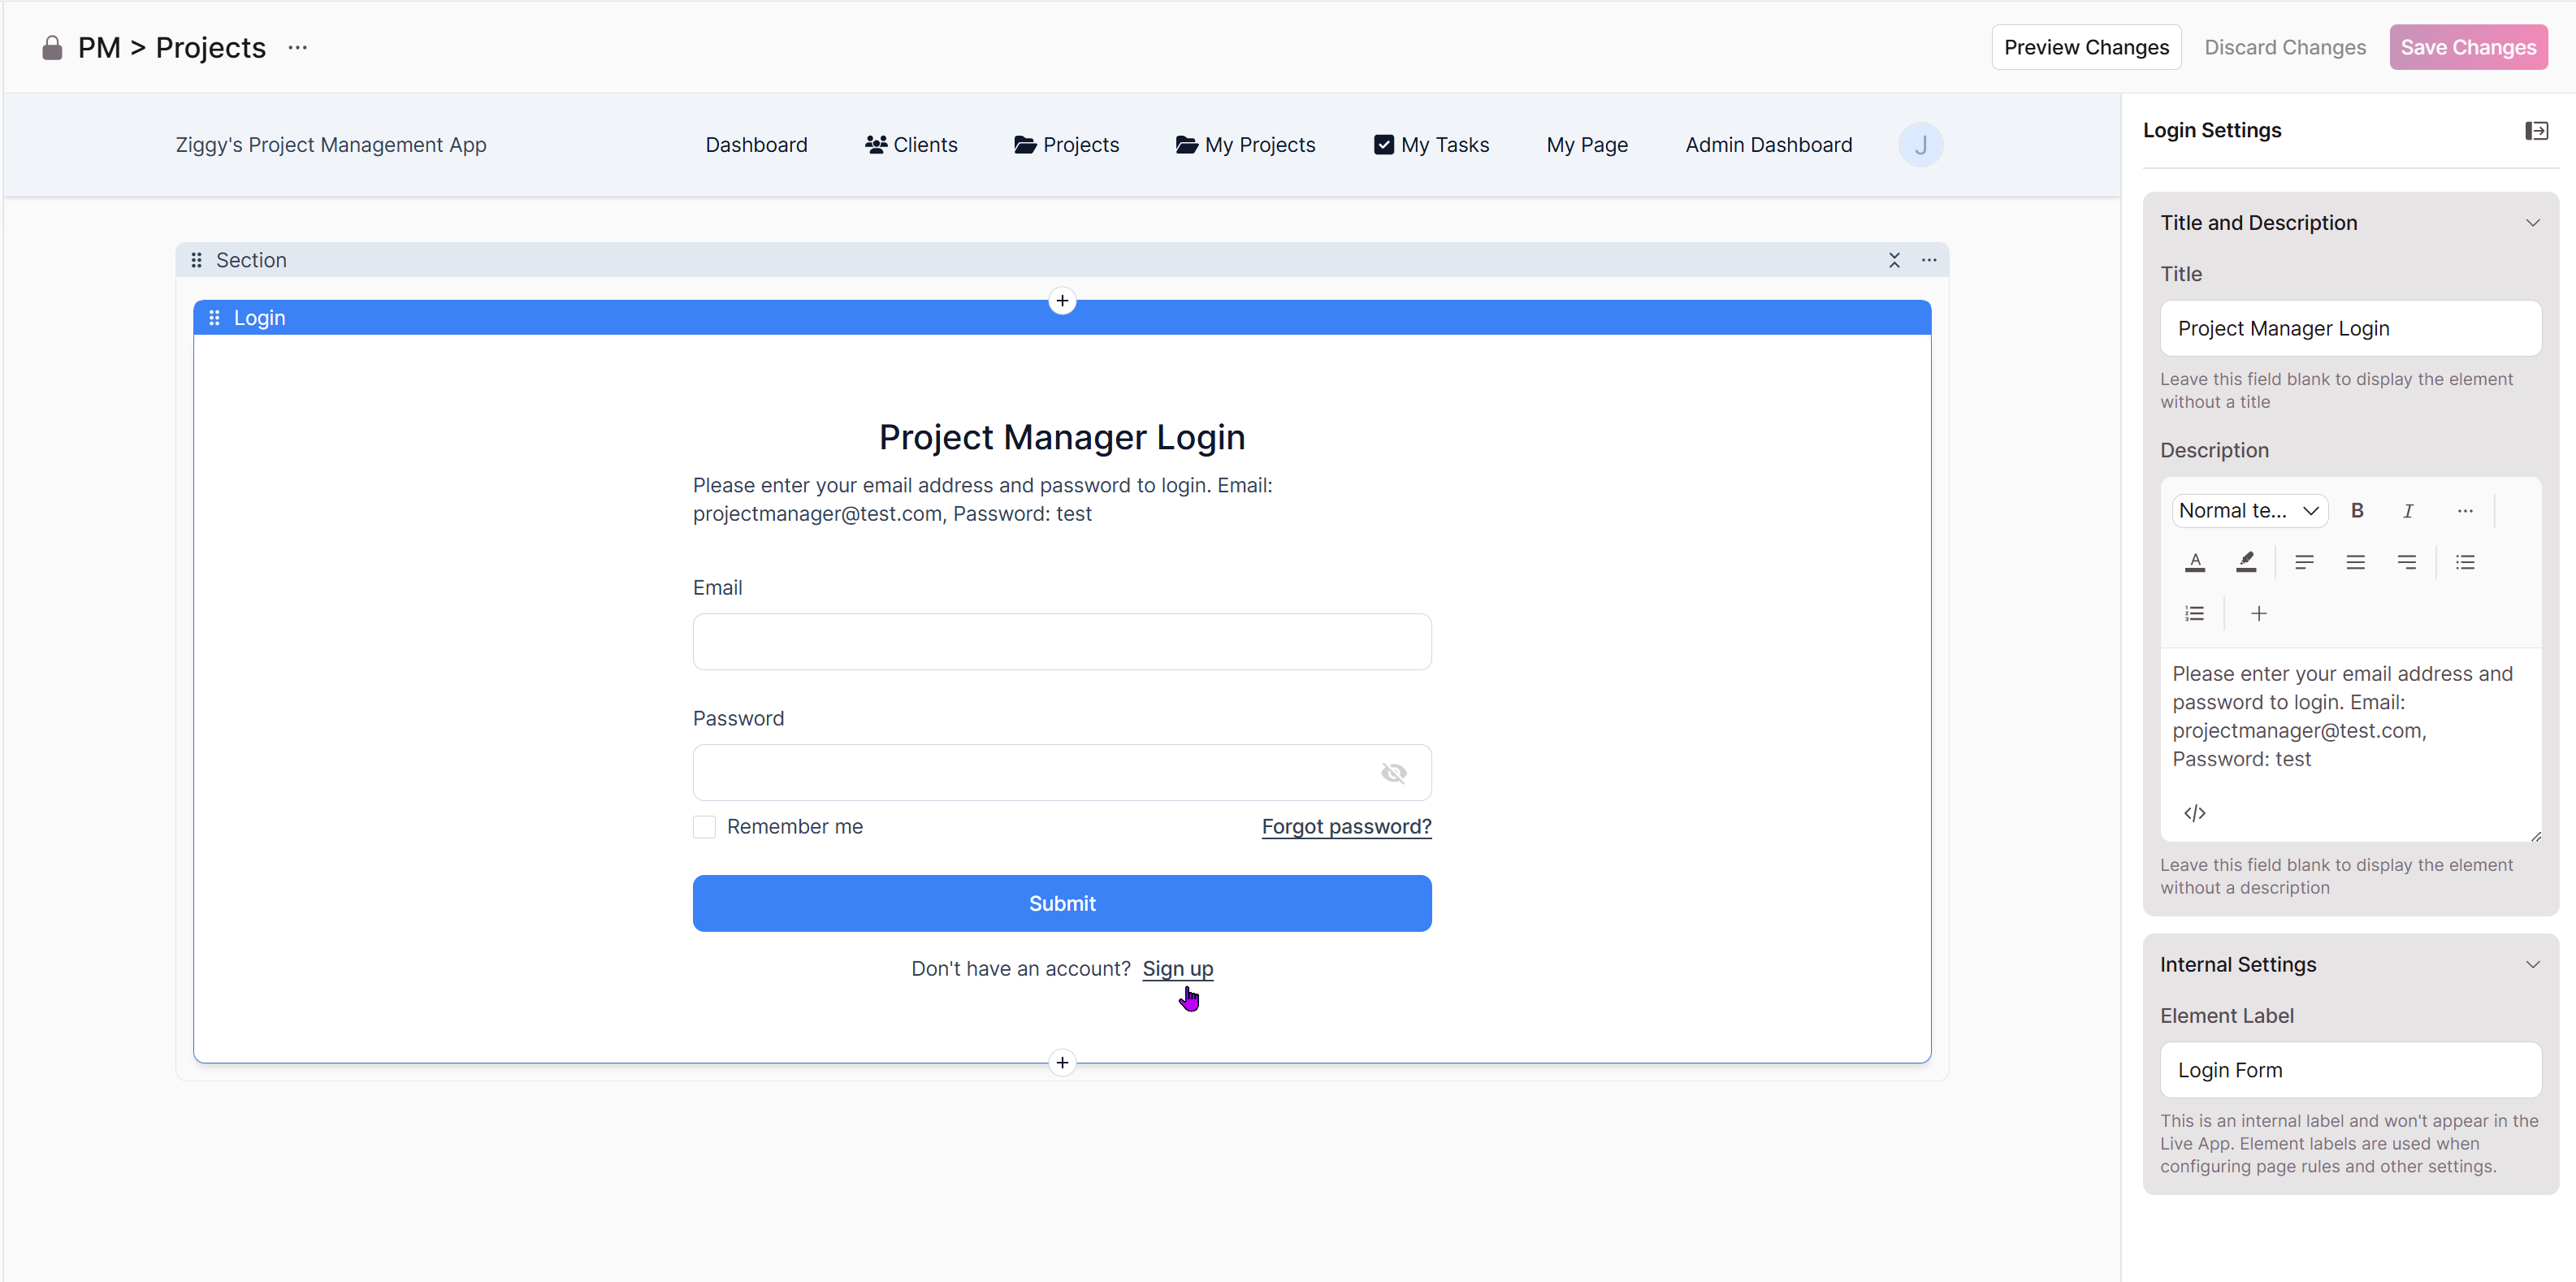
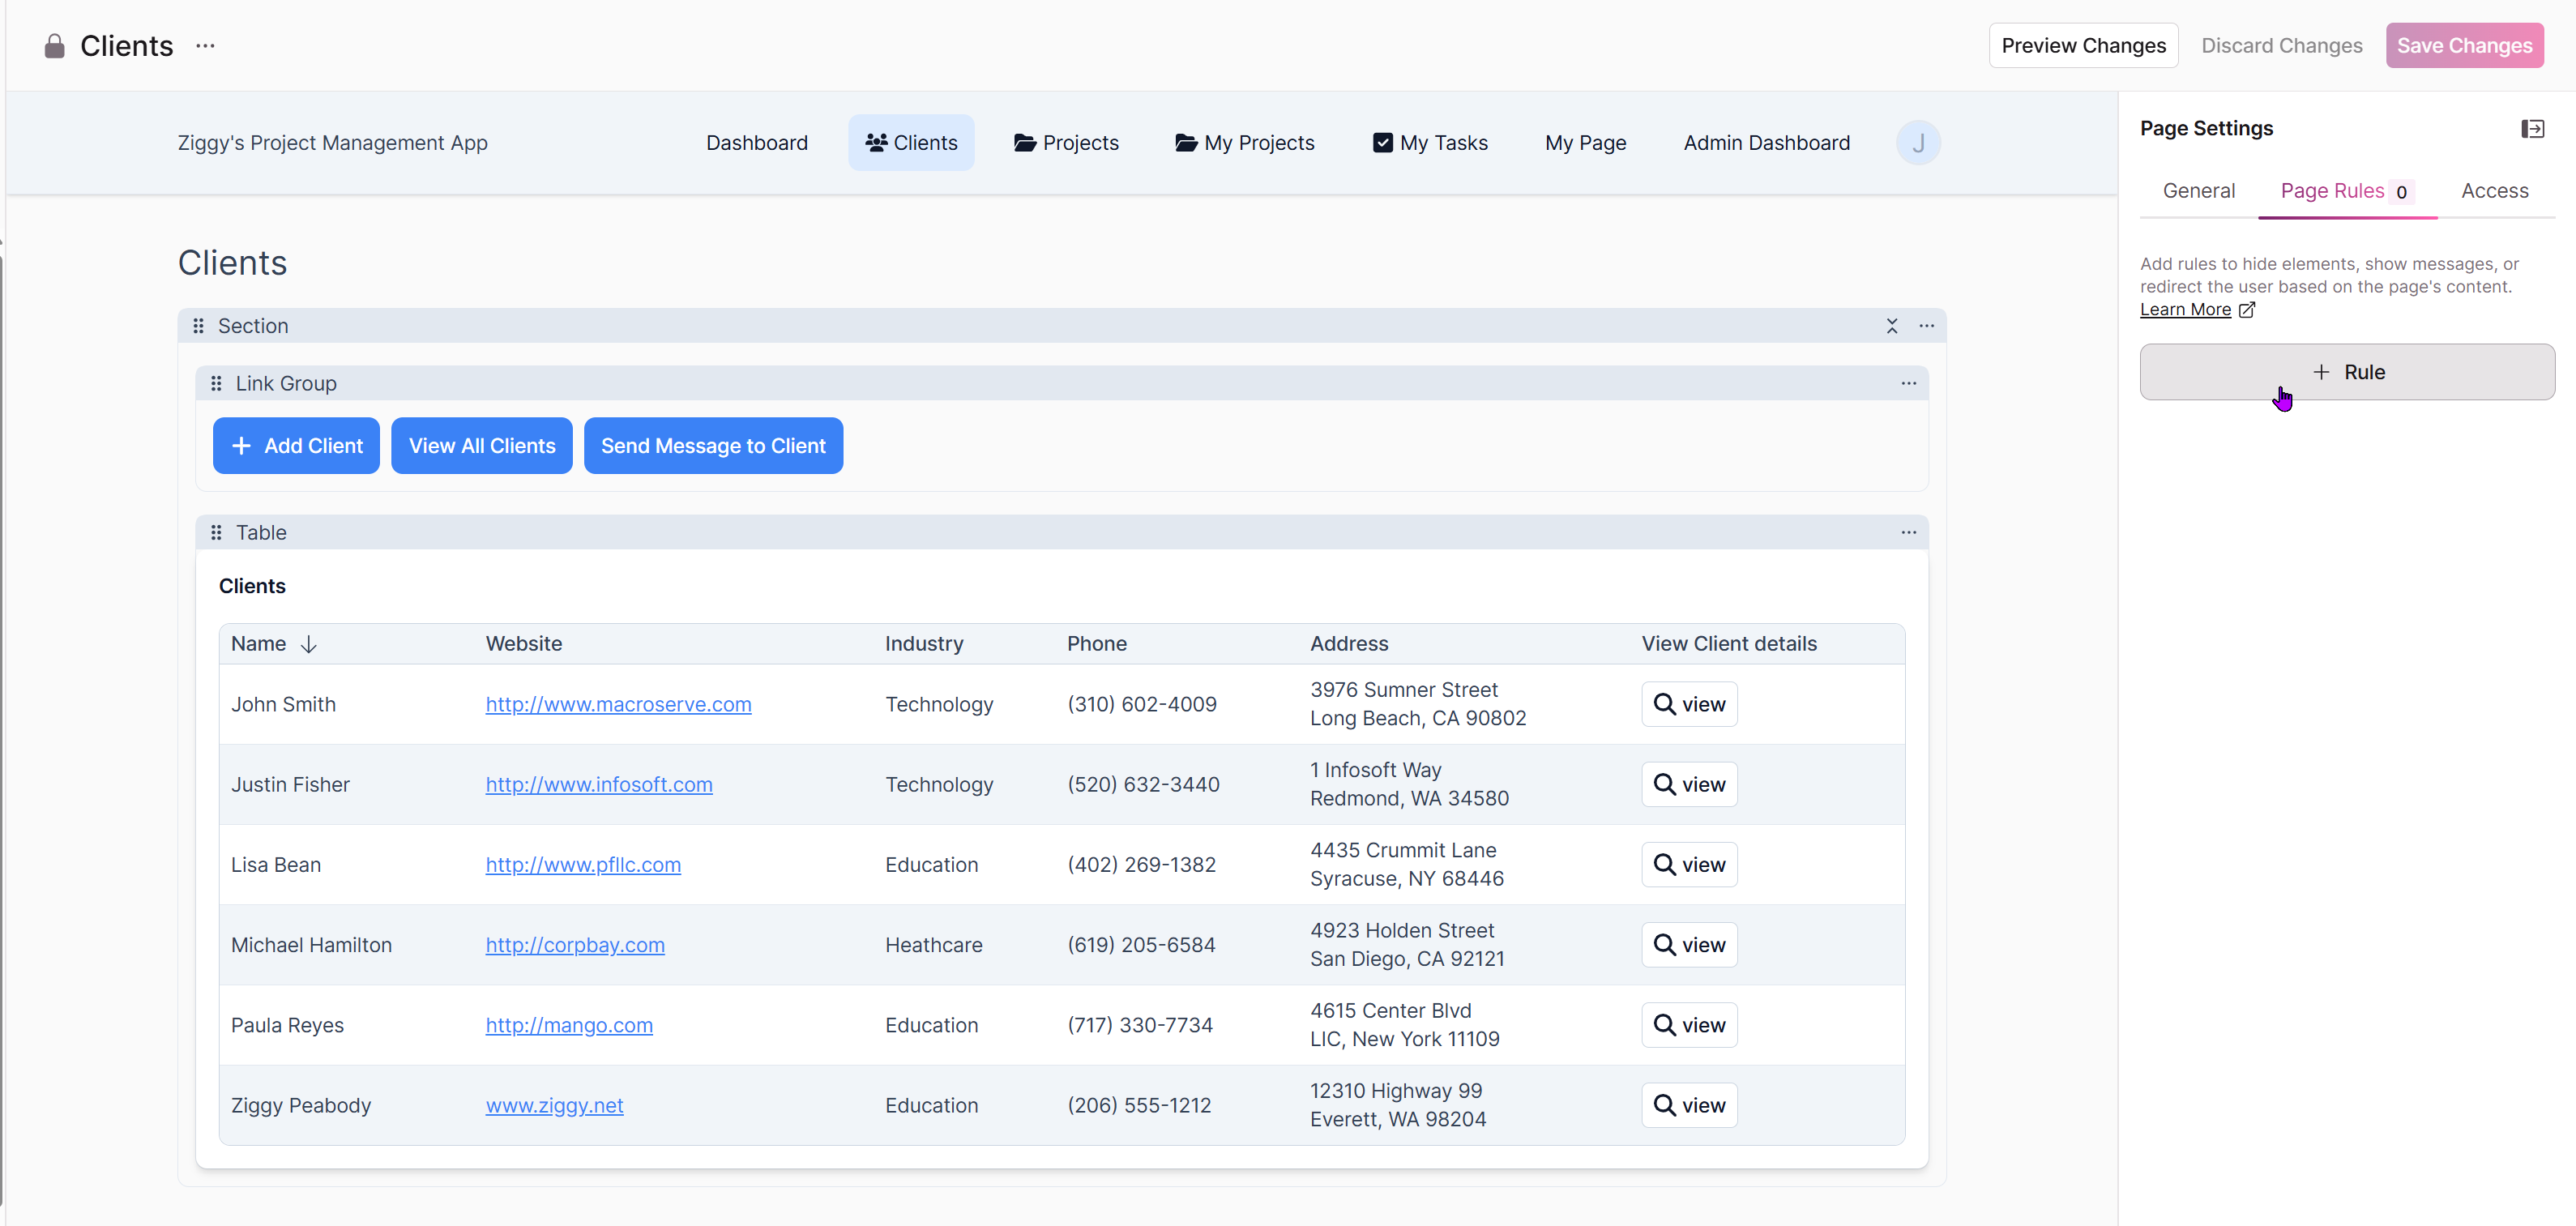
To create a new protected page, navigate to the Pages section of the Builder and click the "Page" button or the pink "+" button to open the Add Page dialog. In this dialog, you'll see a "Page Name" field where you can enter the name for your new page. Directly below this, you'll find a "Protect page" toggle with the description "Require a login to access this page."
When you enable the "Protect page" toggle, additional configuration options appear immediately within the same dialog. This integrated approach allows you to set up all aspects of page protection without navigating between different screens or settings panels.
Registration Configuration
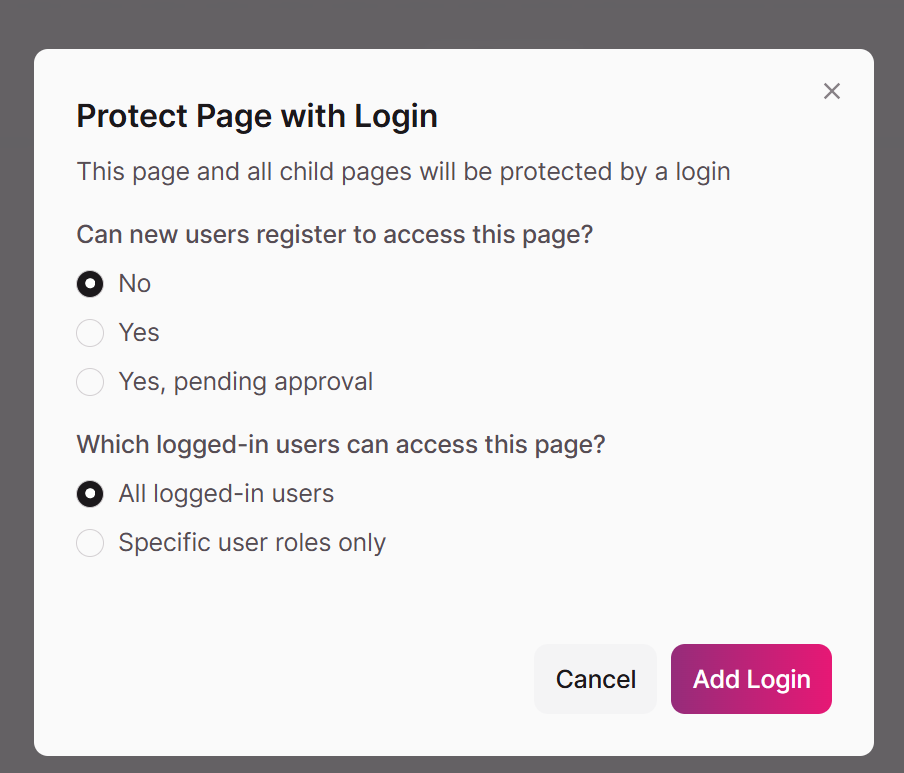
The first additional option that appears when you enable page protection is the registration configuration section. This setting determines whether new users can create accounts to access your protected content and, if so, what approval process they must follow.
The "Can new users register to access this page?" section provides three options, each serving different security and user management needs. The "No" option, which is selected by default, prevents new user registration entirely. This setting is ideal for internal applications or situations where you want to manually control who has access to your protected content.
The "Yes" option allows new users to register and immediately gain access to the protected page upon completing the registration process. This setting works well for public-facing applications where you want to encourage user engagement while still maintaining some level of access control.
The "Yes, pending approval" option provides a middle ground where new users can register, but their access remains restricted until an administrator manually approves their account. This setting is particularly useful for applications that need to maintain strict access control while still allowing for new user onboarding.
Protected page with Yes or Yes, Pending Approval options selected
Access Control Settings
The second configuration section that appears when you enable page protection is the access control settings. This section determines which authenticated users can access the protected page, allowing you to create different levels of access within your application.
The "Which logged-in users can access this page?" section offers two primary options for managing user access. The "All logged-in users" option, which is selected by default, grants access to any user who successfully authenticates, regardless of their assigned role. This setting is appropriate for applications where all authenticated users should have access to the same content.
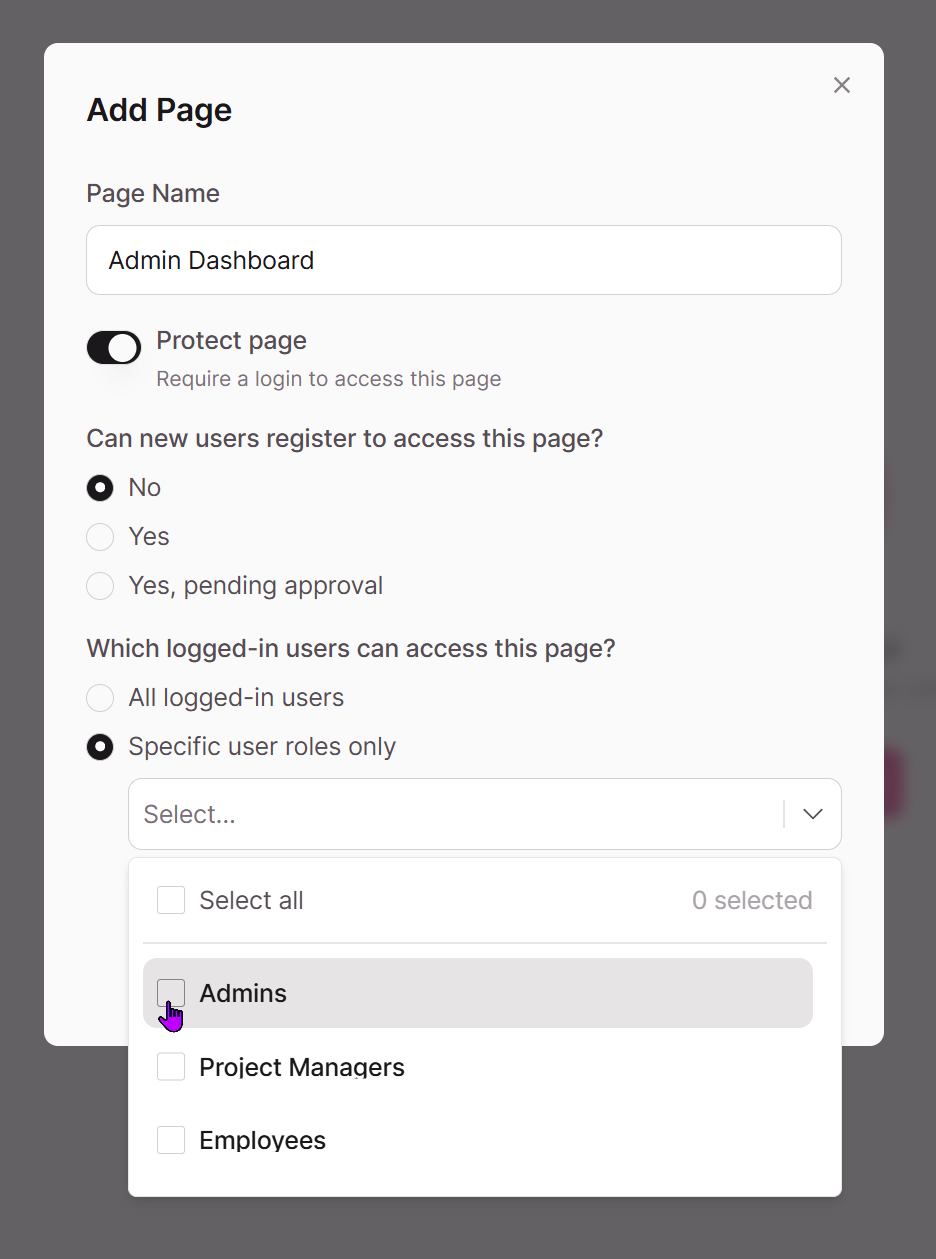
The "Specific user roles only" option provides more granular control by restricting access to users who have been assigned specific roles within your application. When you select this option, you can choose which user roles should have access to the protected page. This setting is essential for applications that need to maintain different access levels for different types of users, such as administrators, managers, and regular users.
Adding Protection to Existing Pages
If you have existing pages in your application that you want to protect, Knack provides a straightforward method for adding login protection without disrupting your current page structure.
To protect an existing page, first click on the ellipses to the right of the page name that appear when you hover over the page name.
Then, select Protect Page with Login.
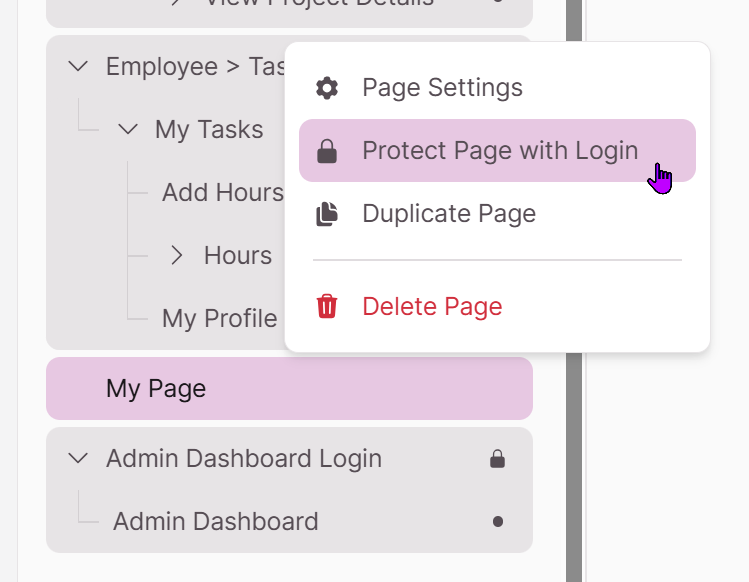
This will bring you to a modal similar to creating a new protected page:
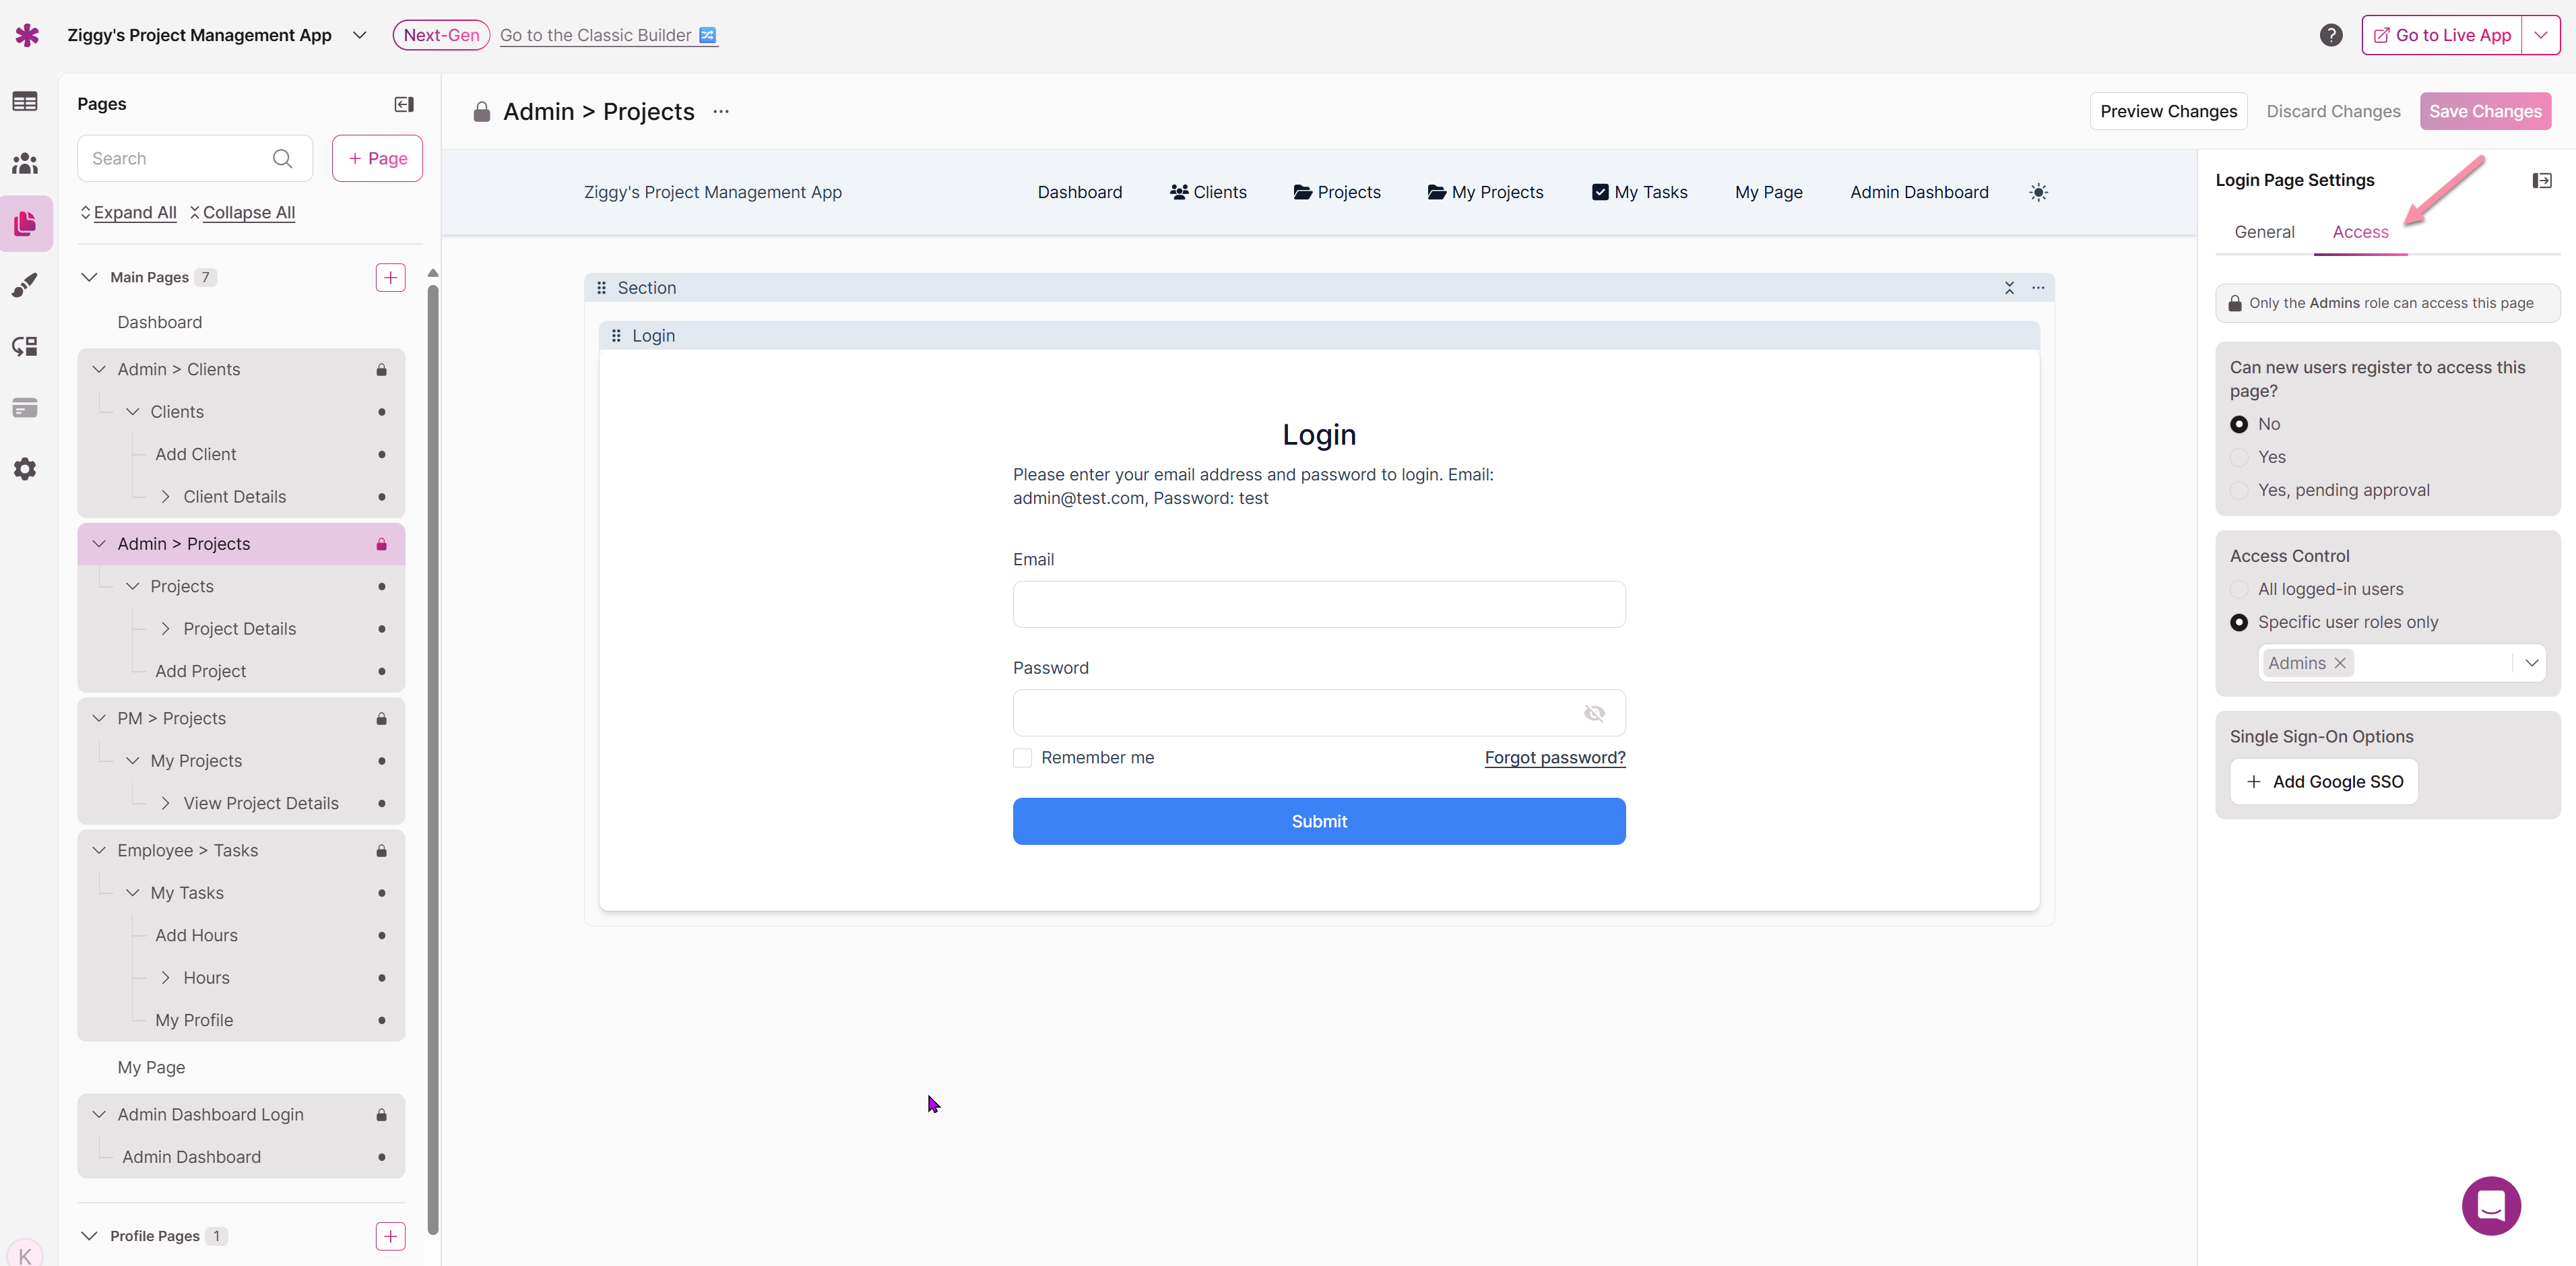
Viewing Access
Click on the "Access" tab to view the current access settings for the selected page. For unprotected pages, you'll see a message indicating "This page is publicly accessible." This clear status indicator helps you understand the current security state of your page before making any changes.
Registration and User Management
The registration settings you configure for protected pages directly impact how new users can join your application and what approval processes they must complete. Understanding these options helps you balance user accessibility with security requirements.
When you enable user registration with immediate access, new users can create accounts and begin using your protected content right away. This approach works well for applications that benefit from rapid user onboarding, such as community platforms or customer portals. However, it also means that you have less control over who accesses your content initially.
The pending approval option provides additional security by requiring administrator review before new users can access protected content. When users register with this setting enabled, they receive confirmation that their account has been created but cannot access protected pages until an administrator approves their account. This approval process allows you to verify user information, ensure that registrants meet your criteria, and maintain tighter control over your user base.
For applications that require the highest level of access control, disabling registration entirely ensures that only users you manually add to the system can access protected content. This approach is common for internal business applications, sensitive data management systems, and other scenarios where unrestricted access could pose security risks.
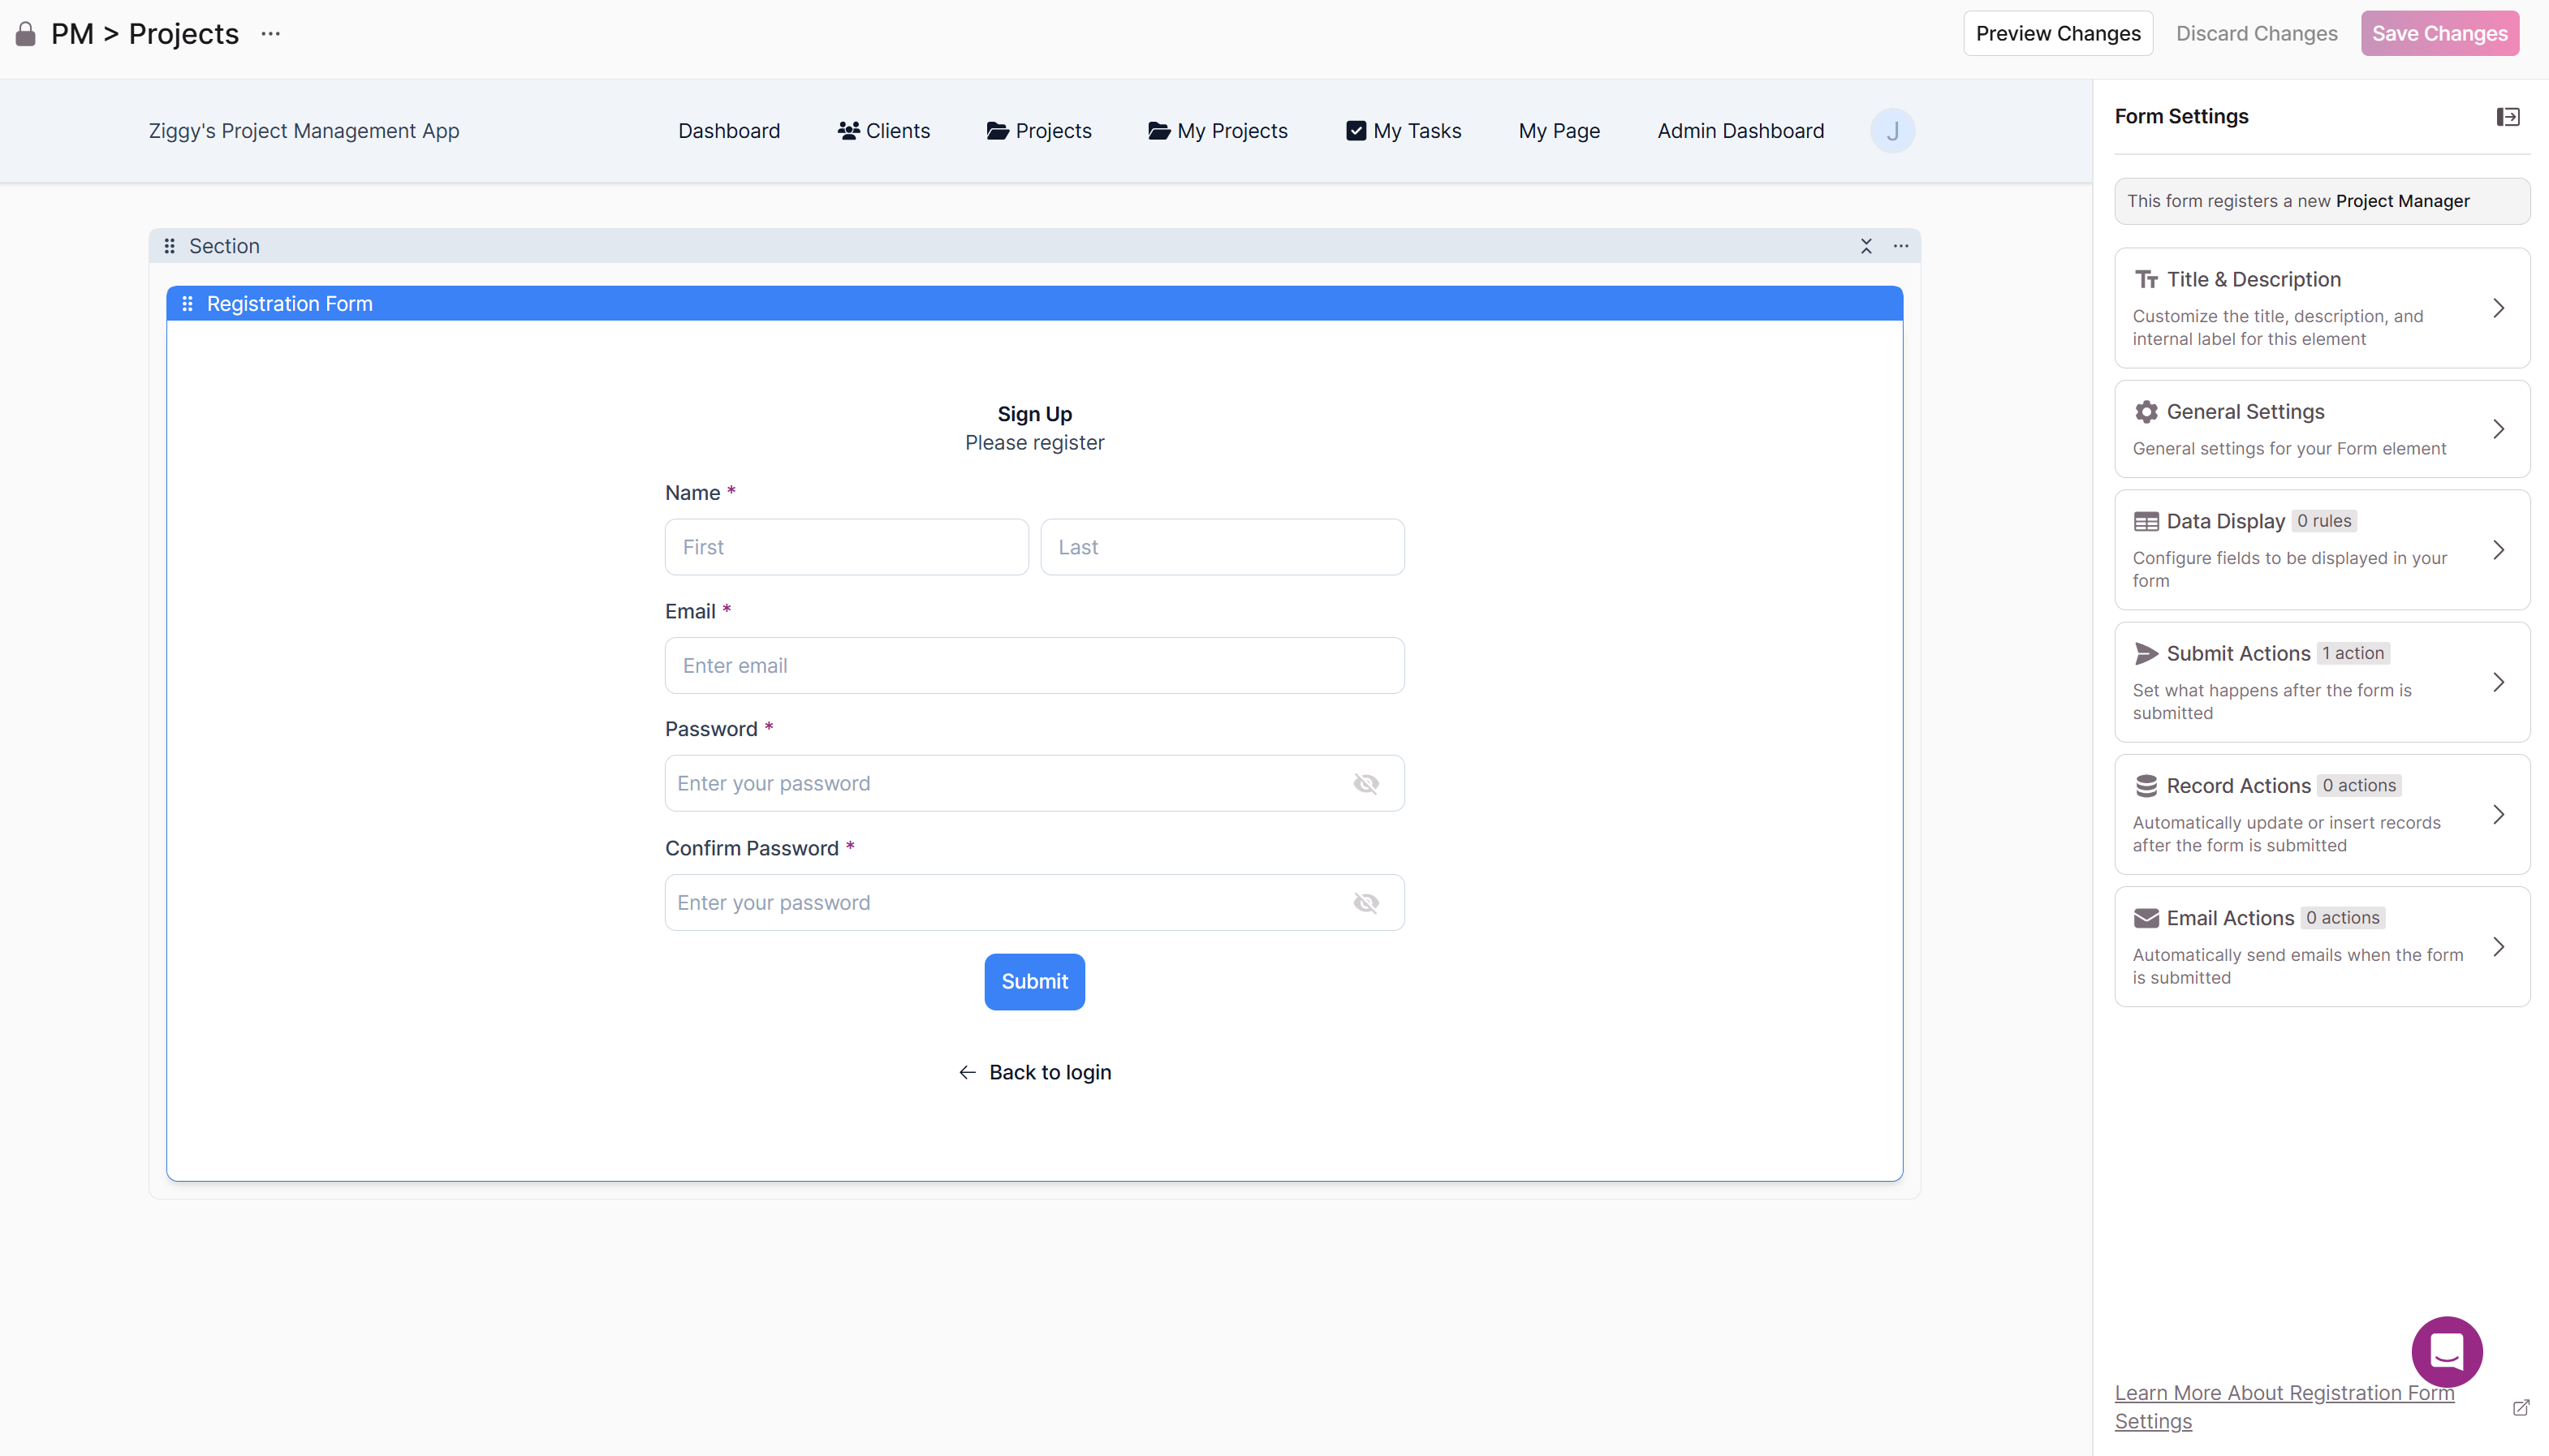
Required Registration Fields
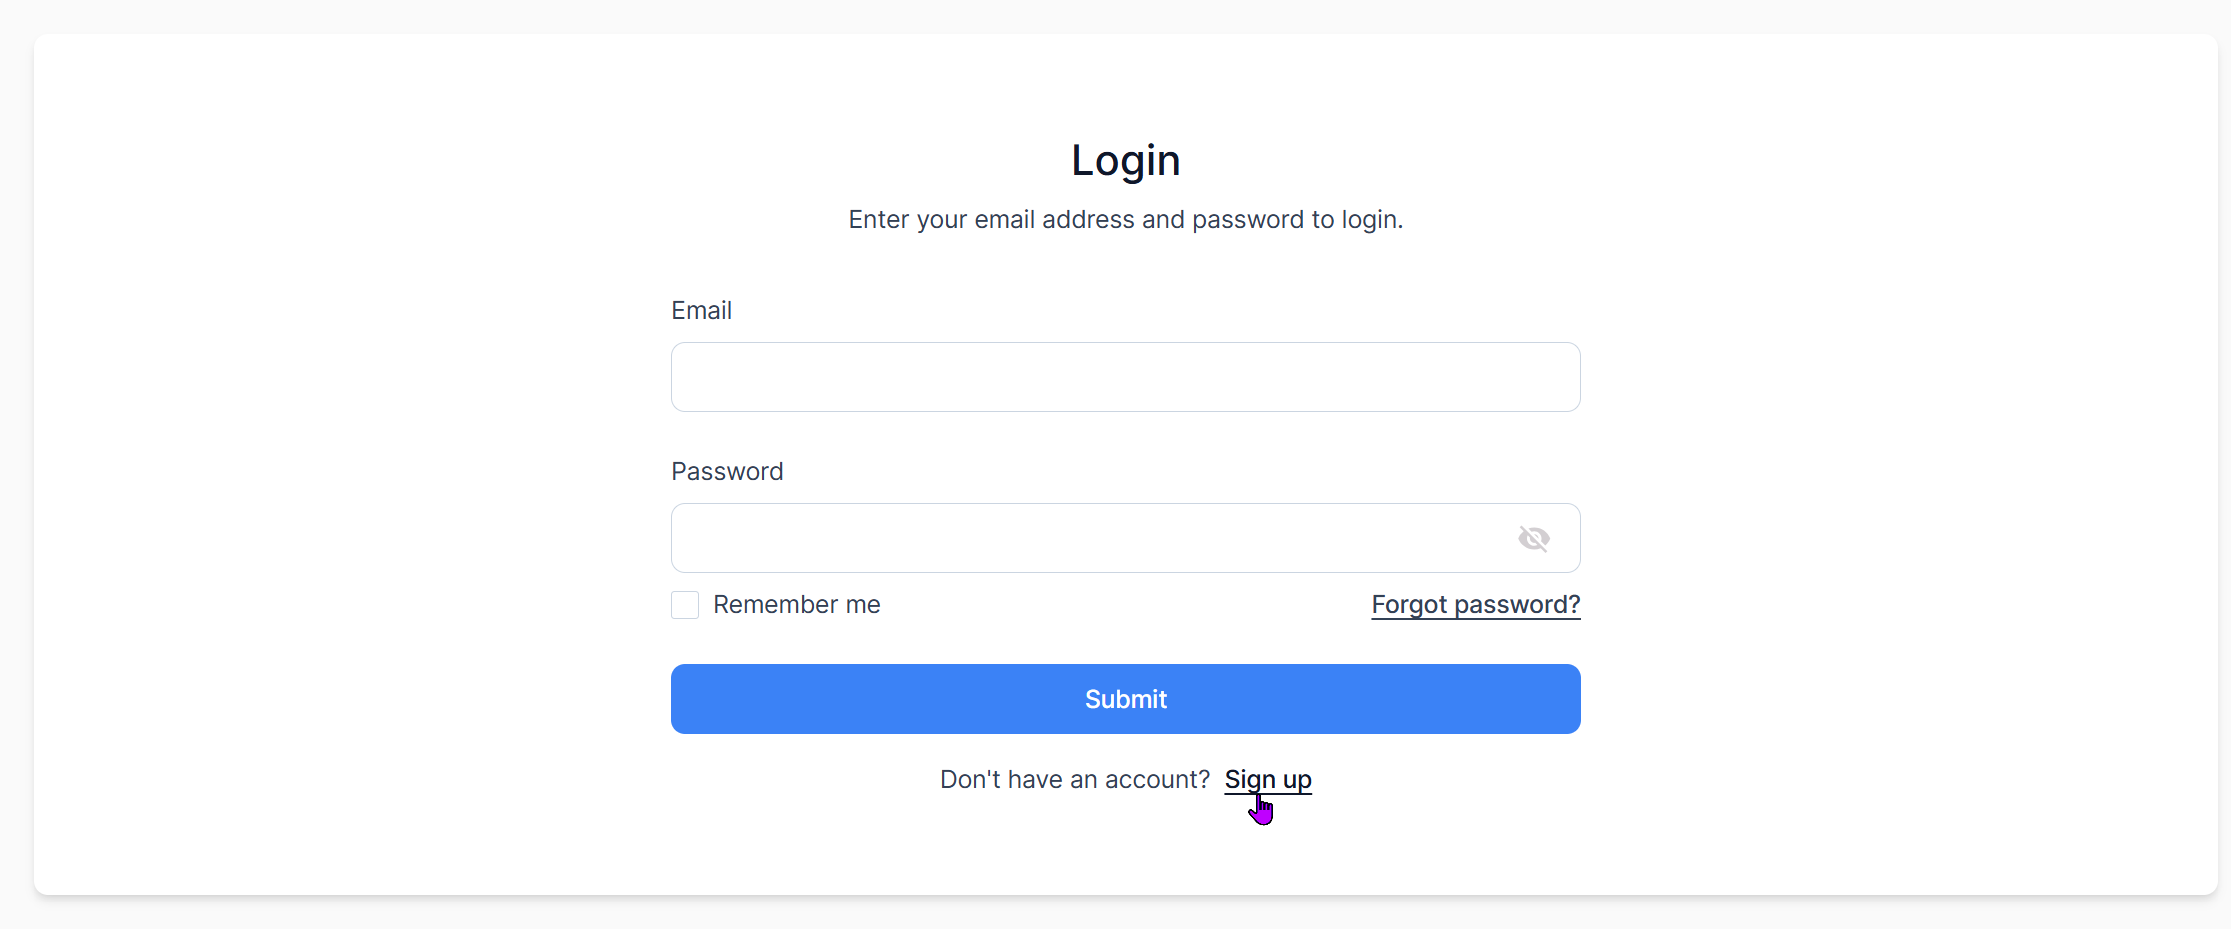
By default, all registration forms in Knack require certain basic information to create user accounts. The email field serves as the primary identifier for user accounts and must be unique across your application. Users will use this email address to log in to your protected pages.
The password field allows users to create secure credentials for accessing their accounts. Knack automatically handles password security requirements and storage, ensuring that user credentials are properly protected. Users can also reset their passwords if needed through the standard password recovery process.
Additional fields can be added to registration forms based on your specific needs. These might include name fields, organization information, or custom fields that help you categorize and manage your users effectively.
Access the registration page by clicking the Sign Up link from within the Page Editor:
You'll have full control over the Registration form, just like you do with regular forms:
Access Control and User Roles
User roles provide a powerful way to create different levels of access within your protected pages. By assigning users to specific roles, you can ensure that different types of users see only the content and functionality appropriate for their needs.
When you configure a protected page to restrict access to specific user roles, only users assigned to those roles can access the page and its child pages. This role-based access control allows you to create sophisticated permission structures that match your organization's hierarchy and security requirements.
For example, you might create an "Administrators" role that has access to all protected pages, a "Managers" role that can access reporting and oversight pages, and an "Employees" role that can access only basic functionality pages. This structure ensures that sensitive administrative functions remain accessible only to appropriate personnel while still providing necessary access to other users.
Managing User Role Assignments
User role assignments can be managed through the Users section of the Knack Builder. You can assign roles to users when you create their accounts or modify role assignments later as your organizational needs change. This flexibility allows you to adapt your access control structure as your application and user base evolve.
When users log in to protected pages, Knack automatically checks their assigned roles against the access requirements for each page. If a user attempts to access a page that requires a role they don't have, they'll be prevented from viewing that content, maintaining the security of your protected areas.

Single Sign-On Integration
Knack supports Google Single Sign-On (SSO) integration for protected pages, providing users with a convenient alternative to traditional username and password authentication. This integration can improve user experience by reducing the number of credentials users need to manage while maintaining security standards.
To enable Google SSO for a protected page, you can use the "Add Google SSO" option available in the Access settings. This integration allows users to authenticate using their existing Google accounts, which can be particularly useful for organizations that already use Google Workspace or for applications targeting users who prefer social login options.
Google SSO integration works alongside traditional email and password authentication, giving users the choice of which method they prefer to use. This flexibility accommodates different user preferences and can help reduce barriers to accessing your protected content.
SSO Configuration Considerations
When implementing SSO integration, consider how it fits with your overall user management strategy. SSO can simplify the login process for users, but it also means that user access is tied to their Google account status. If users lose access to their Google accounts or if Google services experience outages, they may not be able to access your protected content through SSO.
For critical applications, consider maintaining both SSO and traditional authentication options to ensure that users always have a way to access necessary content. This redundancy can prevent access issues and provide flexibility for users who may not have or prefer not to use Google accounts.
Best Practices
Consider the user experience when configuring registration and access settings. While security is important, overly complex or restrictive access controls can frustrate users and reduce adoption of your application. Strike a balance between security requirements and usability to create an effective protected environment.
Establish regular procedures for reviewing user accounts and access permissions. Remove accounts for users who no longer need access, update role assignments as responsibilities change, and monitor login activity to identify any unusual patterns that might indicate security issues.
Keep your protection settings aligned with your organization's security policies and compliance requirements. As these requirements change, update your Knack application settings accordingly to maintain appropriate security standards.
Troubleshooting Common Issues
When working with protected pages in Knack, you may encounter some common issues that can be resolved with proper configuration adjustments.
If users report that they cannot access protected pages after logging in, verify that their user accounts have been assigned the appropriate roles for the pages they're trying to access. Role assignment issues are among the most common causes of access problems.
If new user registration is not working as expected, check the registration settings for your protected pages and ensure that the "Can new users register" option is configured correctly. Also verify that any approval workflows you may have set up are functioning properly if you're using the pending approval option.
If users are having trouble with the login process itself, ensure that the email addresses in their user accounts match exactly what they're entering when trying to log in. Case sensitivity and extra spaces can cause authentication failures.
Examples
Let's take a look at how roles and permissions are used in our Customer Portal sample app.
The Customer Portal has two user roles: Customers and Managers. In order to give Customers and Managers access to only the data and functions they need, there is a different page in the app for each role.
These two pages are each protected by a login element with permission restricted to their respective user role.
The Customers' page provides customers with the ability to perform three actions:
- Add a new service request
- View current and past service requests
- Pay invoices
The Managers' page has much more functionality. Managers are able to:
- View and edit all customers
- See their related service requests and invoices
- Add new records - customers, invoices
To effectively manage the customer side of the business, it is necessary for managers to have access to all the data in the database.
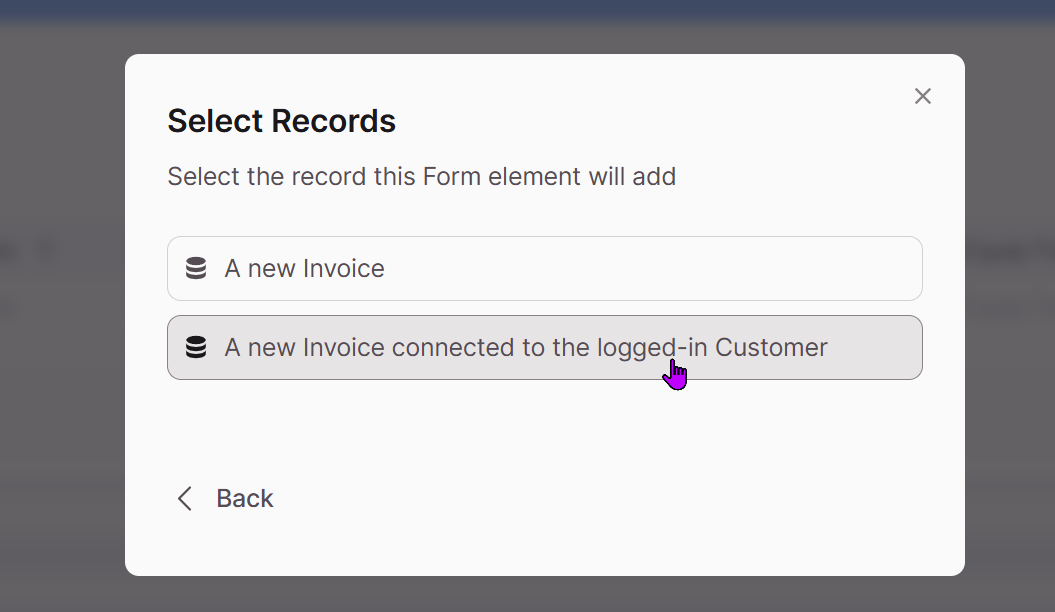
Based on the user role you have assigned to this page, you can now personalize it to meet their specific needs. For instance, if access is limited to the "Customer" user role, you can opt to display the Invoices associated with the logged-in Customer.
Notes:
- The option to add elements displaying records connected to the logged-in user only appears if you have restricted access to a single user role. You won't have these options if you restrict access to multiple user roles.
- From here, you can continue choosing the elements you want on the page and naming the page.
Here are a few other examples of apps that demonstrate how roles and permissions can be utilized to create an application that can benefit your entire business. Each user role in these apps has its own dedicated pages, which are protected by logins restricted to their respective roles.
These pages include elements that offer the functionality described below.
Project Management:
- Admins can create projects, assign managers, and have full read/write privileges.
- Project Managers manage one or more projects and assign tasks to employees.
- Employees login to receive project tasks and track hours and costs.
Employee Time Sheet:
- Supervisors manage employees and view hourly totals and reports.
- Employees login and submit hours.
Warehouse Manager:
- Admins have access to view and perform all warehouse operations.
- Warehouse staff can log in to ship recent orders or order more inventory.
Using Logins to Allow Users to See Only Their Records
One of the amazing features in Knack is the capability to design pages that display each user's individual records.
By creating a page protected by a login and restricted to a single user role, you can add elements to that page that show:
- Records connected directly to the logged-in user.
- Records connected to a company or group the logged-in user is also connected to.
Now, let's take a look at a Project Management app and see how these elements can be utilized.
Records Connected Directly to the Logged-In User
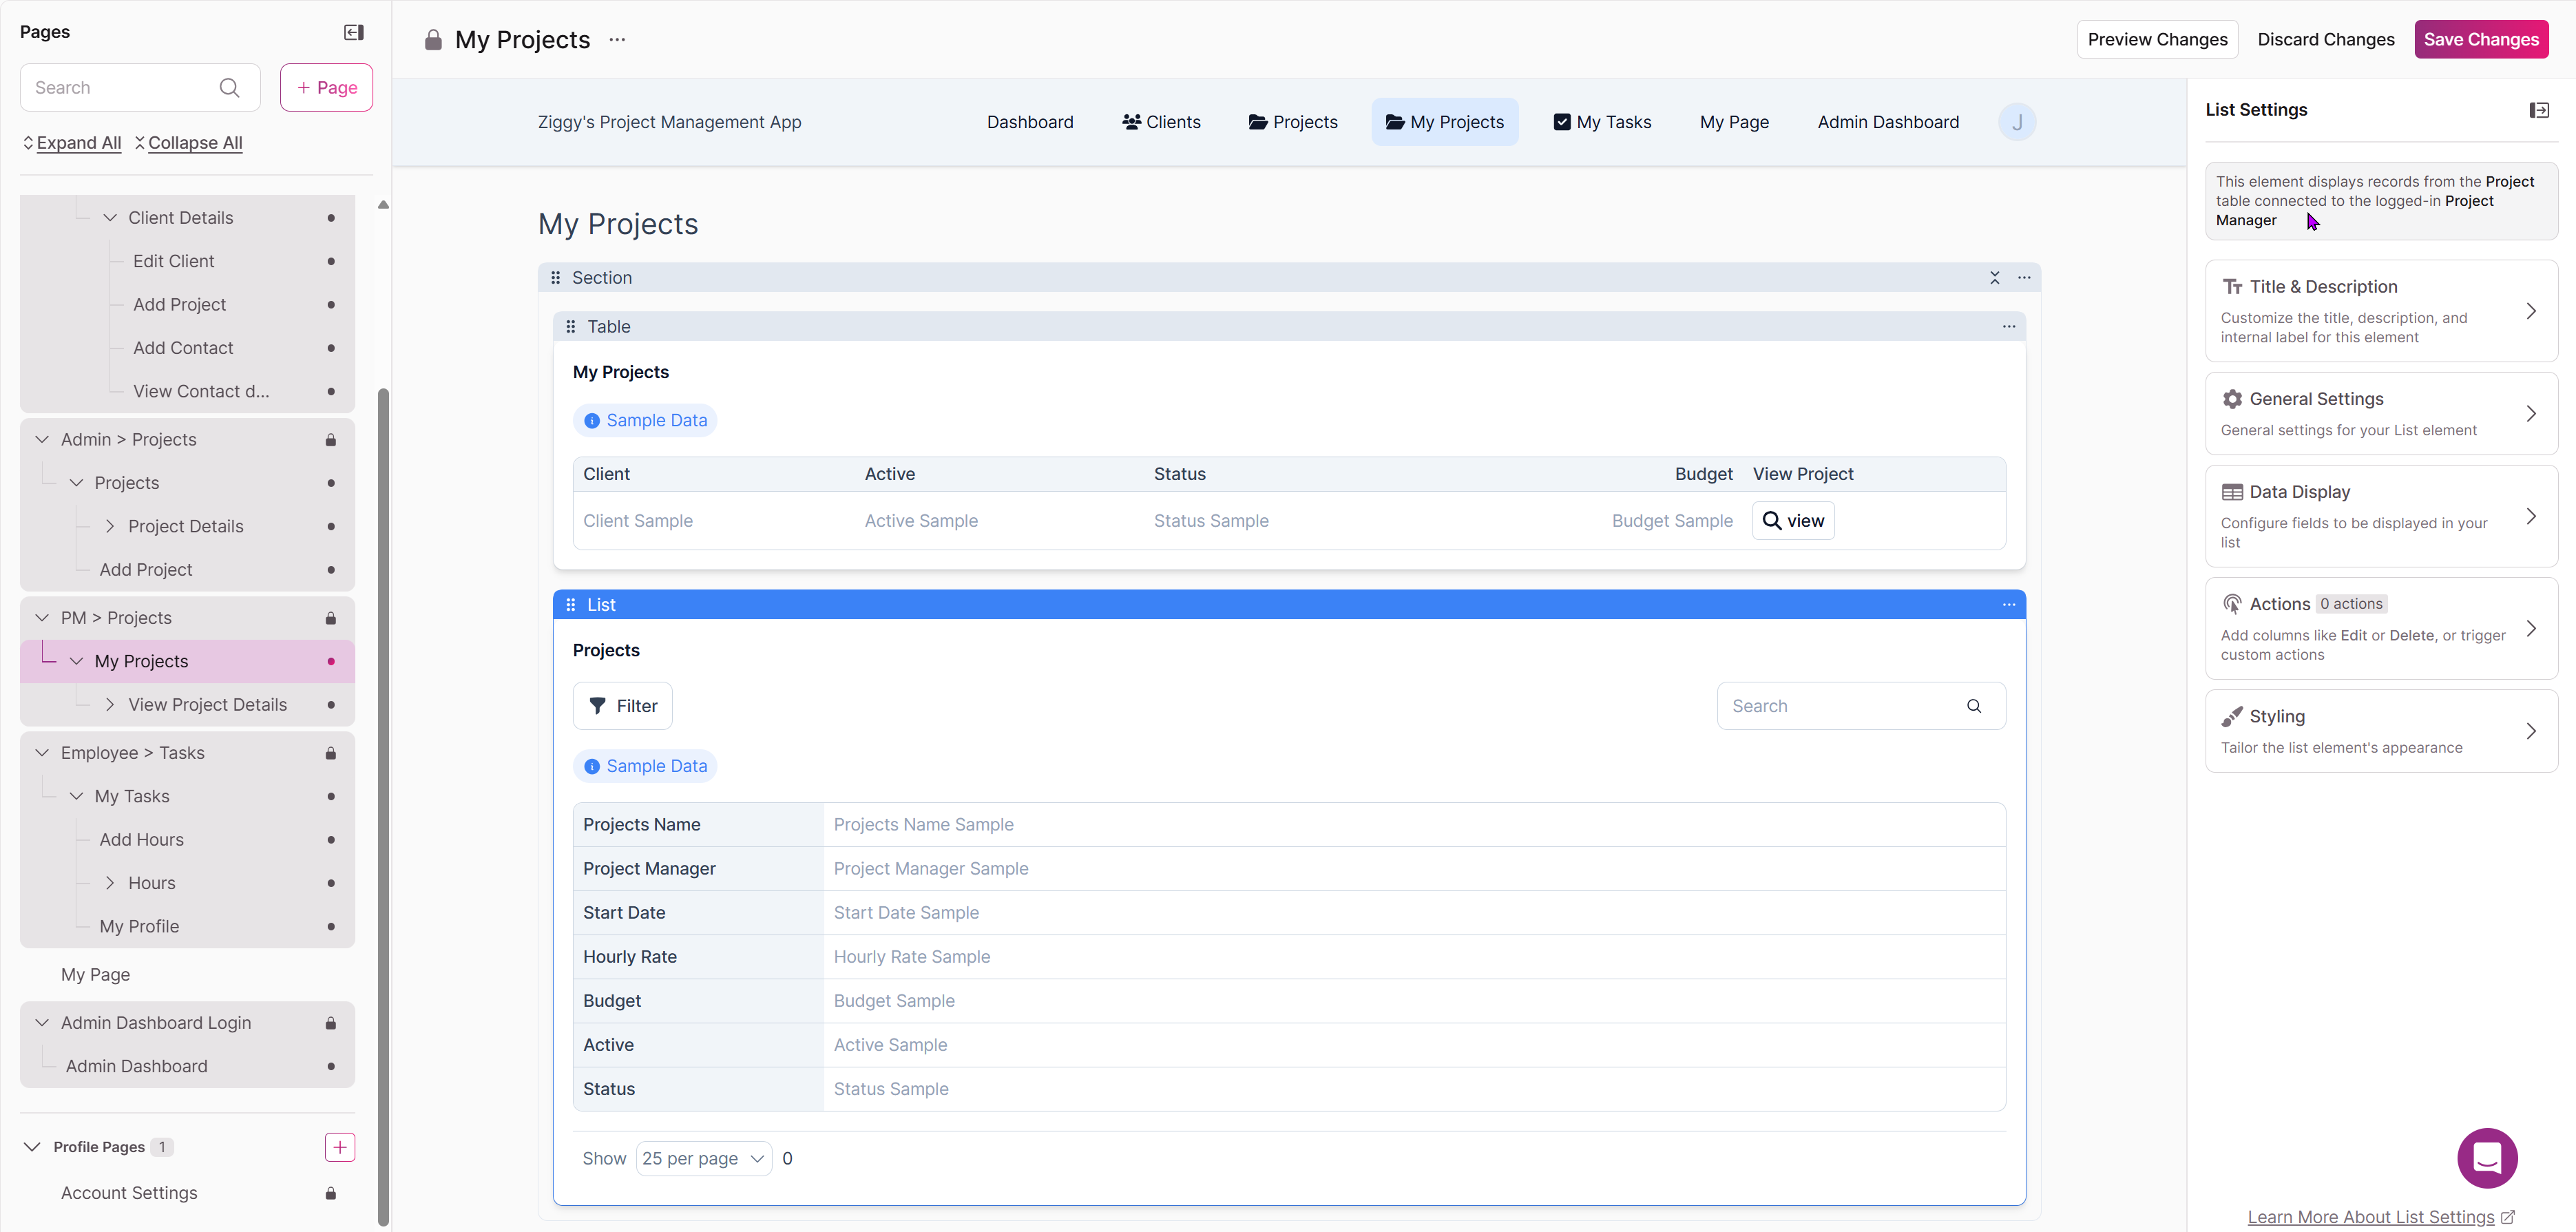
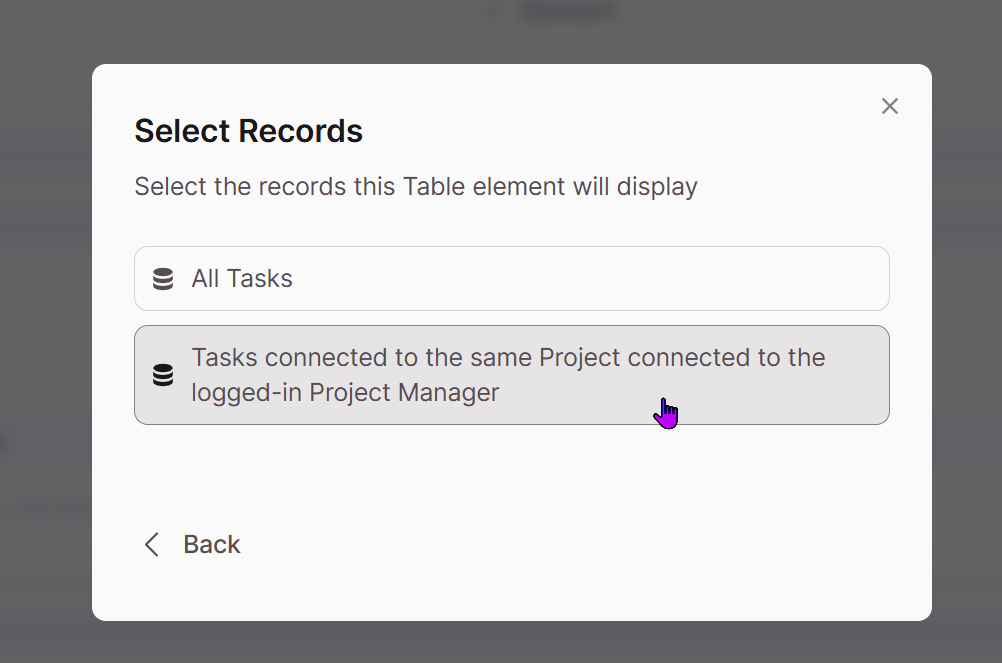
In a Project Management app, you have the ability to create a Projects page specifically for Project Managers. When they log in, each Project Manager will be able to view all the Projects records that they are associated with.
Essentially, the Project Manager logs in to access their own Projects.
Records Connected to a Company or Group the Logged-In User is Also Connected To
To enhance the functionality for Project Managers, you can provide them with an easier way to view all the tasks associated with their projects in one place. This feature allows Project Managers to quickly see which tasks are assigned to their projects and the status of those tasks.
You can set up a page that displays "Tasks connected to the same Projects connected to the logged-in Project Manager".
Note: Each of these scenarios require that the login has user role access restricted to only a single role (including the Accounts role). If the login element allows access to all users or more than one role, these options will no longer be available.
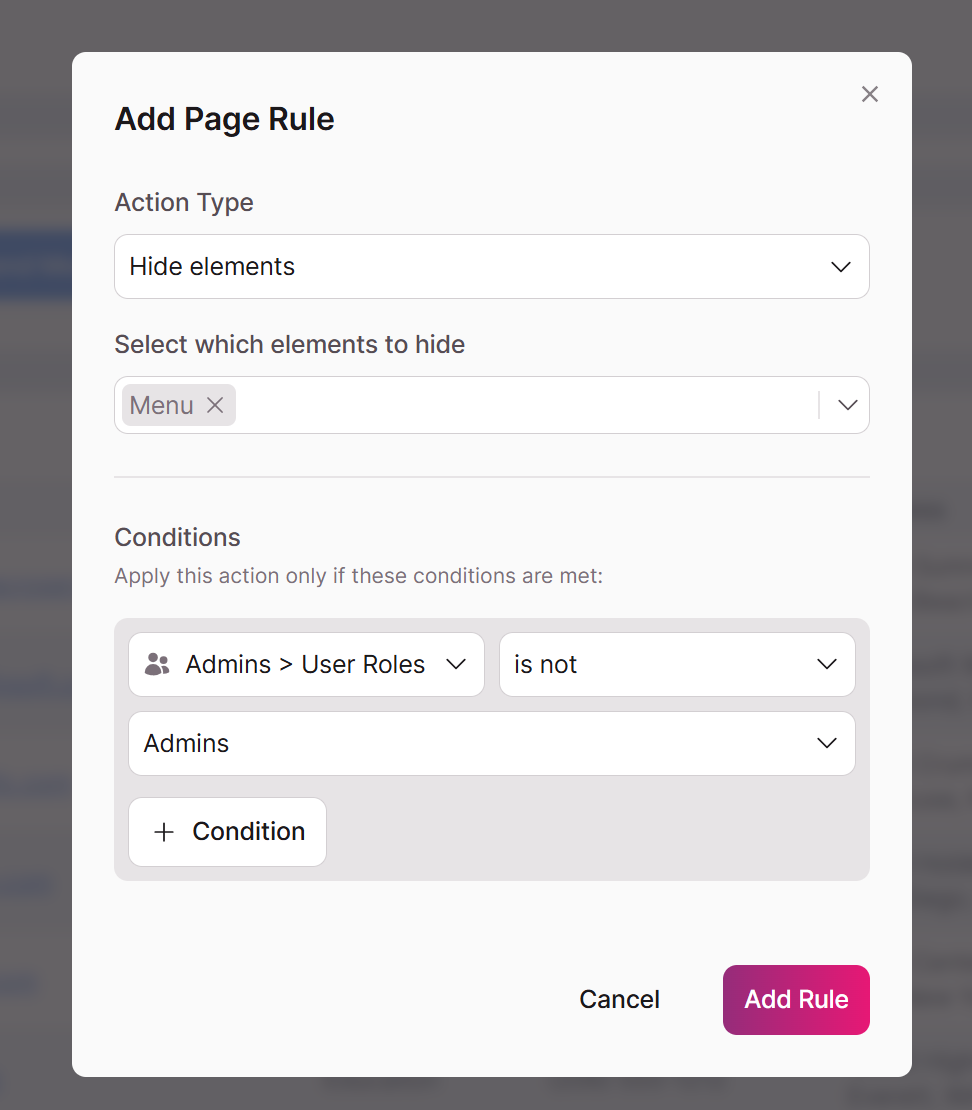
Using Page Rules with Logins to Manage Permissions
Manage Permissions on Pages with Multiple User Role Access
We have already discussed the fundamental concepts of using user roles with login elements to manage permissions in your Live App. The previous section provides information on specific elements that you can create when restricting login access to a single user role.
What if you have multiple user roles that can access a single page but need to manage permissions on a element level? This is where page rules come into play.
Page rules are an excellent tool for streamlining your app. If you have multiple user roles that require access to mostly the same content, with just a element or two that differs, you can utilize page rules to selectively display or hide specific elements based on the user role.
For example, an internal company event calendar may be accessible to all the user roles in the company: HR, Managers, Employees, Directors. Only the HR users can add new events.
You could set up a page rule to only show the form to add a new event if the logged-in user is assigned the HR user role.
Show/Hide Elements Based on a User's Status
Similar to the example above, you can also use page rules to show or hide certain elements based on a logged-in user's status. For example, you may have a member directory with multiple Member tiers.
Basic and Premium Members can all view the Members list, but only Premium members can send a message to other Members.
Using page rules, you can choose to only show the form element to add a new message if the Member's status is Premium.
Removing User Roles from Your App and From a Login Element
Please exercise caution when removing user roles from a login element or deleting them from your app. If there are any elements on the pages protected by the login that rely on the logged-in user, they may become corrupted.
For instance, if you have a page displaying Invoices for the logged-in Customer and you remove the Customer user roles from the login element, the Invoices element will no longer function properly. The same concept applies when user roles are deleted.
When There is No Option to Add Elements Showing Records Connected to the Logged-In User
If you limit access to a single user role, you will be able to add elements that display records connected to the logged-in user. However, if you restrict access to multiple user roles, you won't have these options available.
The table of the records you want to display must be connected directly to the user role that has access to the page. For example, you may have a Notes table connected to Accounts allowing all users of all roles to submit notes.
To display the connected Notes records, you must restrict login access to the Accounts role directly since that's the role connected to Notes.
Updated 7 months ago