

Organizing Pages Under Login Pages
Knack now supports more flexible organization of login-protected pages.
This feature is available in Next-Gen only.
Overview
Knack now supports more flexible organization of login-protected pages. You can add new parent pages under an existing login page and move public page groups into a login-protected parent page. This makes it easier to build clean, well-structured apps without login pages scattered throughout your page tree.
Adding a parent page under an existing Login page
You can create a new parent page as a child of an existing login page. This is useful when you want to expand a protected area of your app — for example, adding a new section to a member portal that already has a login page in place.
Because the new parent page sits under the login page, it inherits the login requirement. Any child pages you add beneath it are also protected, giving you a clean hierarchy where the authentication boundary is clear.
Moving public page groups into a Login parent page
You can move existing public page groups into a login-protected parent page. This lets you convert public areas of your app into protected ones without rebuilding pages or reconfiguring views.
When you move a page group under a login parent, all pages in that group become protected by the login page. This is particularly helpful when your app evolves and pages that were originally public now need to sit behind authentication.
When to use this
- Building member portals. Start with a login page, then add parent pages underneath it for different sections — dashboards, account settings, resources — all protected by a single login.
- Restructuring your app. If your page tree has become cluttered with individual login pages, you can consolidate by moving page groups under a shared login parent.
- Converting public pages to protected. When a set of pages that started as public needs to be locked down, consider moving the group into an existing login parent rather than recreating the pages behind a new login.
Tips
- Use login parent pages to reduce sprawl. Instead of creating a new login page for every protected section, nest related pages under a single login parent. This keeps your page tree focused on content rather than authentication scaffolding.
- Plan your hierarchy around access boundaries. Group pages by who needs to see them. A single login page with well-organized parent pages underneath is easier to manage — and easier for new builders to understand — than multiple login pages scattered across the tree.
- Moves preserve page structure. Views, rules, permissions, and nested child pages travel with the page when it moves into or out of a Login. However, removing login protection can permanently affect elements that depend on the logged-in user. See What happens to logged-in user references when you remove a Login below for details.**
What's supported and what's not
Supported
- Adding a new parent page under an existing Login page.
- Moving a public page group into a Login parent page.
- Adding a dropdown menu that mixes public and protected pages (each page keeps its own access settings).
Not supported
- Moving a protected page group from one Login to a different Login. You must remove login protection from the page group first, then move it under the new Login. See Understanding the constraints for why this matters.
- Nesting a public page under another public page. Public-to-public nesting isn't supported.
- Removing login protection from a single page within a group. Login removal applies to the entire page group at once — you cannot selectively remove protection from one parent page while keeping sibling pages protected under the same Login. *A child page that has it's own log in requirements, separate from its parent, will still retain its login.
- Moving a page group while it's inside a dropdown. Remove it from the dropdown first, then move it.
Adding a new page under a Login
To create a new page that's protected by an existing Login:
- In the Page Editor, locate the Login page you want to nest the new page under.
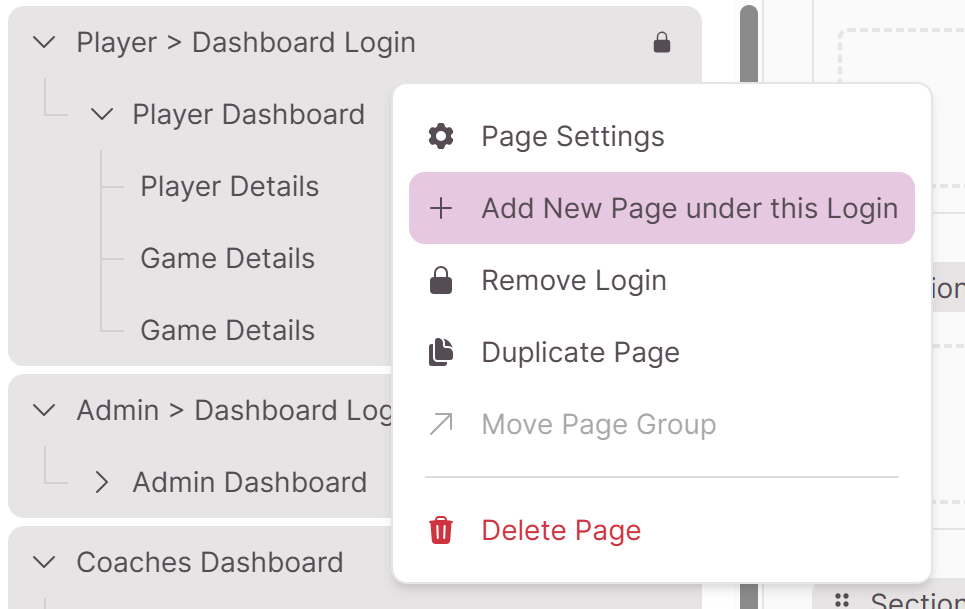
- Add a new page using the Add New Page Under This Login option on the 3 dot menu.
- Configure the new page as you normally would.
The new page is created as a direct child of the Login, automatically inherits its protection, and isn't accessible without authentication.
Moving a public page under a Login
You can move a top-level public page into an existing Login page:
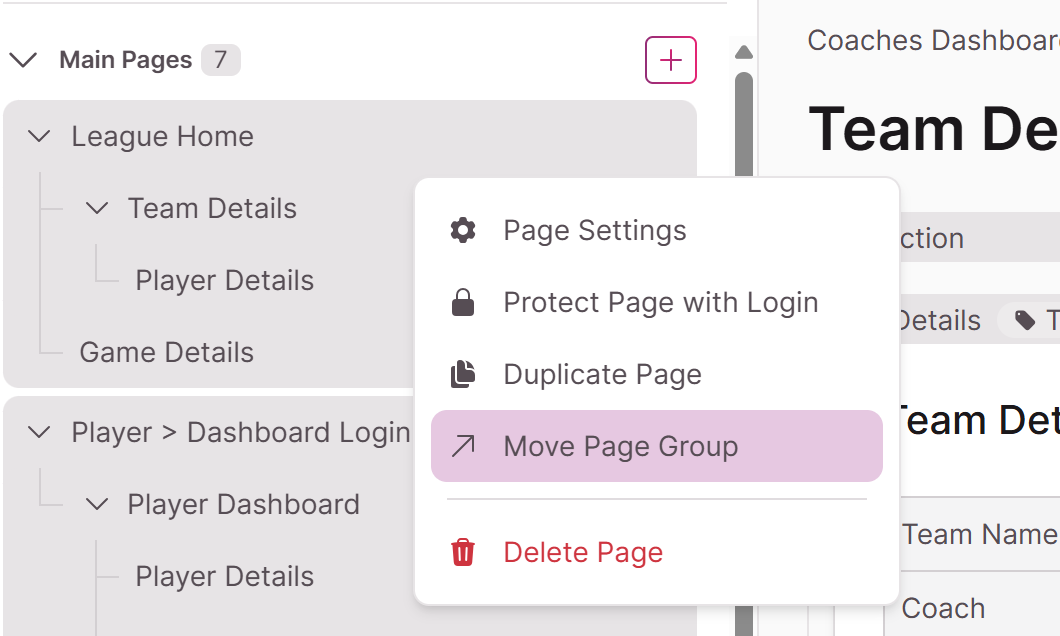
- From the public page's three-dot menu, choose Move page group.
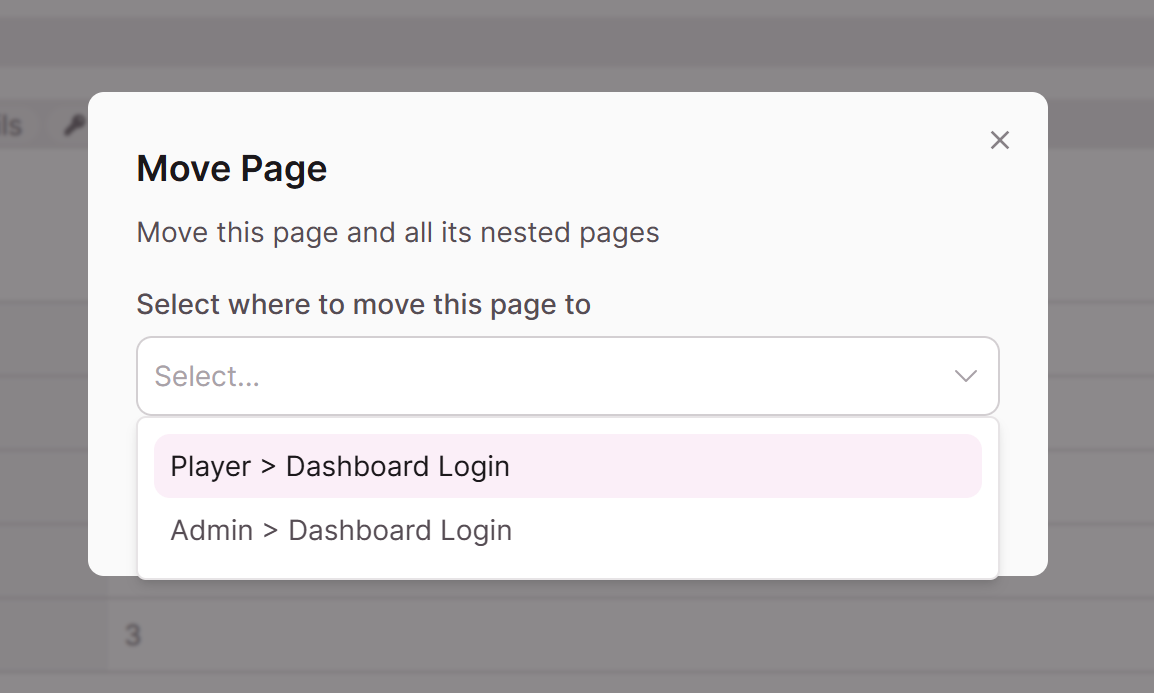
- Pick a destination from the list. Only Login pages appear as eligible destinations — public pages aren't shown, since public-to-public nesting isn't supported.
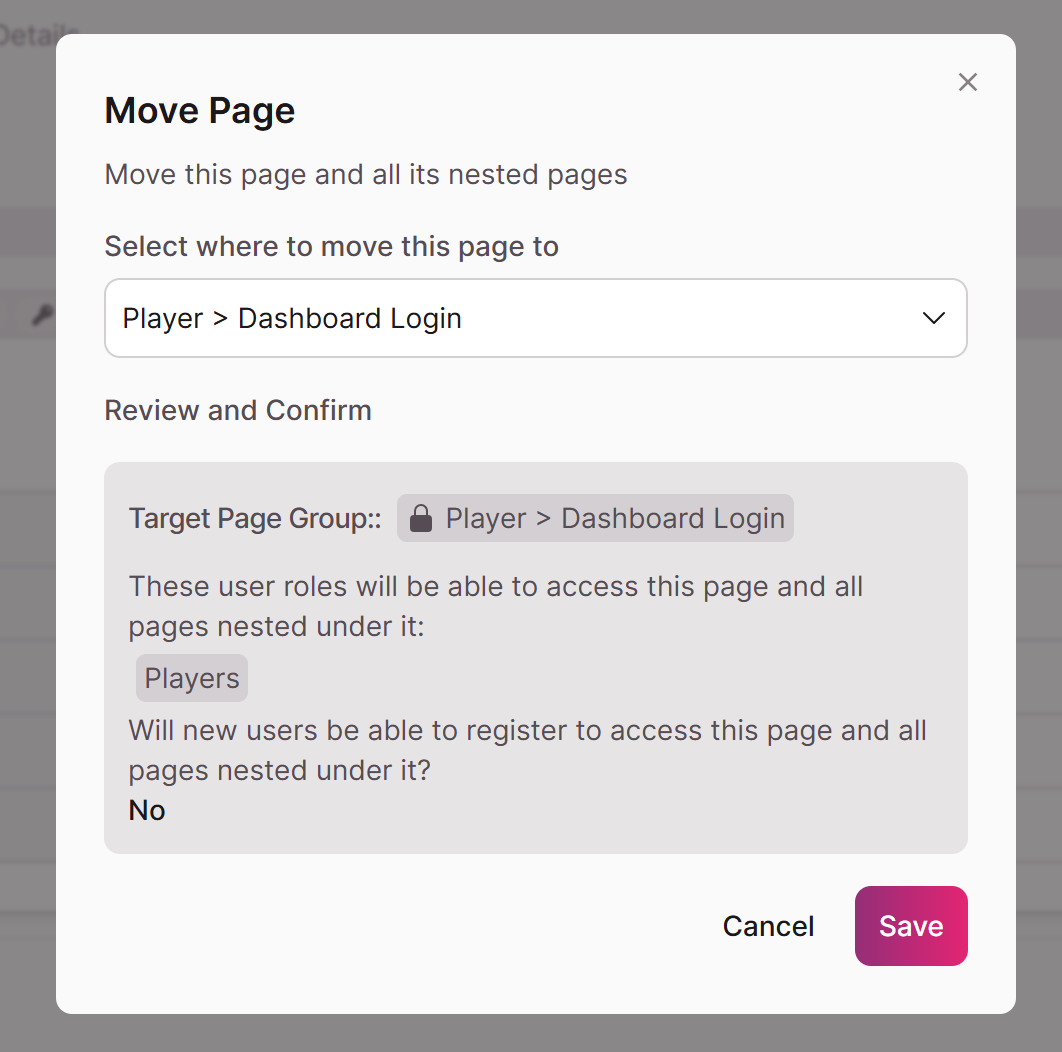
- Review the confirmation modal warning that the page will become login-protected.
- Confirm the move.
After confirmation:
- The page and all nested child pages move under the Login and inherit its protection.
- Existing views, rules, and permissions on the moved page are preserved as-is.
- The page now requires authentication; visiting it without a session redirects to login.
- The page appears in the nav for users with access to that Login.
If you cancel, no changes are made and the page stays public.
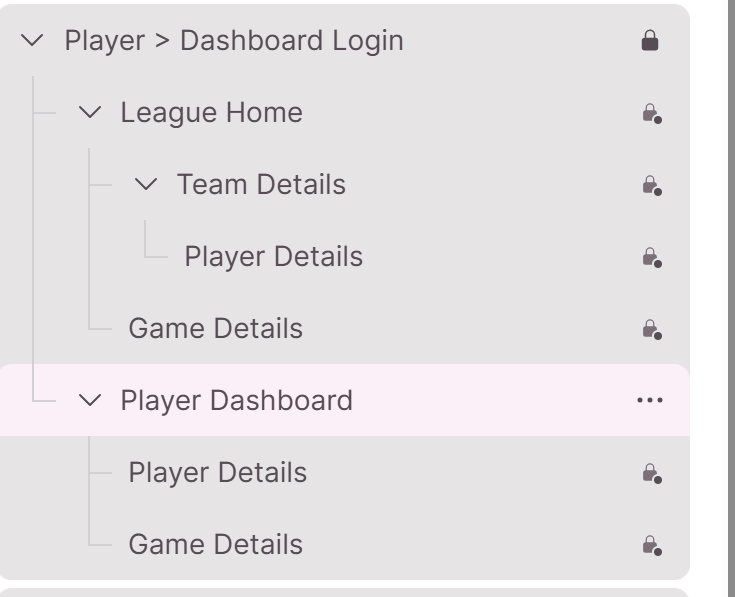
Removing login protection from a page group
You might remove login protection from a page group when you're consolidating page sprawl — for example, if your app has multiple Login pages that each protect a small number of pages, and you want to reorganize them under a single shared Login. To do that, you'd remove the Login from one page group (making it temporarily public), then move it under the Login you're consolidating into.
To make a protected page group public:
- From the protected parent page's three-dot menu, choose the option to remove the login.
- Review the confirmation modal warning that the page will become publicly accessible.
- Confirm.
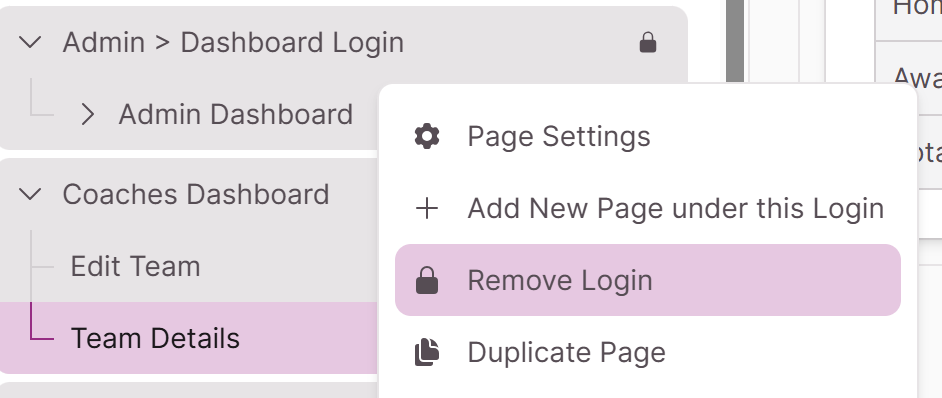
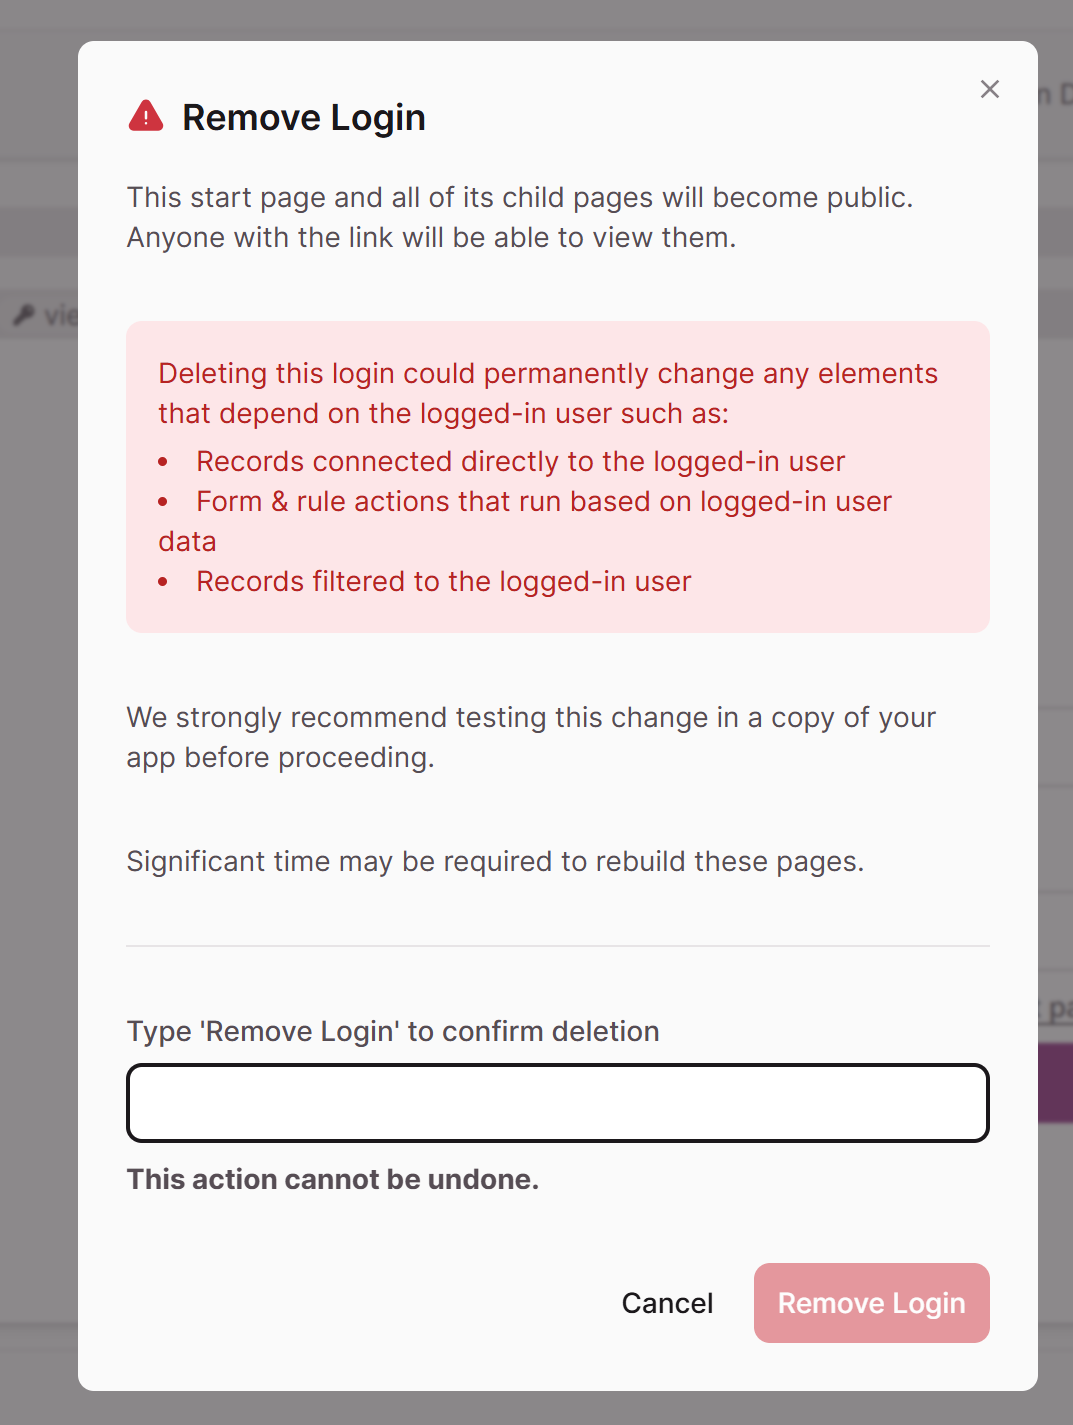
After confirmation:
- The page and all nested child pages become accessible without authentication.
- If the page is set to appear in the nav menu, it will show in the Live App nav for all users.
Important: Login removal applies to the entire page group. You cannot remove login protection from a single page — all pages in the group become public at once. Before removing the Login, review the section below to understand how this affects elements that reference the logged-in user.
Note: Move page group is disabled while a page is still under a Login. Remove the login protection first, then move the page if you'd like to relocate it.
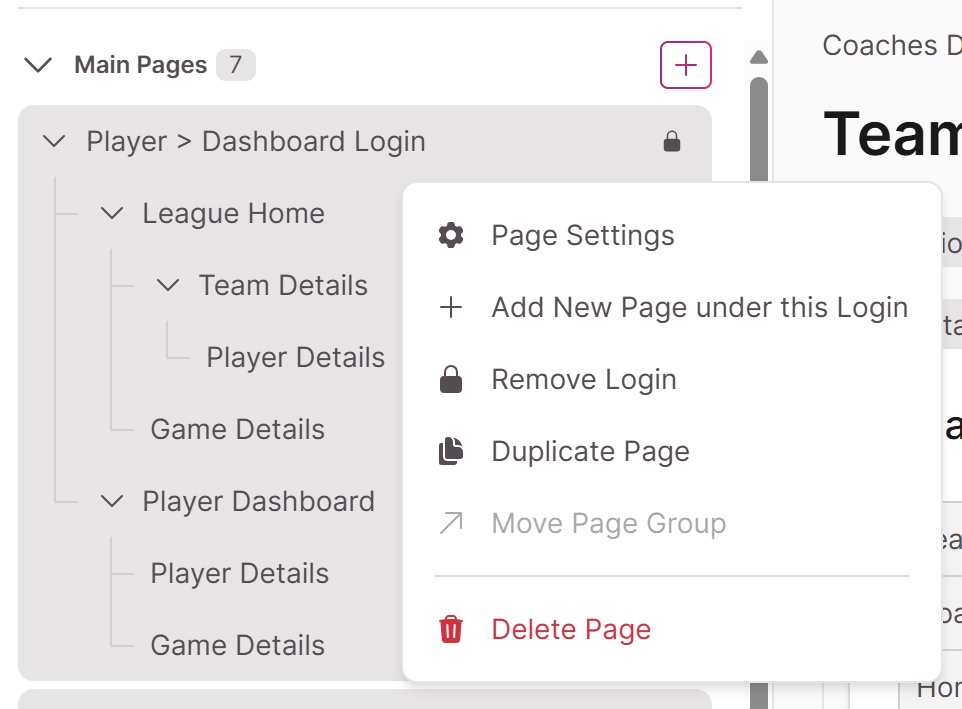
What happens to logged-in user references when you remove a Login
When a page sits behind a Login, elements on that page can reference the logged-in user — for example, showing only records connected to them, or submitting form data on their behalf. If you remove the Login, those references lose their context. The effects depend on how the element was originally configured.
Elements that are removed from the page
Some elements are fundamentally defined by their relationship to the logged-in user. When you remove the Login, these elements are deleted from the page entirely.
This includes:
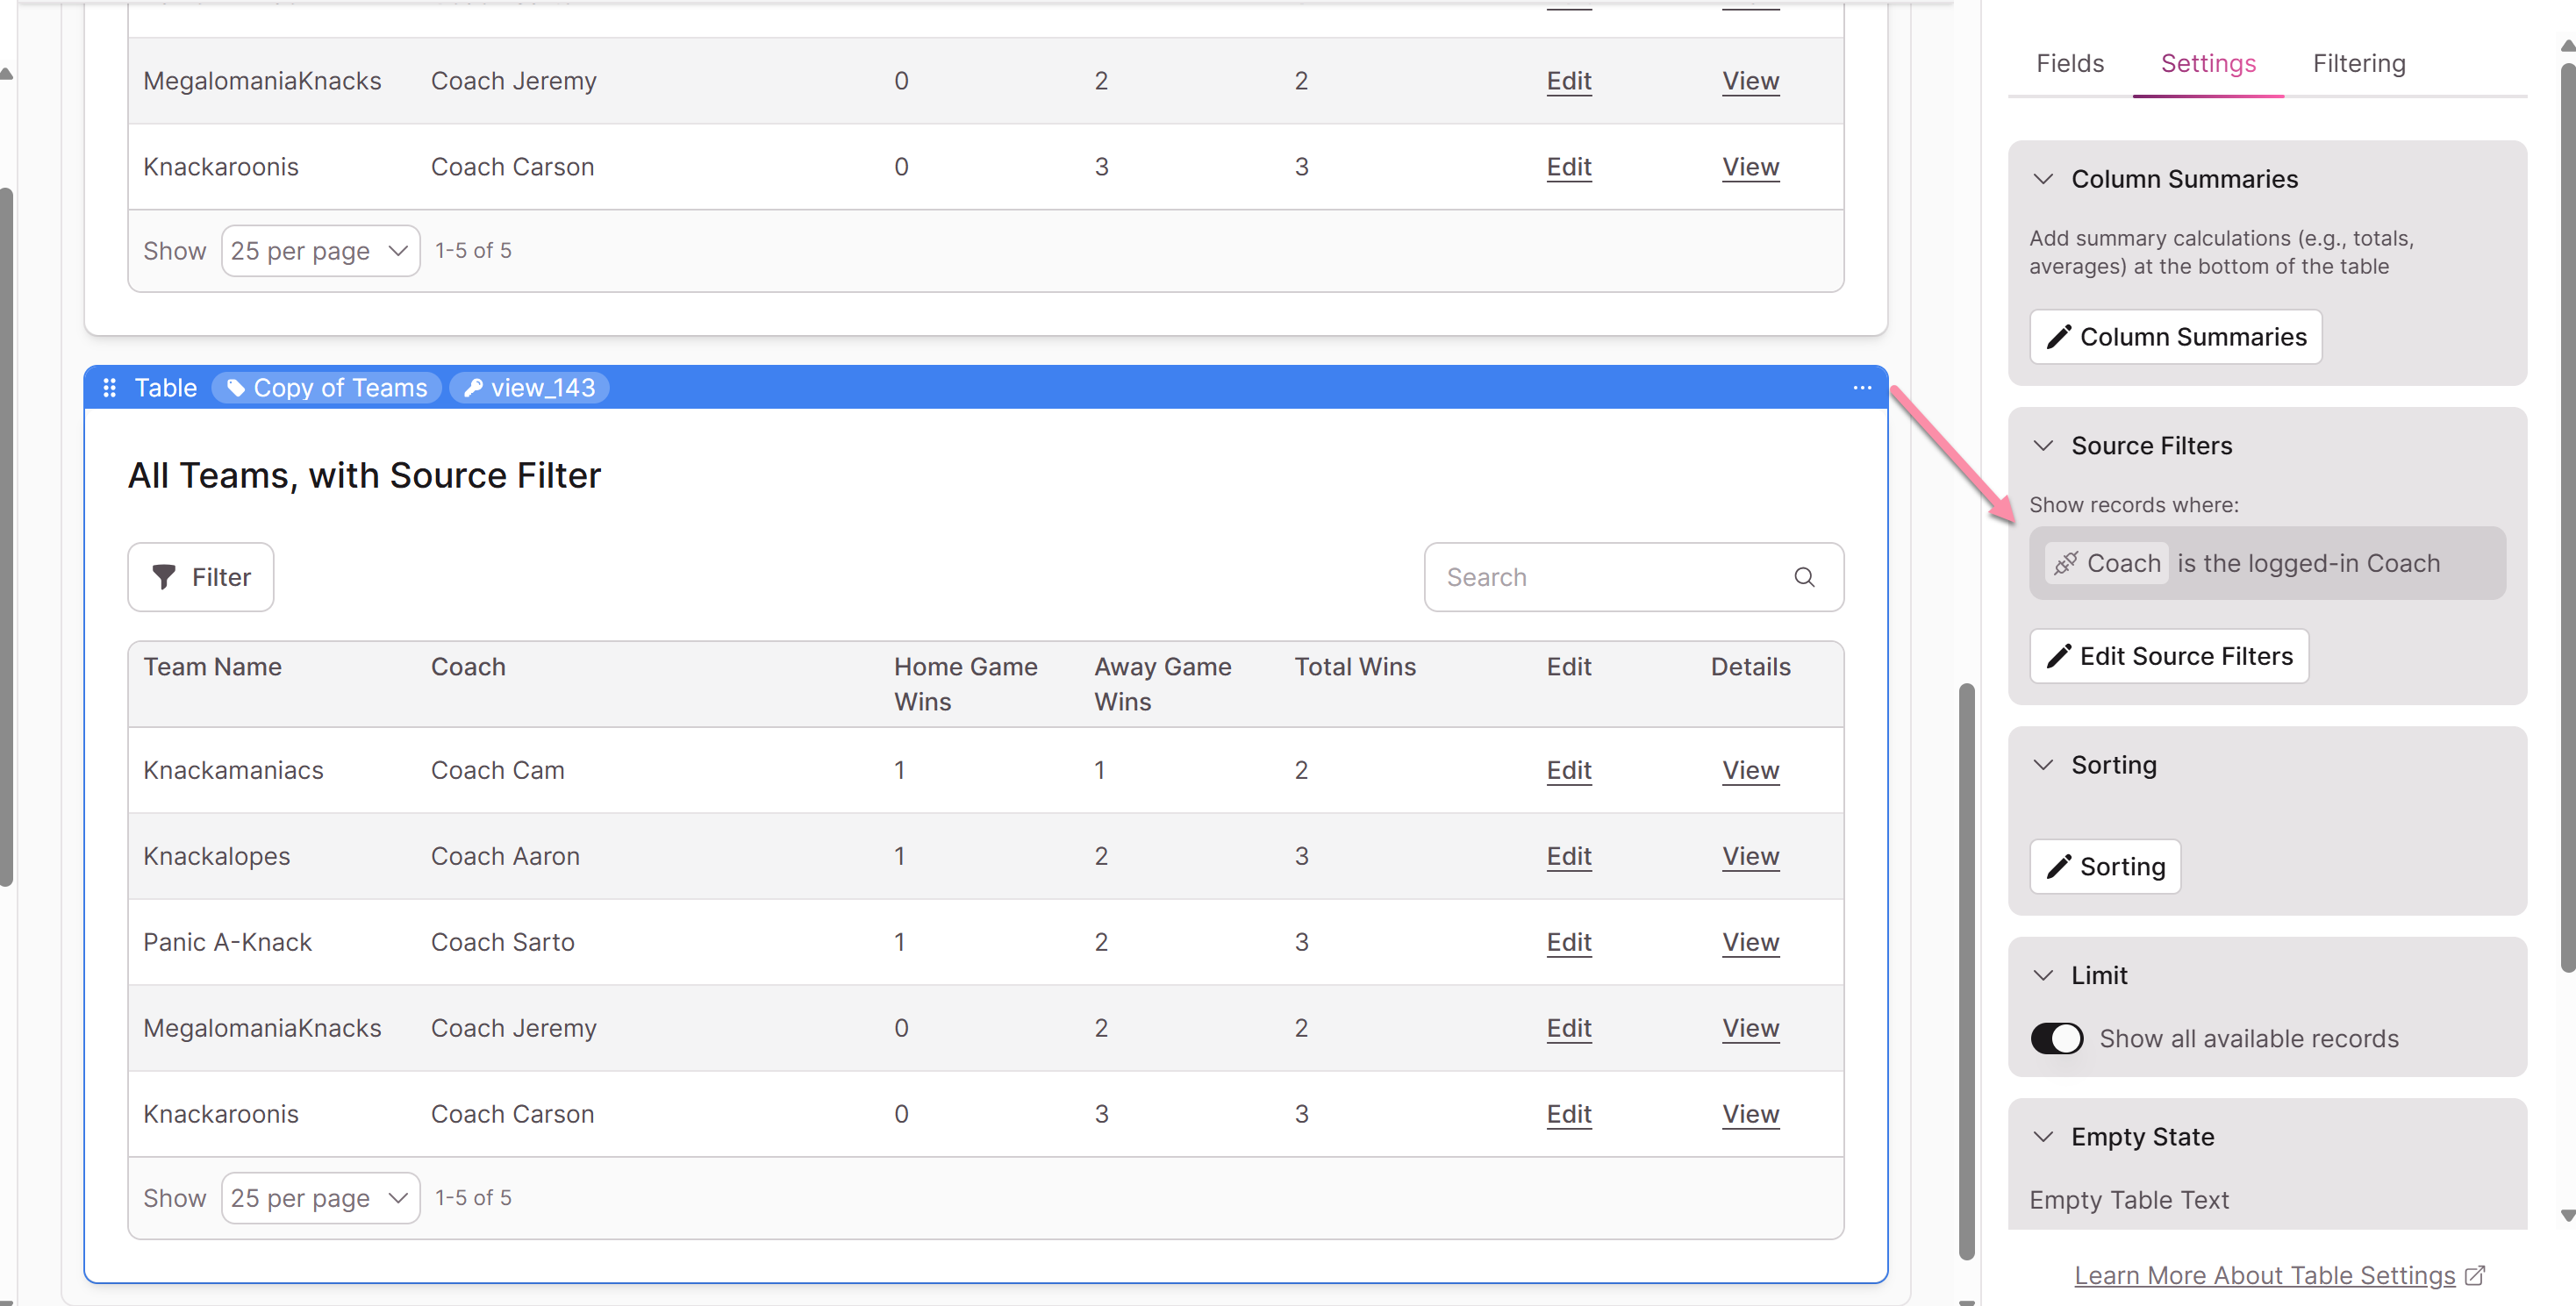
- List or Table elements sourced from the logged-in user's connected records. For example, a List configured to display "records from the Teams table connected to the logged-in Coach" will be removed. This is the source relationship shown in the element's settings panel — not a source filter you added afterward.
- Form elements that update the logged-in user's record. For example, a Form configured to "update the logged-in Account" will be removed.
These are elements where the logged-in user is part of the element's core source definition — the configuration you see when you first add the element in the "Confirm Add Element" modal. Once the Login is removed, the element has no valid source, so Knack removes it.
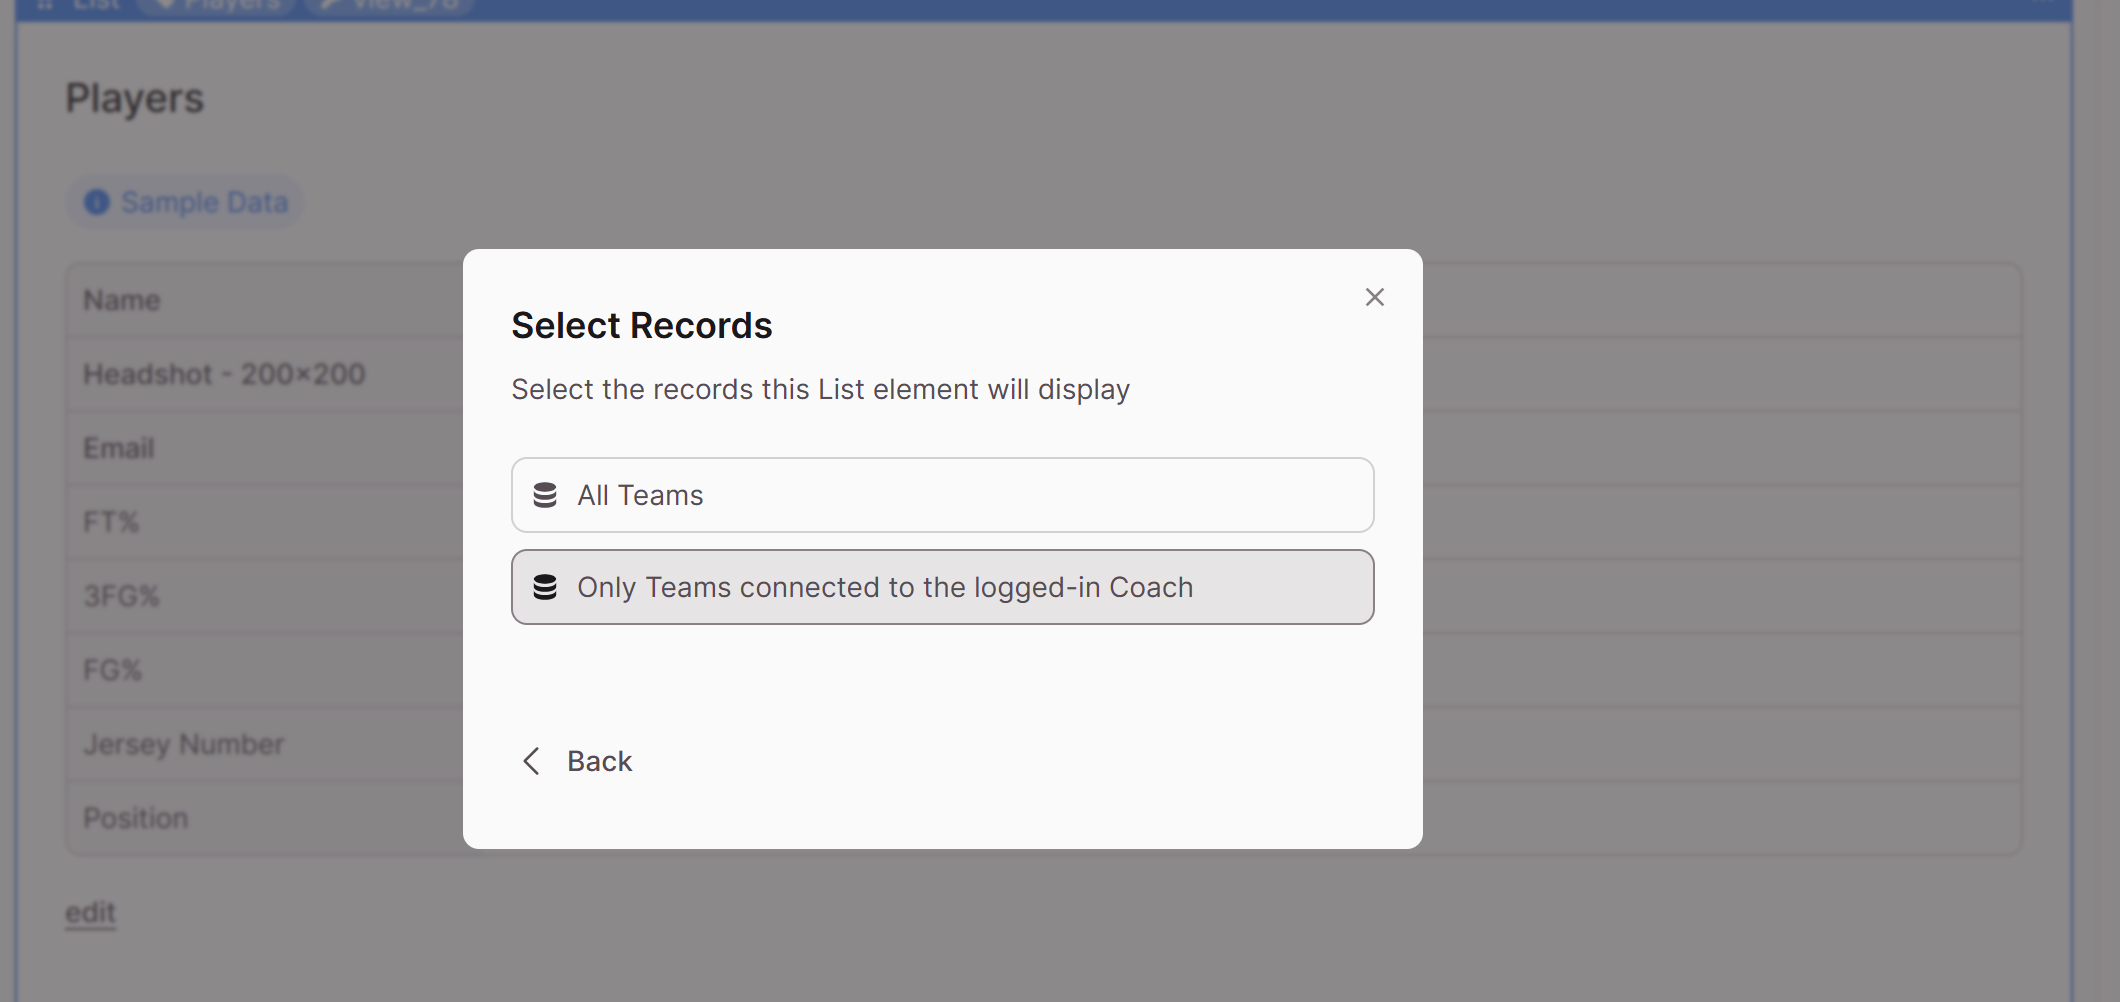
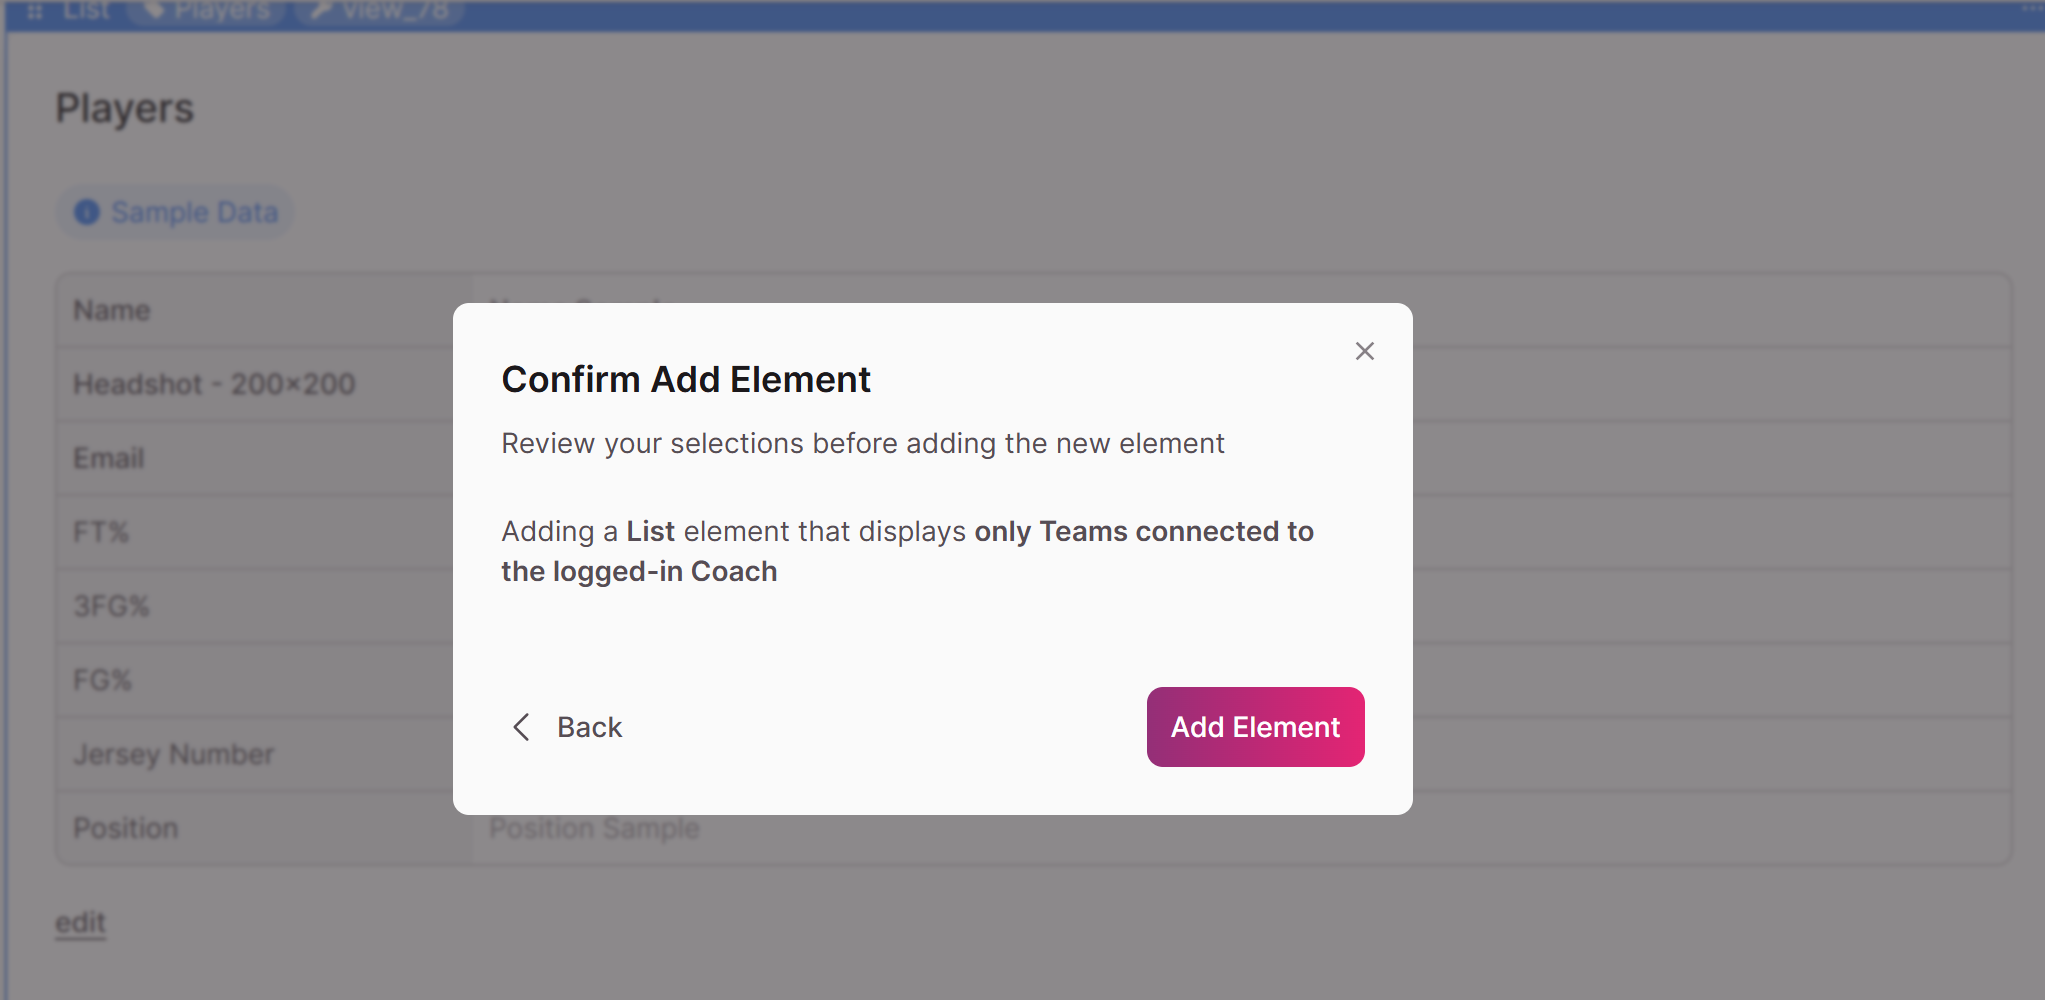
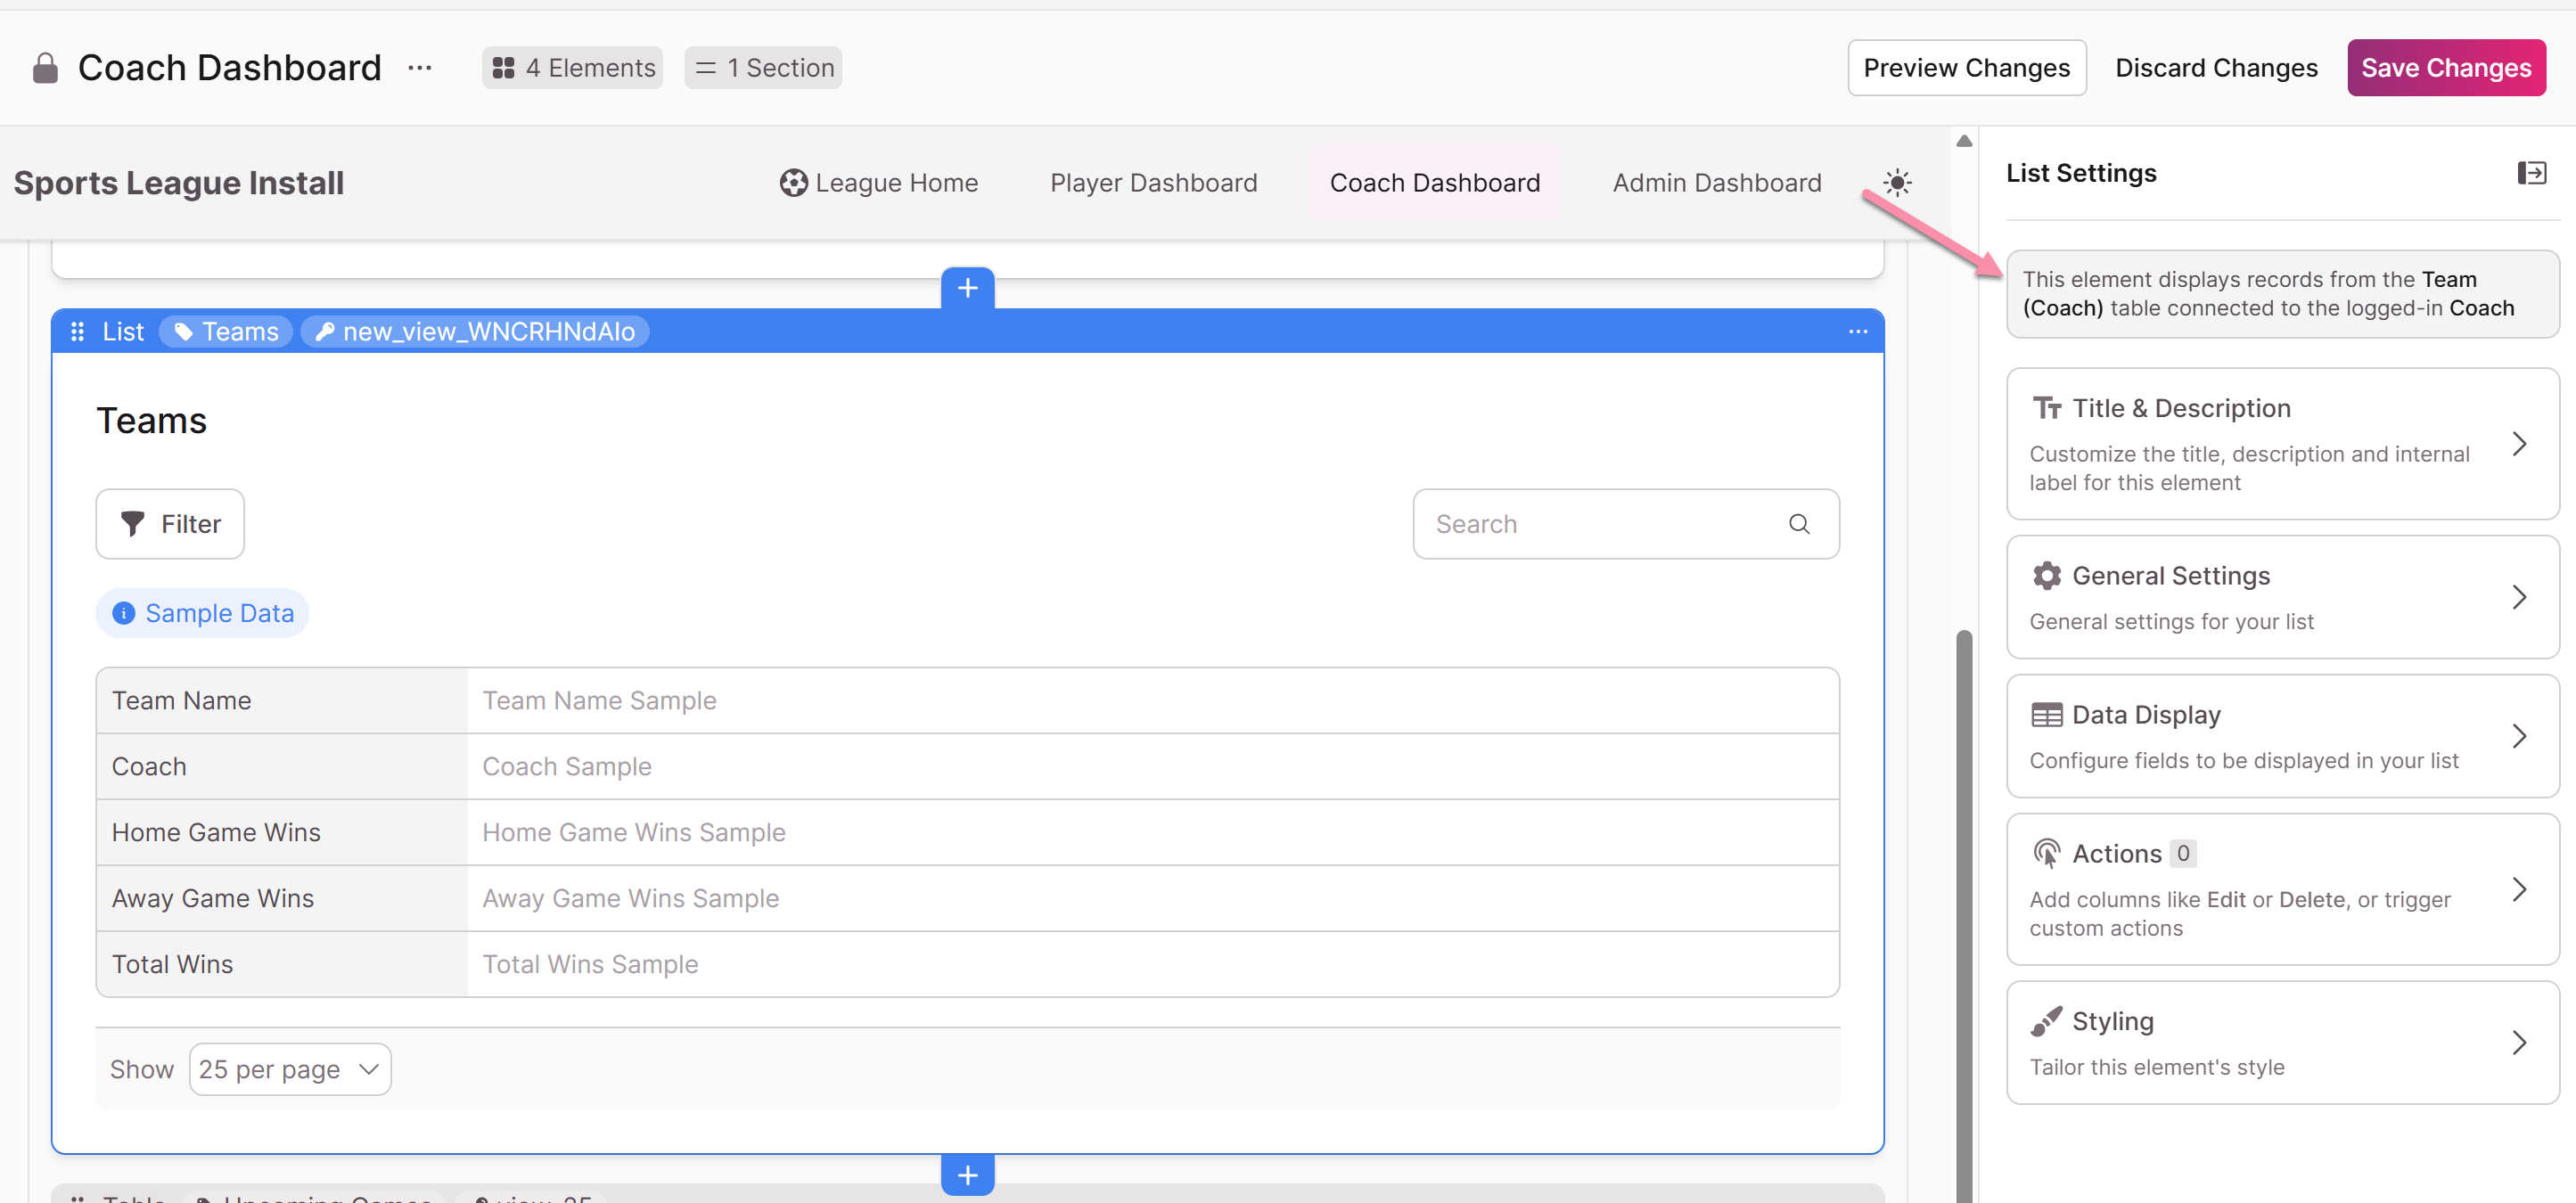
This removal is permanent. Re-adding a Login to the page will not restore these elements. You would need to recreate them from scratch.
Example: Before and after removing a Login
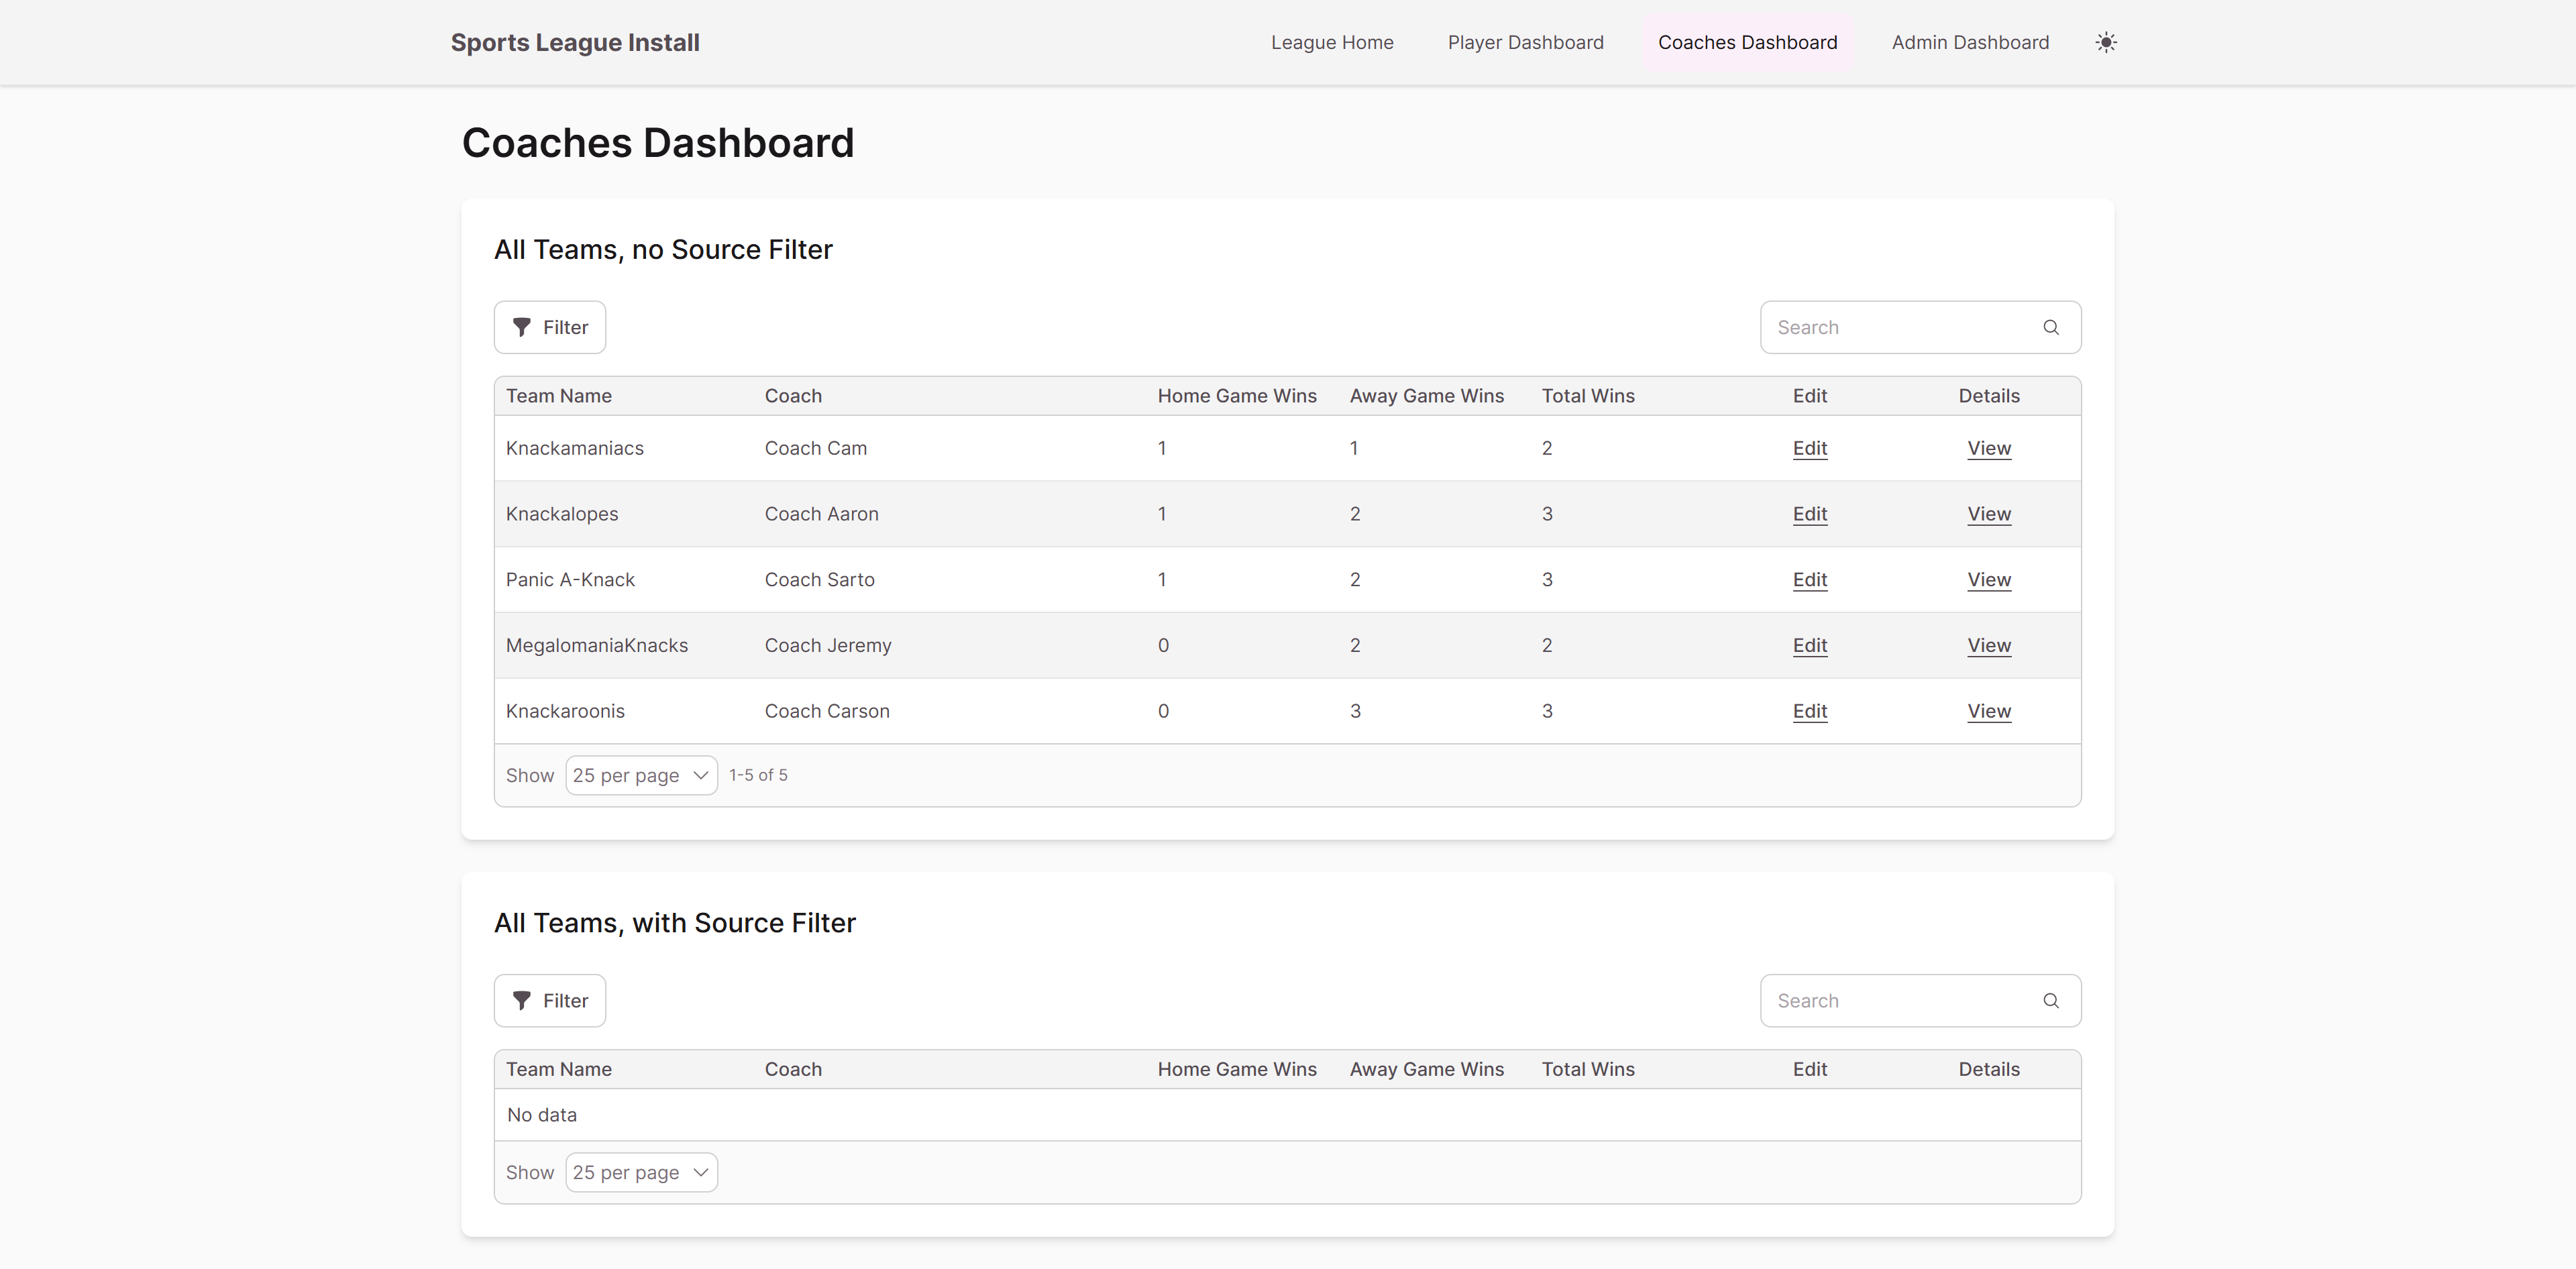
A Coaches Dashboard page sits behind a Login. It contains several elements, some of which are sourced from the logged-in Coach:
Before (with Login): The page displays an "Add Team" form that connects new teams to the logged-in Coach, a List showing only teams connected to the logged-in Coach, and a Table with a source filter showing teams where Coach = the logged-in Coach.
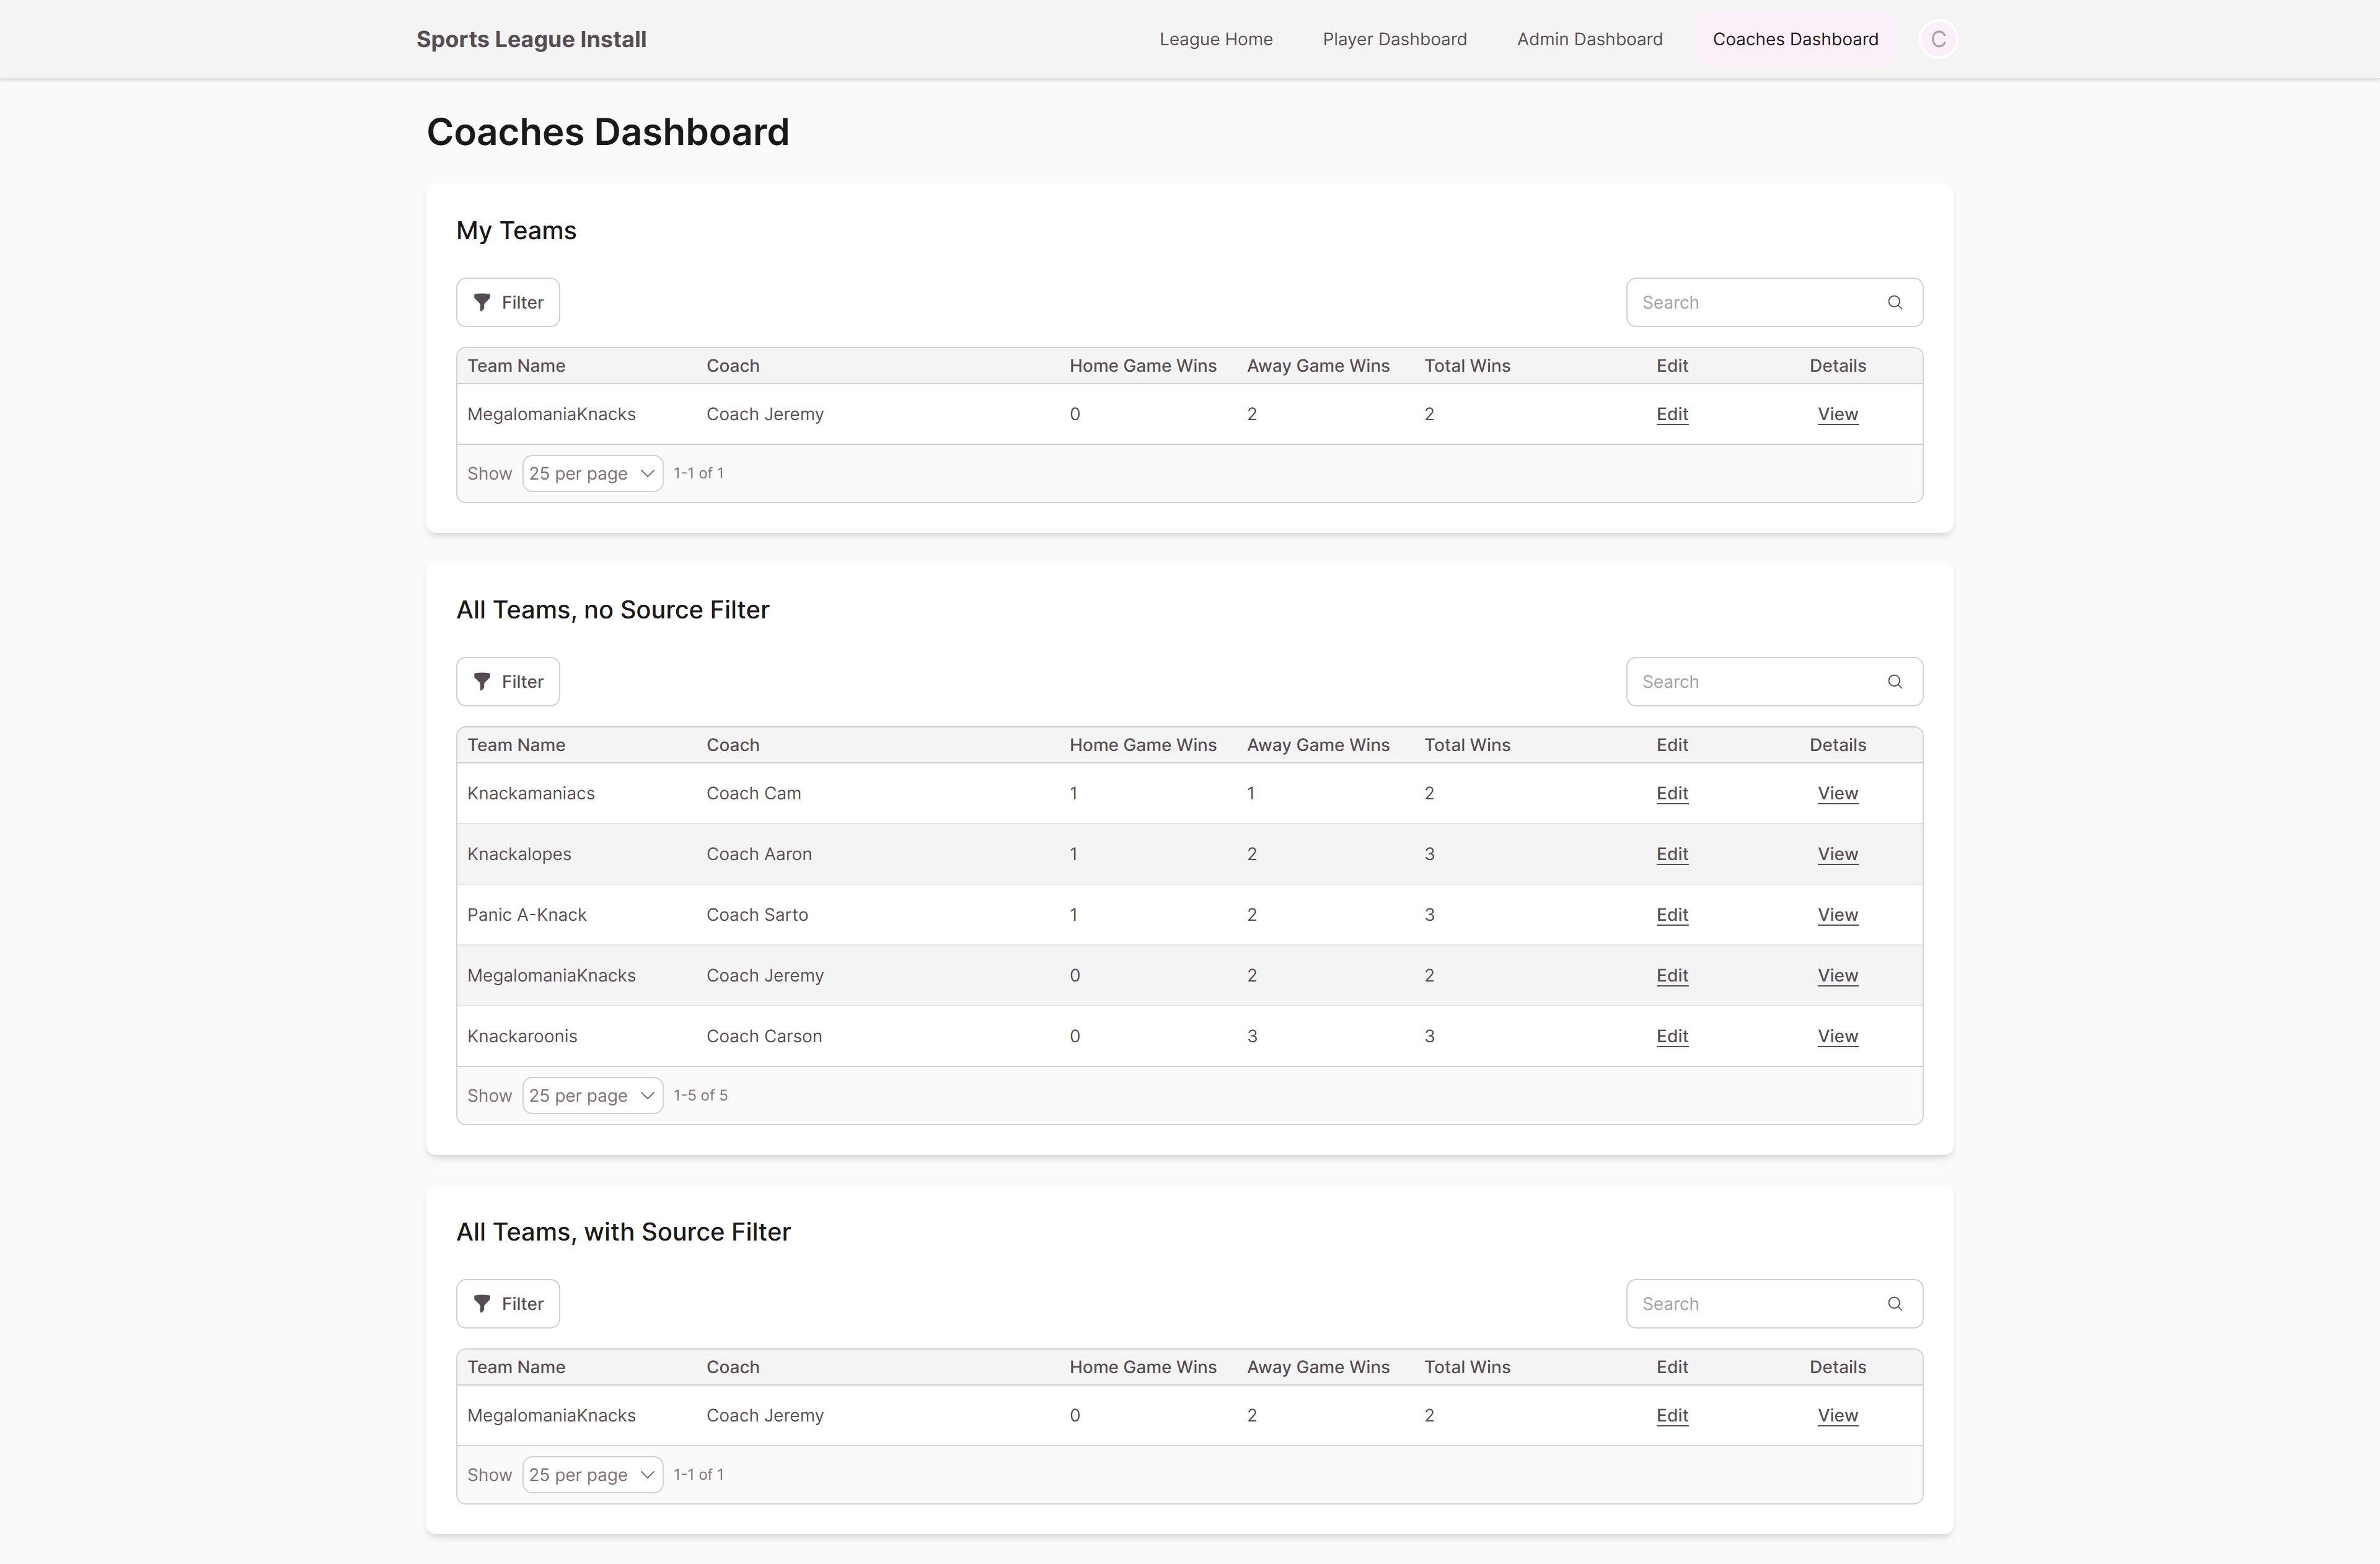
After (Login removed): The "Add Team" form and the "Teams does this disappear" List are gone — they were sourced from the logged-in Coach, so Knack removed them. The Tables that had independent sources remain on the page.
Elements that stay but may stop working as expected
Other elements exist independently but use the logged-in user in their filtering or rule logic. When you remove the Login, these elements remain on the page, but logged-in user references in their configuration silently stop resolving.
This includes:
- Source filters that match against the logged-in user. For example, a Table with a source filter set to "show records where Coach is the logged-in Coach" will stay on the page with the filter still configured — but since there is no longer a logged-in user to match against, the element will display no records. The table appears empty with no visible indication that a filter is the cause.
- Record actions or submit rules that reference the logged-in user. For example, a form submit action that connects a new record to the logged-in user will remain configured, but the connection will have no user to target.
- Display rules conditioned on logged-in user fields. For example, a display rule like "when the logged-in user's Role is Admin, show the Delete column" will have no user data to evaluate and the condition will never be met.
- Email rules referencing logged-in user fields. For example, an email rule that sends to the logged-in user's email address will have no recipient to resolve.
How to check before removing a Login
Before removing a Login from a page group, review the elements on every page in the group (including child pages) for any references to the logged-in user. Remember that login removal applies to the entire page group at once, so every page is affected.
Look for:
- Element source definitions — Open each element's settings and check whether the settings panel shows a source tied to the logged-in user (e.g., "records connected to the logged-in [Role]" or "updates the logged-in [Role]"). These elements will be permanently removed.
- Source filters — Check each element's source filter configuration for any filter criteria that reference the logged-in user. These will persist but return no results, making the element appear empty.
- Form submit rules and record actions — Check for actions that connect records to or update the logged-in user.
- Display rules and email rules — Check for conditions that evaluate fields from the logged-in user.
Understanding the constraints
Login removal is all-or-nothing. When you remove a Login, it applies to the entire page group. You cannot remove login protection from a single page while keeping other pages in the group protected. This means you need to be confident that no page in the group has logged-in user dependencies you aren't prepared to lose.
You cannot move a page group directly between Logins. To relocate a protected page group under a different Login, you must:
- Remove the login protection from the page group first (which will remove or break logged-in user elements as described above).
- Move the now-public page group under the new Login.
Because step 1 can permanently remove elements, duplicate, document, or screenshot your element configurations before removing the Login so you have a reference for recreating them under the new Login.
There is no way to preserve logged-in user element source definitions through a Login change. Elements sourced from the logged-in user are deleted the moment the Login is removed — even if you immediately re-add a Login or move the page under a different one. Plan to rebuild those elements after the move.
Adding a dropdown menu with mixed pages
Dropdown menus can include any existing parent pages, regardless of login protection:
- Add a new dropdown menu from the page editor.
- Select the parent pages to include. Both public and protected pages are eligible.
- Save.
A few details worth knowing:
- Each page in the dropdown keeps its existing access settings — no confirmation modal is needed because nothing about the page's protection is changing.
- Nested child pages come along with their parent and keep their original settings.
- A single dropdown menu can mix public and protected pages; each page respects its own login rules independently.
- To move a page group that lives inside a dropdown, remove it from the dropdown first. Move page group is disabled for pages within a dropdown.
To move a page group that lives inside a dropdown, remove it from the dropdown first.
Updated 4 months ago