Implementing SAML Single Sign-On
Single Sign-On (SSO) lets your users log in to your Knack app using credentials they already have - no separate username and password required.
Setting Up SAML SSO
With SAML SSO, an Identity Provider (IdP), such as Okta, Azure AD, etc handles authentication and passing verified user information back to Knack.
This guide walks you through the complete setup from start to finish, using Okta as an example IdP.
How SAML SSO Works
When a user clicks your SSO login button in the Live App, Knack (the Service Provider) redirects them to the IdP. The IdP authenticates the user and sends a signed SAML assertion back to Knack confirming their identity. Knack then logs them in, or creates their Knack account if it's their first time logging in.
What You'll Need
- A Next-Gen App with a login page
- The Next-Gen Live App URL
- Admin access to an IdP, such as Okta
- About 15–20 minutes
Overview of the Setup Process
Because Knack and the IdP need to exchange configuration details with each other, the setup involves a few back-and-forth steps:
- Add the SAML provider in Knack - using placeholder values to generate your configuration file
- Download the Knack metadata file - the XML file that the IdP needs
- Create a SAML app in the IdP - using the IdP configurations
- Configure the SAML settings in the IdP - using values from the Knack metadata file
- Map user attributes in the IdP - so Knack receives name and email on login
- Finalize the Knack configuration - copying the real values from the IdP back into Knack
- Assign users in the IdP - so they can actually log in
Step 1: Add the SAML Provider in Knack
Start by creating the SSO provider entry in your Knack app. You won't have all the real values yet - that's fine. You'll use placeholders now and update them in Step 6.
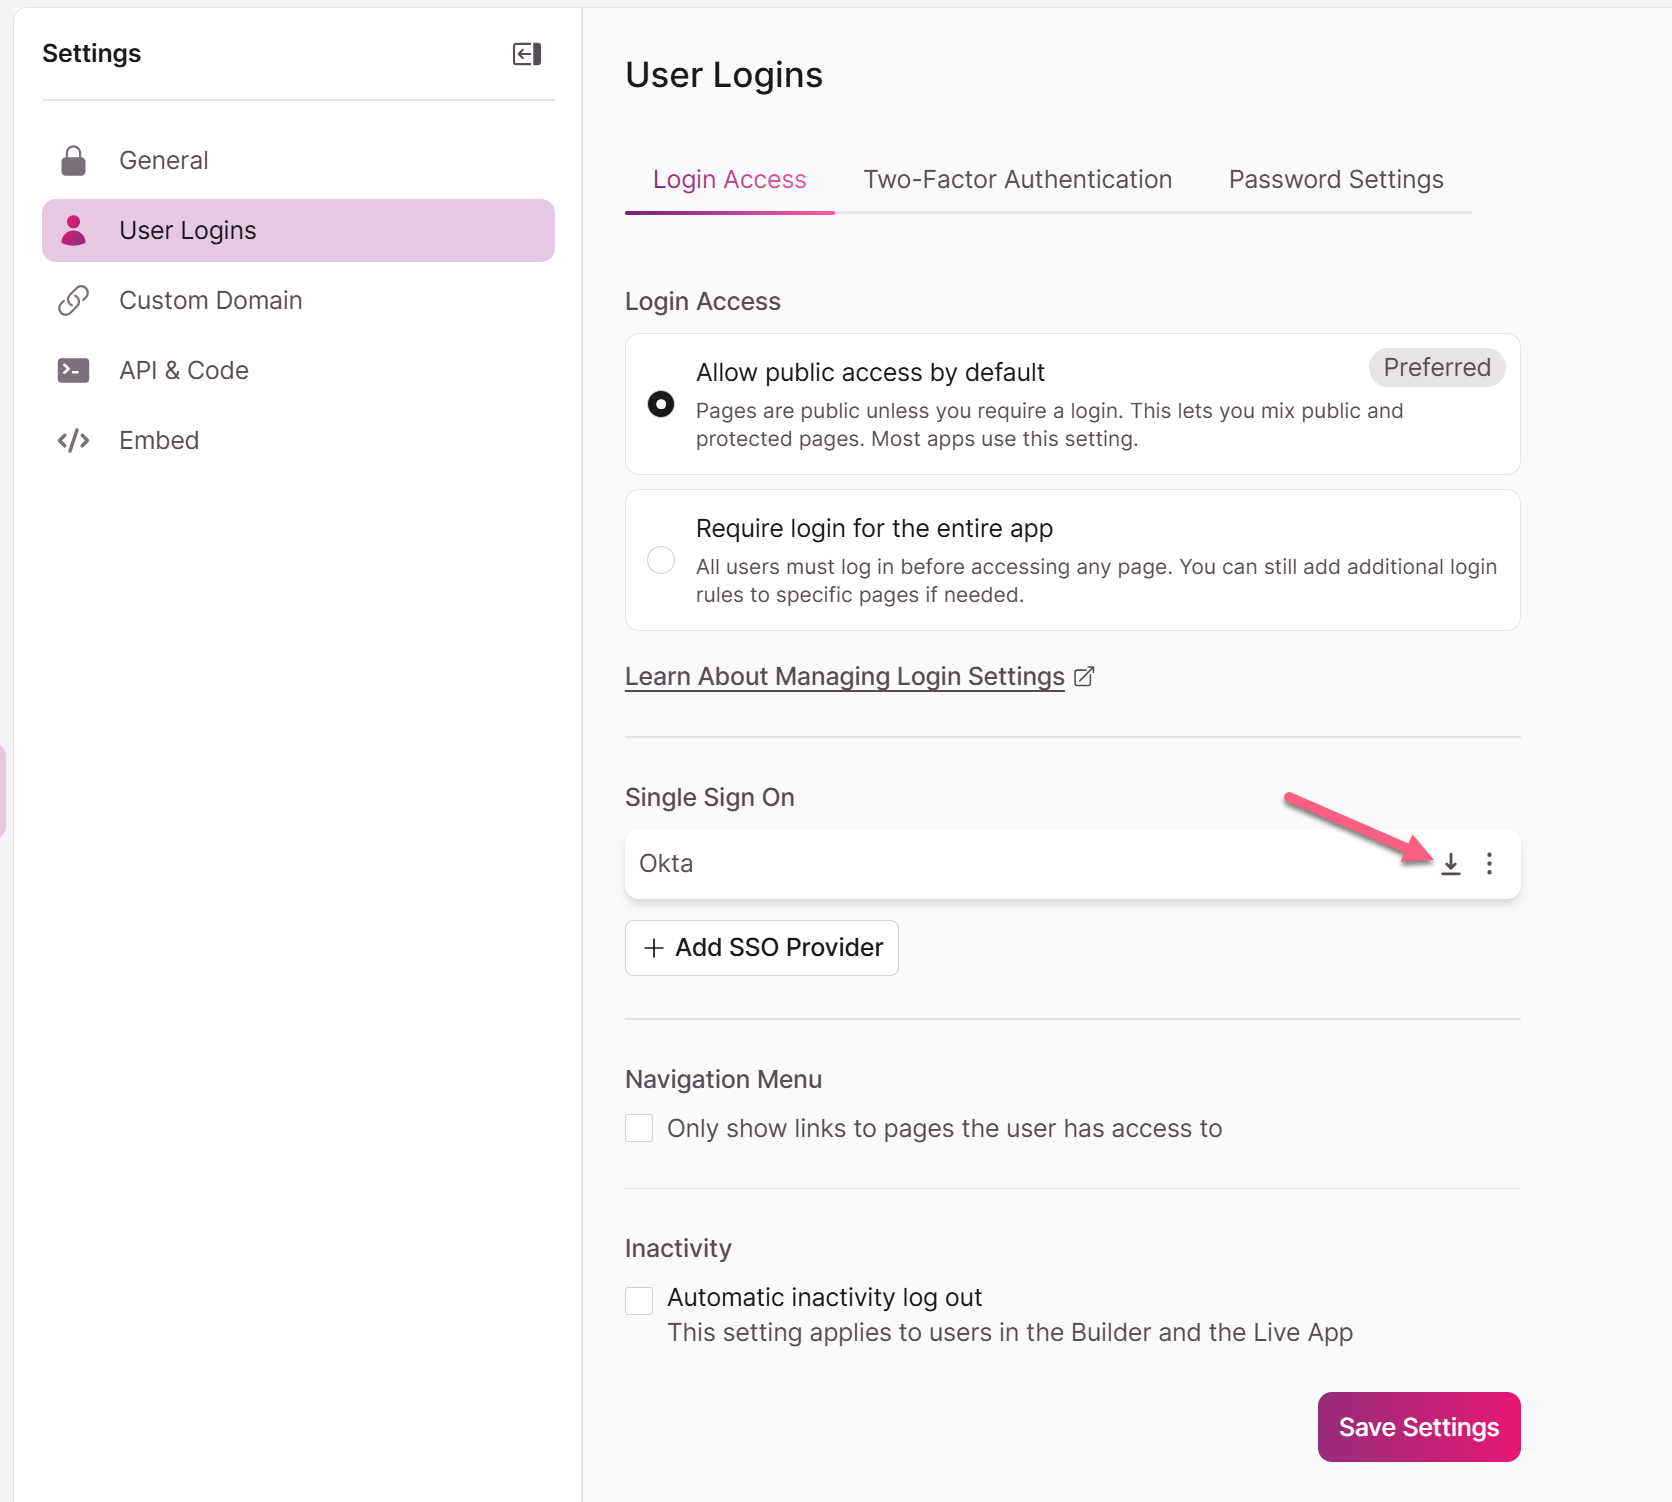
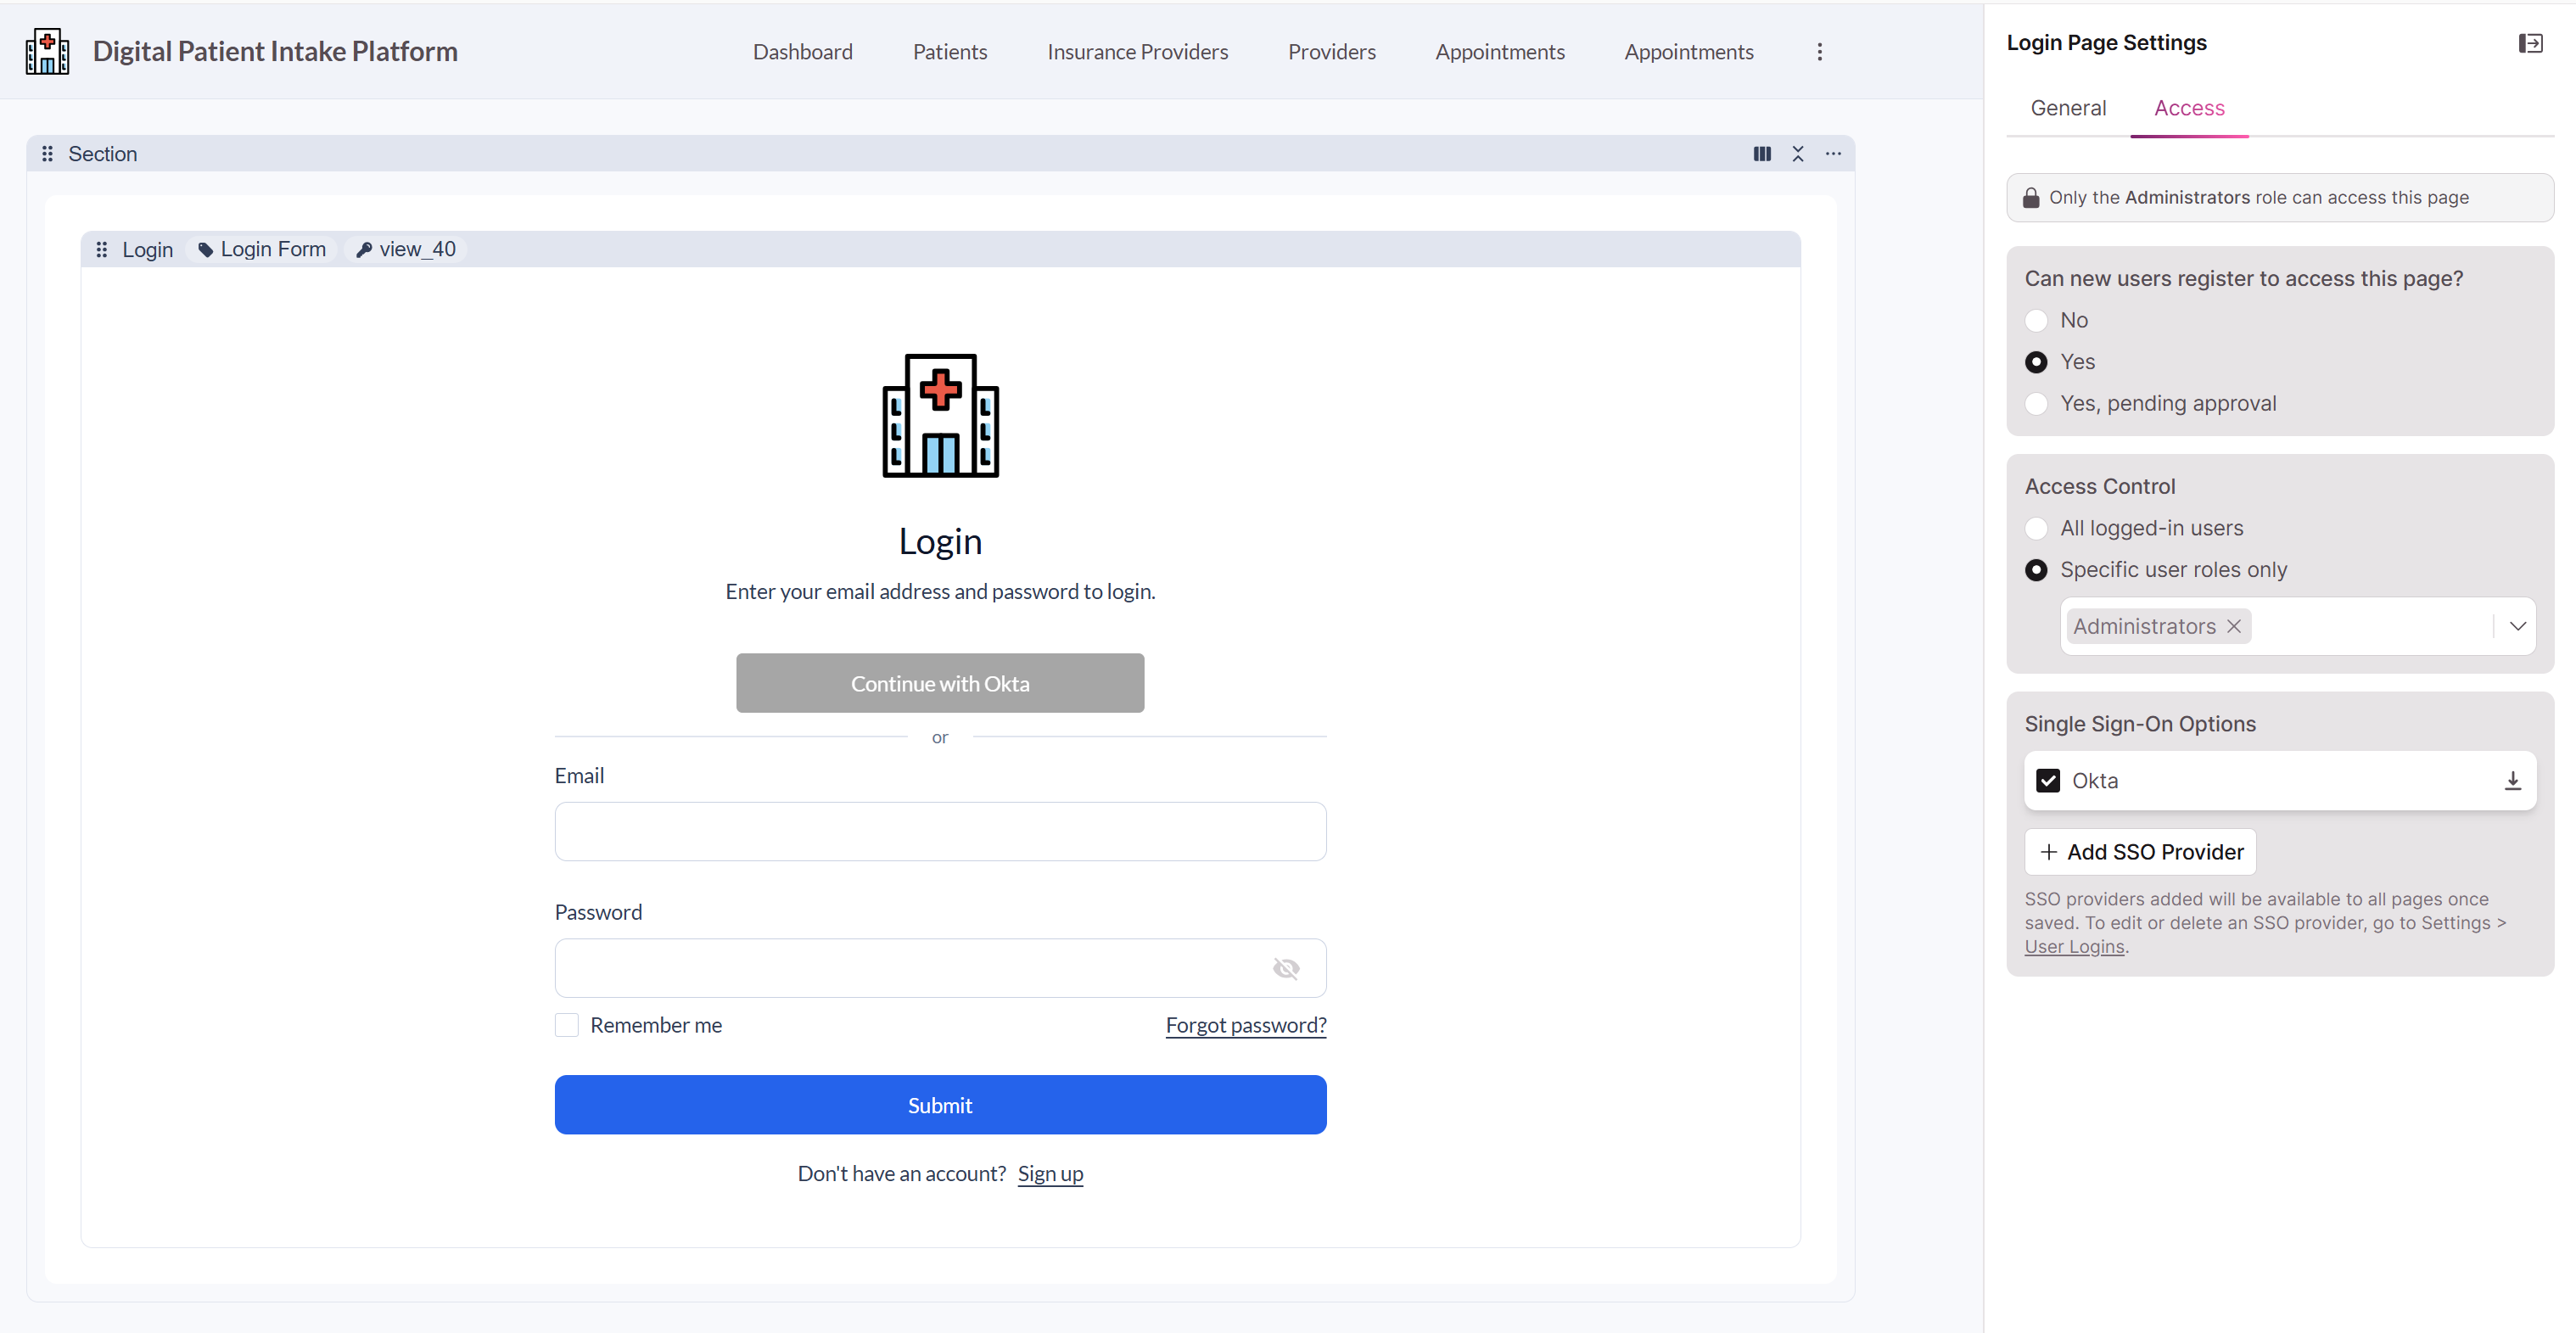
We recommend setting up SAML SSO from Settings > User Logins > Login Access and select Add SSO Provider
Go to Settings > User Logins > Login Access and select Add SSO Provider
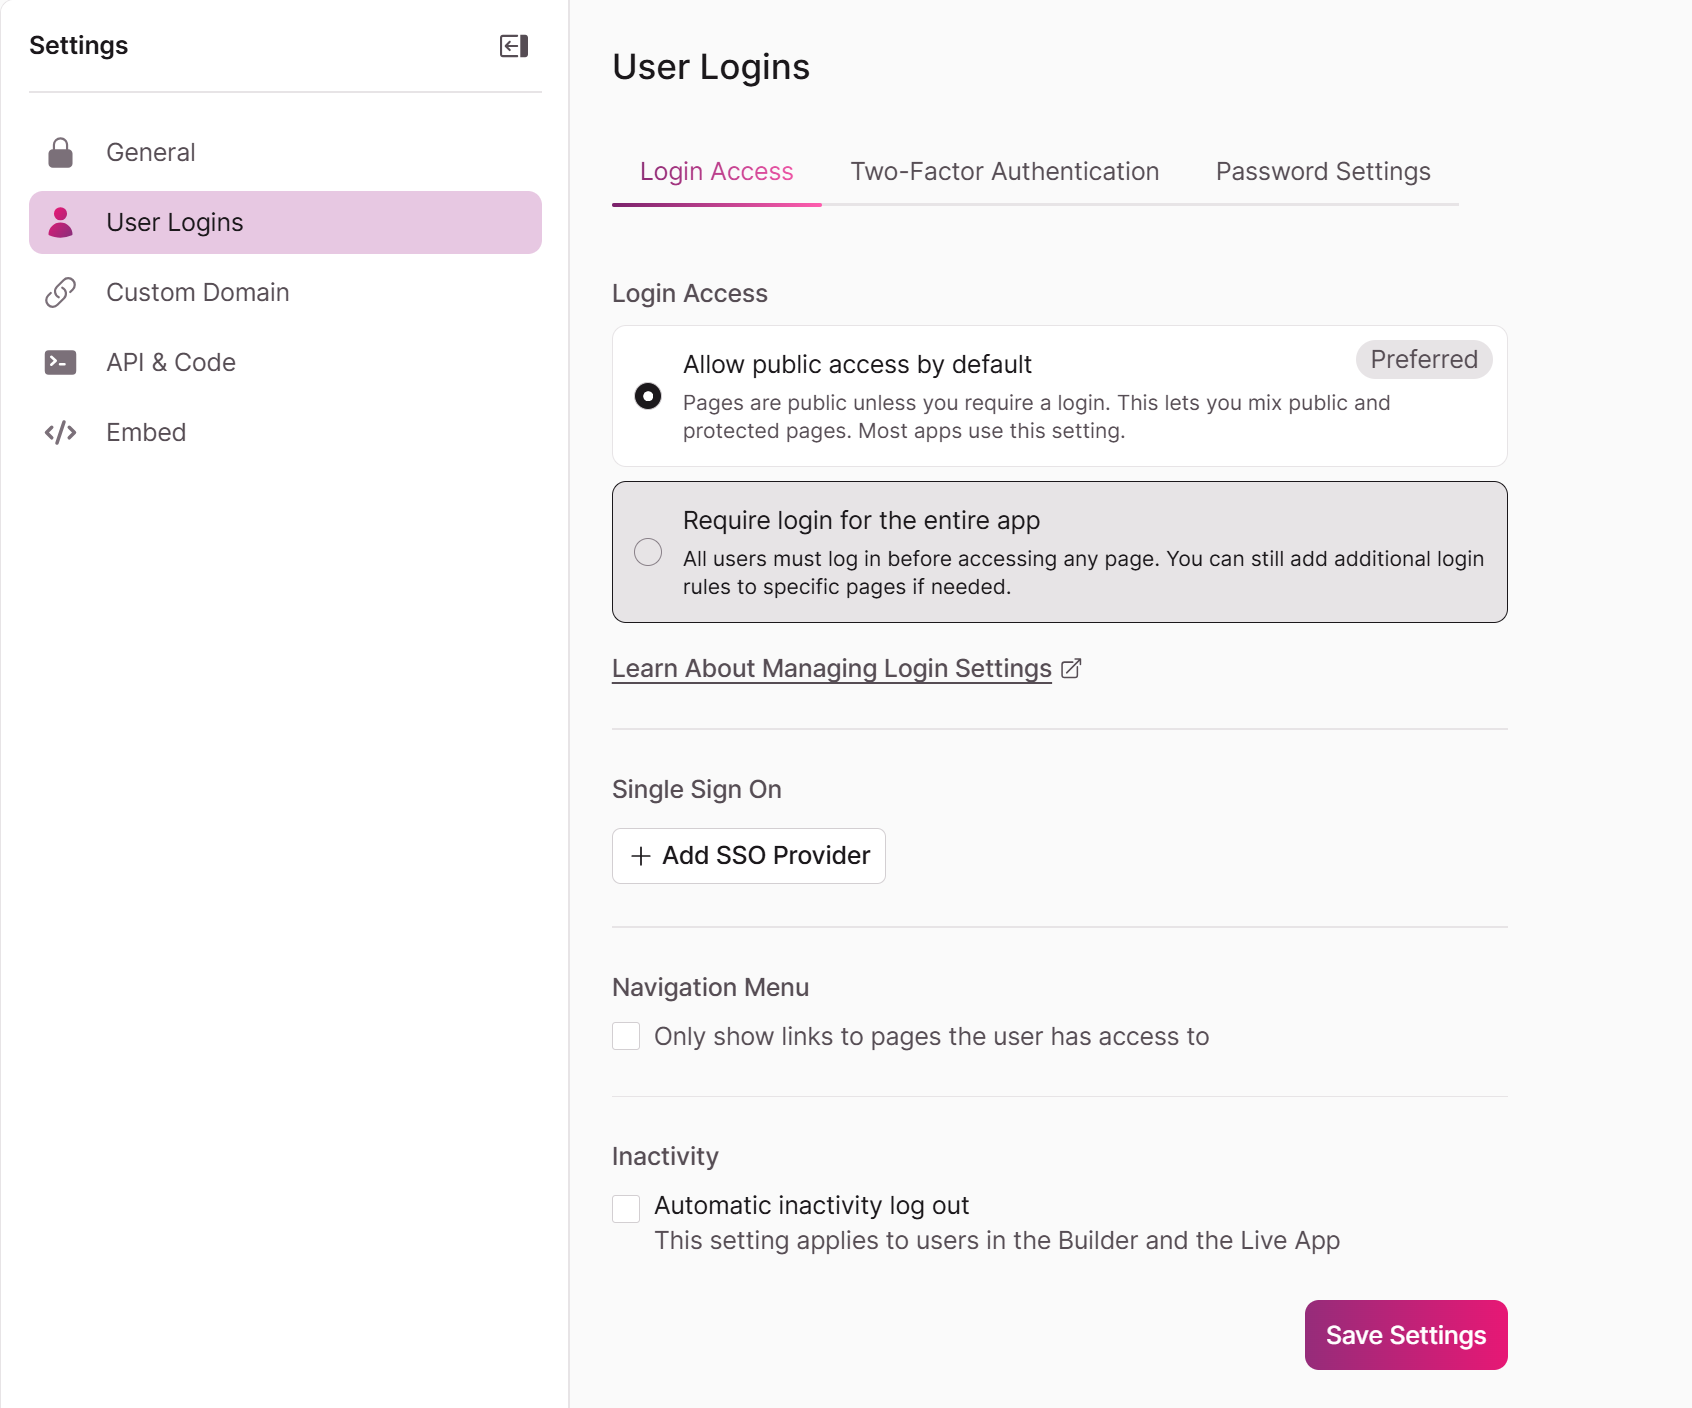
Or,in the Knack Builder, go to Pages and open the login page where you want to add SSO, go to the Access tab, and select +Add New SSO Provider
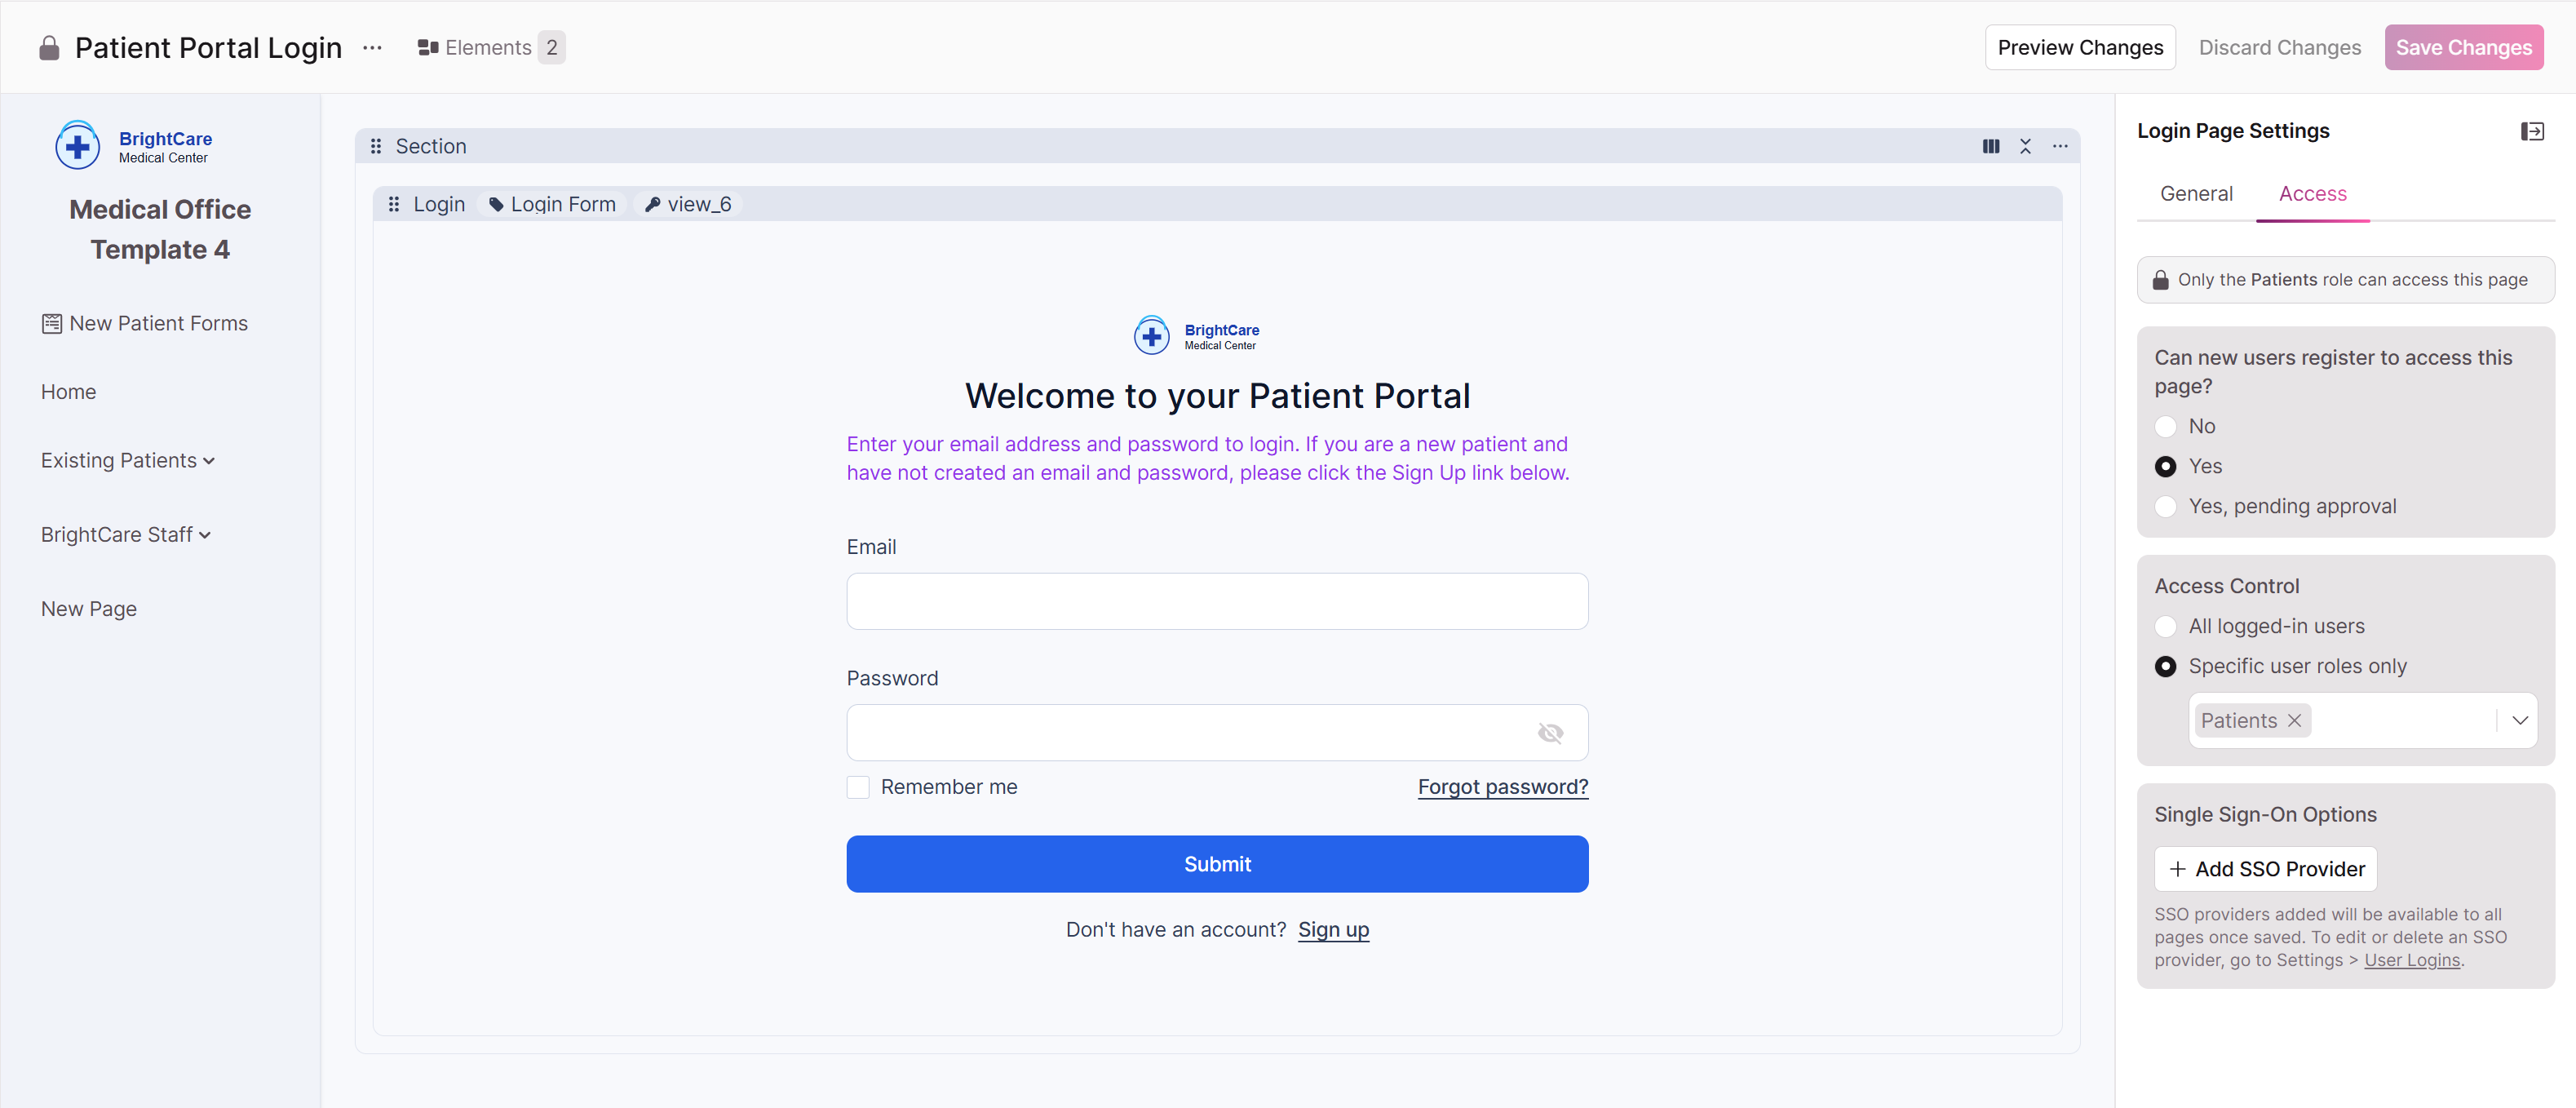
- Click on the login view to open its settings.
- Click Add SSO Credentials and select SAML from the Provider Type dropdown.

We will be using Okta as an IdP for example purposes in the following screenshots
-
Under Login Button, fill in the following:
- Provider Name: A short, display-friendly name for the login button (e.g.,
Okta). No spaces allowed, and this cannot be changed after saving. - Button Icon: Upload your IdP or company logo (optional, 5 MB max).
- Button Color / Button Font Color: Customize to match your branding.
- Provider Name: A short, display-friendly name for the login button (e.g.,
-
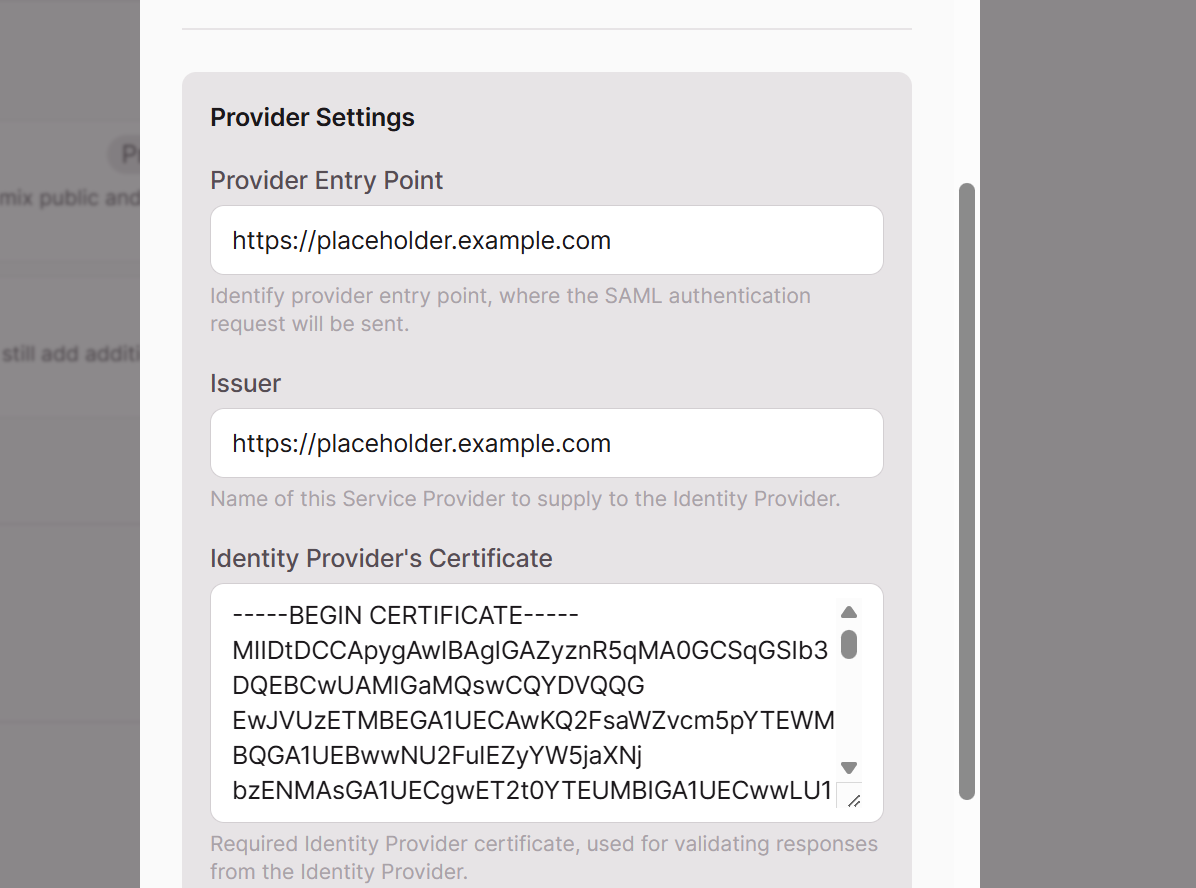
Under Provider Settings, enter placeholder values for now:
- Provider Entry Point:
https://placeholder.example.com - Issuer:
https://placeholder.example.com - Identity Provider's Certificate: Paste the following placeholder certificate:
- Provider Entry Point:
-----BEGIN CERTIFICATE-----
MIIDtDCCApygAwIBAgIGAZyznR5qMA0GCSqGSIb3DQEBCwUAMIGaMQswCQYDVQQG
EwJVUzETMBEGA1UECAwKQ2FsaWZvcm5pYTEWMBQGA1UEBwwNU2FuIEZyYW5jaXNj
bzENMAsGA1UECgwET2t0YTEUMBIGA1UECwwLU1NPUHJvdmlkZXIxGzAZBgNVBAMM
EmludGVncmF0b3ItMzIzMzUyNjEcMBoGCSqGSIb3DQEJARYNaW5mb0Bva3RhLmNv
bTAeFw0yNjAzMDMxMjExMjRaFw0zNjAzMDMxMjEyMjRaMIGaMQswCQYDVQQGEwJV
UzETMBEGA1UECAwKQ2FsaWZvcm5pYTEWMBQGA1UEBwwNU2FuIEZyYW5jaXNjbzEN
MAsGA1UECgwET2t0YTEUMBIGA1UECwwLU1NPUHJvdmlkZXIxGzAZBgNVBAMMEmlu
dGVncmFADggEPADCCAQoCggEBALo3za0g/4+WKaS8hIYlqoNq
unSZ9mjyahXVzf/kXGii10X5fRTrv9VtZCXKR2b8nZLgDd4x54EhsQcE2Uh4/UKM
6kwD36Ai3rp3rXRer+gVtiabYcSCM5tEyYk/MT9Ji6HG3pGQuq7zXlLEw827kJNN
rVyhw3Nt8jy96QUAafBurKb/FXaoChxVybISA0gt98wzEagLmxZDQgSEl6gmViYg
VanHr6HkcvBGhLEW2b6GzbIPtxebUcFBkYbNGHm9n3FnLqD0qBTi6NUZ4zG5PpYJ
6avruhOD6My8bz9Q0O2yrozR1n//L4aeVU65HfRmOK7bI5yKkQrrgt6hawz/8E8C
AwEAATANBgkqhkiG9w0BAQsFAAOCAQEAhr+hOybErzjCKSdeQCT17eSlrgL2gP3i
dBgPSdfEnWMF7k5X5vK+/DB4N6Iowv6ETOwSGnbH9ehroRdyybGgCn90Xp5Uv2zr
0D8hHe4yuB41EJOg68MVDcvSEVOt6x+Wf6TyB21GqAlQqRXrZmV1m7YvpWvlEGx5
DhT0ZewT21f2vxwqP1NPdVRkuP9QNTSOFWm4JwnWbsZScR93jXRn4qUO92nPhno
koHDpZxuisWKyfX4HKvDt2XuMxn2Ym7z1Lo+gNSjl2R3KeZfBg0MqktLvVWx7J8z
SATjBbGVLlLgWjx5WMu6KVlK03bBcYf0CMTkbex0qqLlNtFr9xFTg6g==
-----END CERTIFICATE-----This is a placeholder certificate to allow you to save the form. You will replace it with the real IdP certificate later
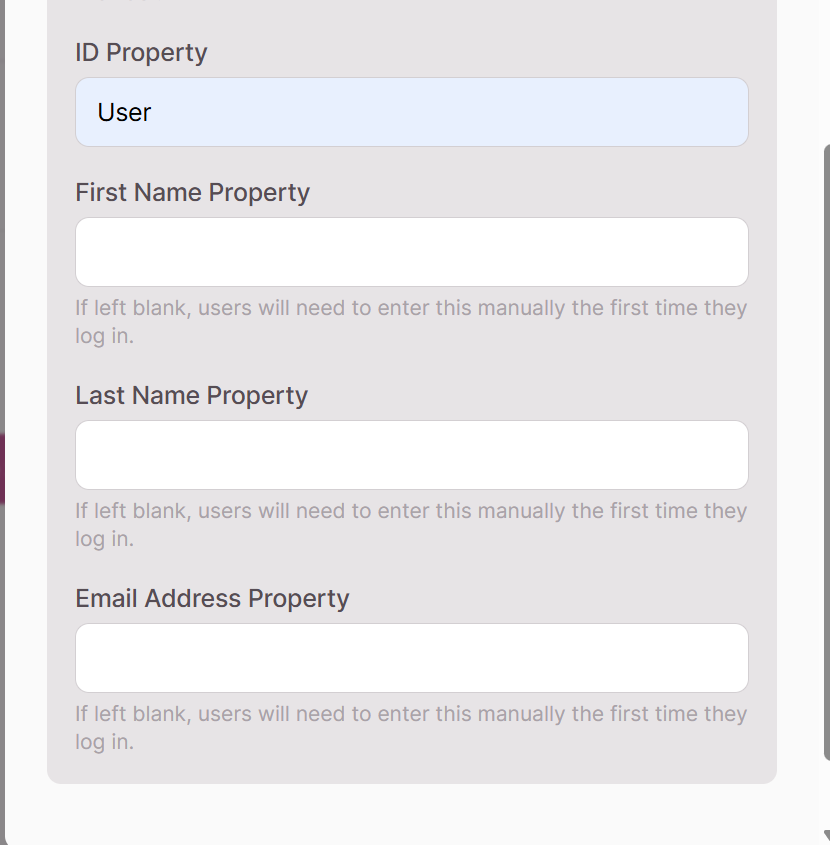
In the ID Property, enter User
- Click Save SSO Provider.
Step 2: Download the Knack Metadata File
With the provider saved, Knack generates an XML metadata file that contains the configuration details the IdP needs.
- In Settings > User Logins > Login Access, select the SAML provider you just created.
- Click the Download icon
- Save the XML file to your computer — you'll need it in the next step.
The key value you'll need is the
LocationURL inside the<AssertionConsumerService>element
Step 3: Create a SAML App in your IdP
These examples are specific to Okta and may vary based on your Identity Provider
Now switch over to your Okta Admin Console to set up the app integration.
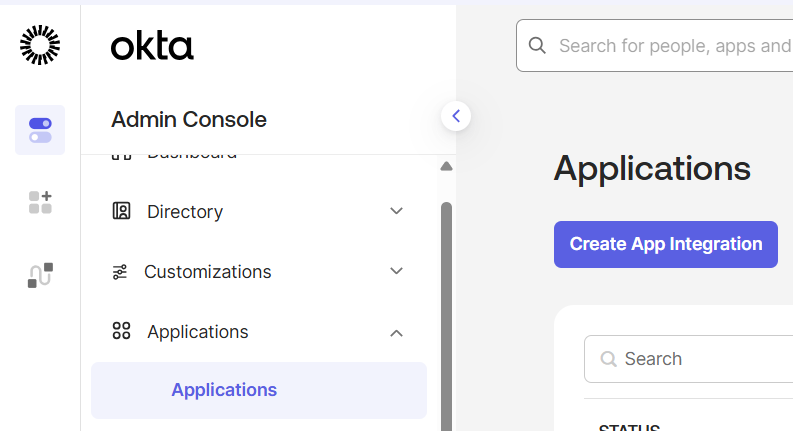
- Log in to your Okta Admin Console.
- In the left-hand navigation, go to Applications > Applications.
- Click Create App Integration.
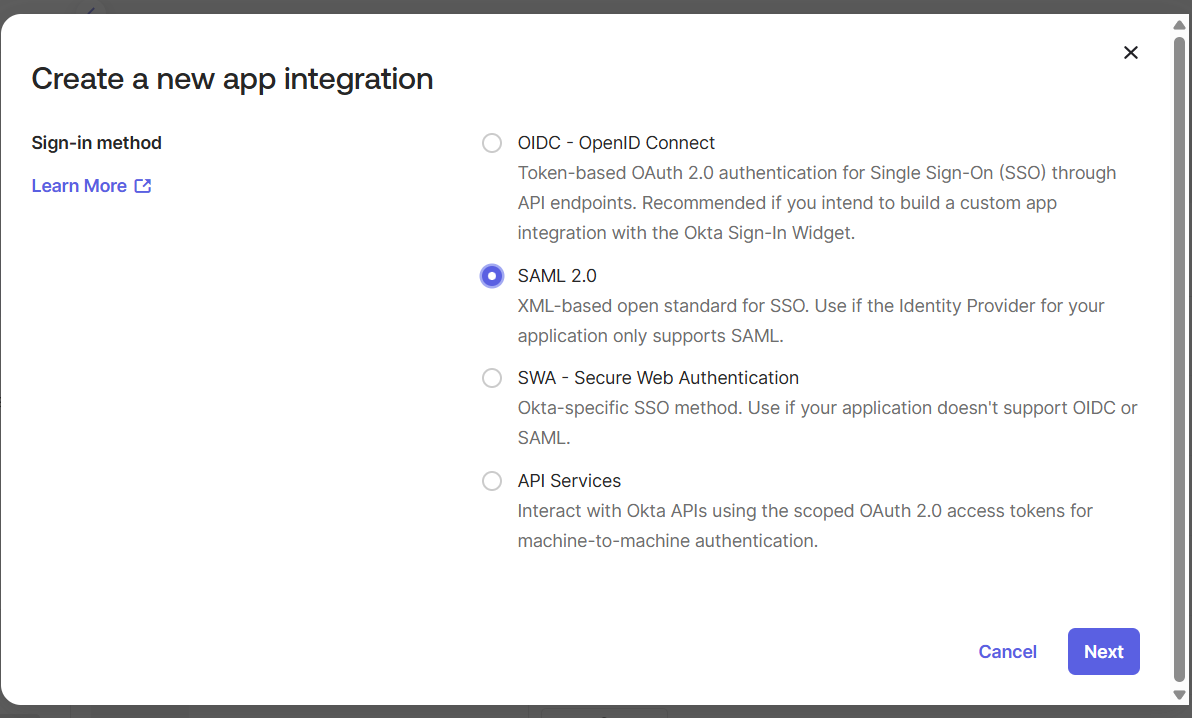
- In the dialog that appears, select SAML 2.0 as the Sign-in method.
- Click Next.
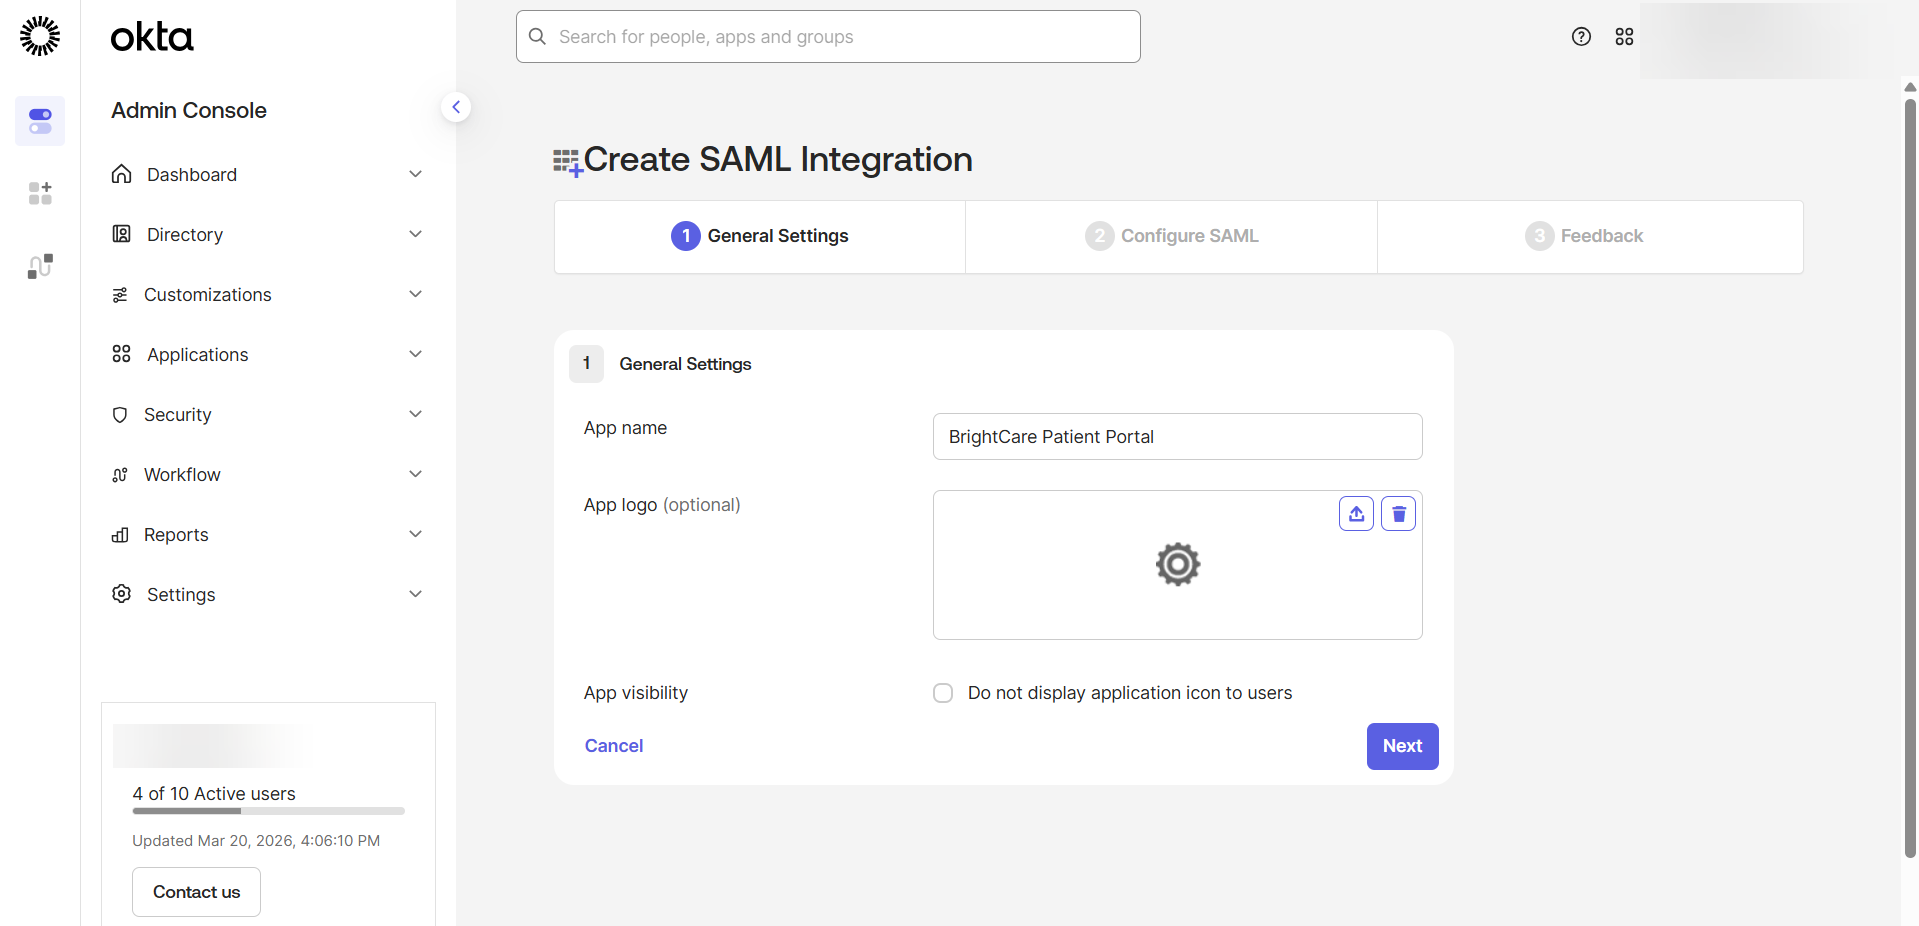
- On the General Settings tab, enter a name for your app (e.g.,
BrightCare Patient Portal). - Optionally upload an app logo.
- Click Next.
Step 4: Configure the SAML Settings in Okta
This is where you connect Okta to your Knack app using the metadata file you downloaded.
- Open the Knack metadata XML file you've downloaded

- Find the
Locationattribute inside the<AssertionConsumerService>tag. It will look something like:https://us-east-1-builder-read.knack.com/v1/live-app/appslug/liveappslug/sso/saml/okta/acs - In Okta, on the Configure SAML tab, enter the following:
| Okta Field | Value |
|---|---|
| Single sign-on URL | Paste the Location URL from the Knack metadata file |
| Audience URI (SP Entity ID) | Paste the same Location URL |
| Name ID format | EmailAddress |
| Application username | Email |

Note: You can leave all other settings at their defaults unless you have a specific reason to change them.
- Click Next.
- Click Finish.
Step 5: Map User Attributes
Attribute statements tell Okta which user profile fields to include in the SAML assertion it sends to Knack. Without these, Knack won't know the user's name or email.
- Navigate to Applications > Sign on:
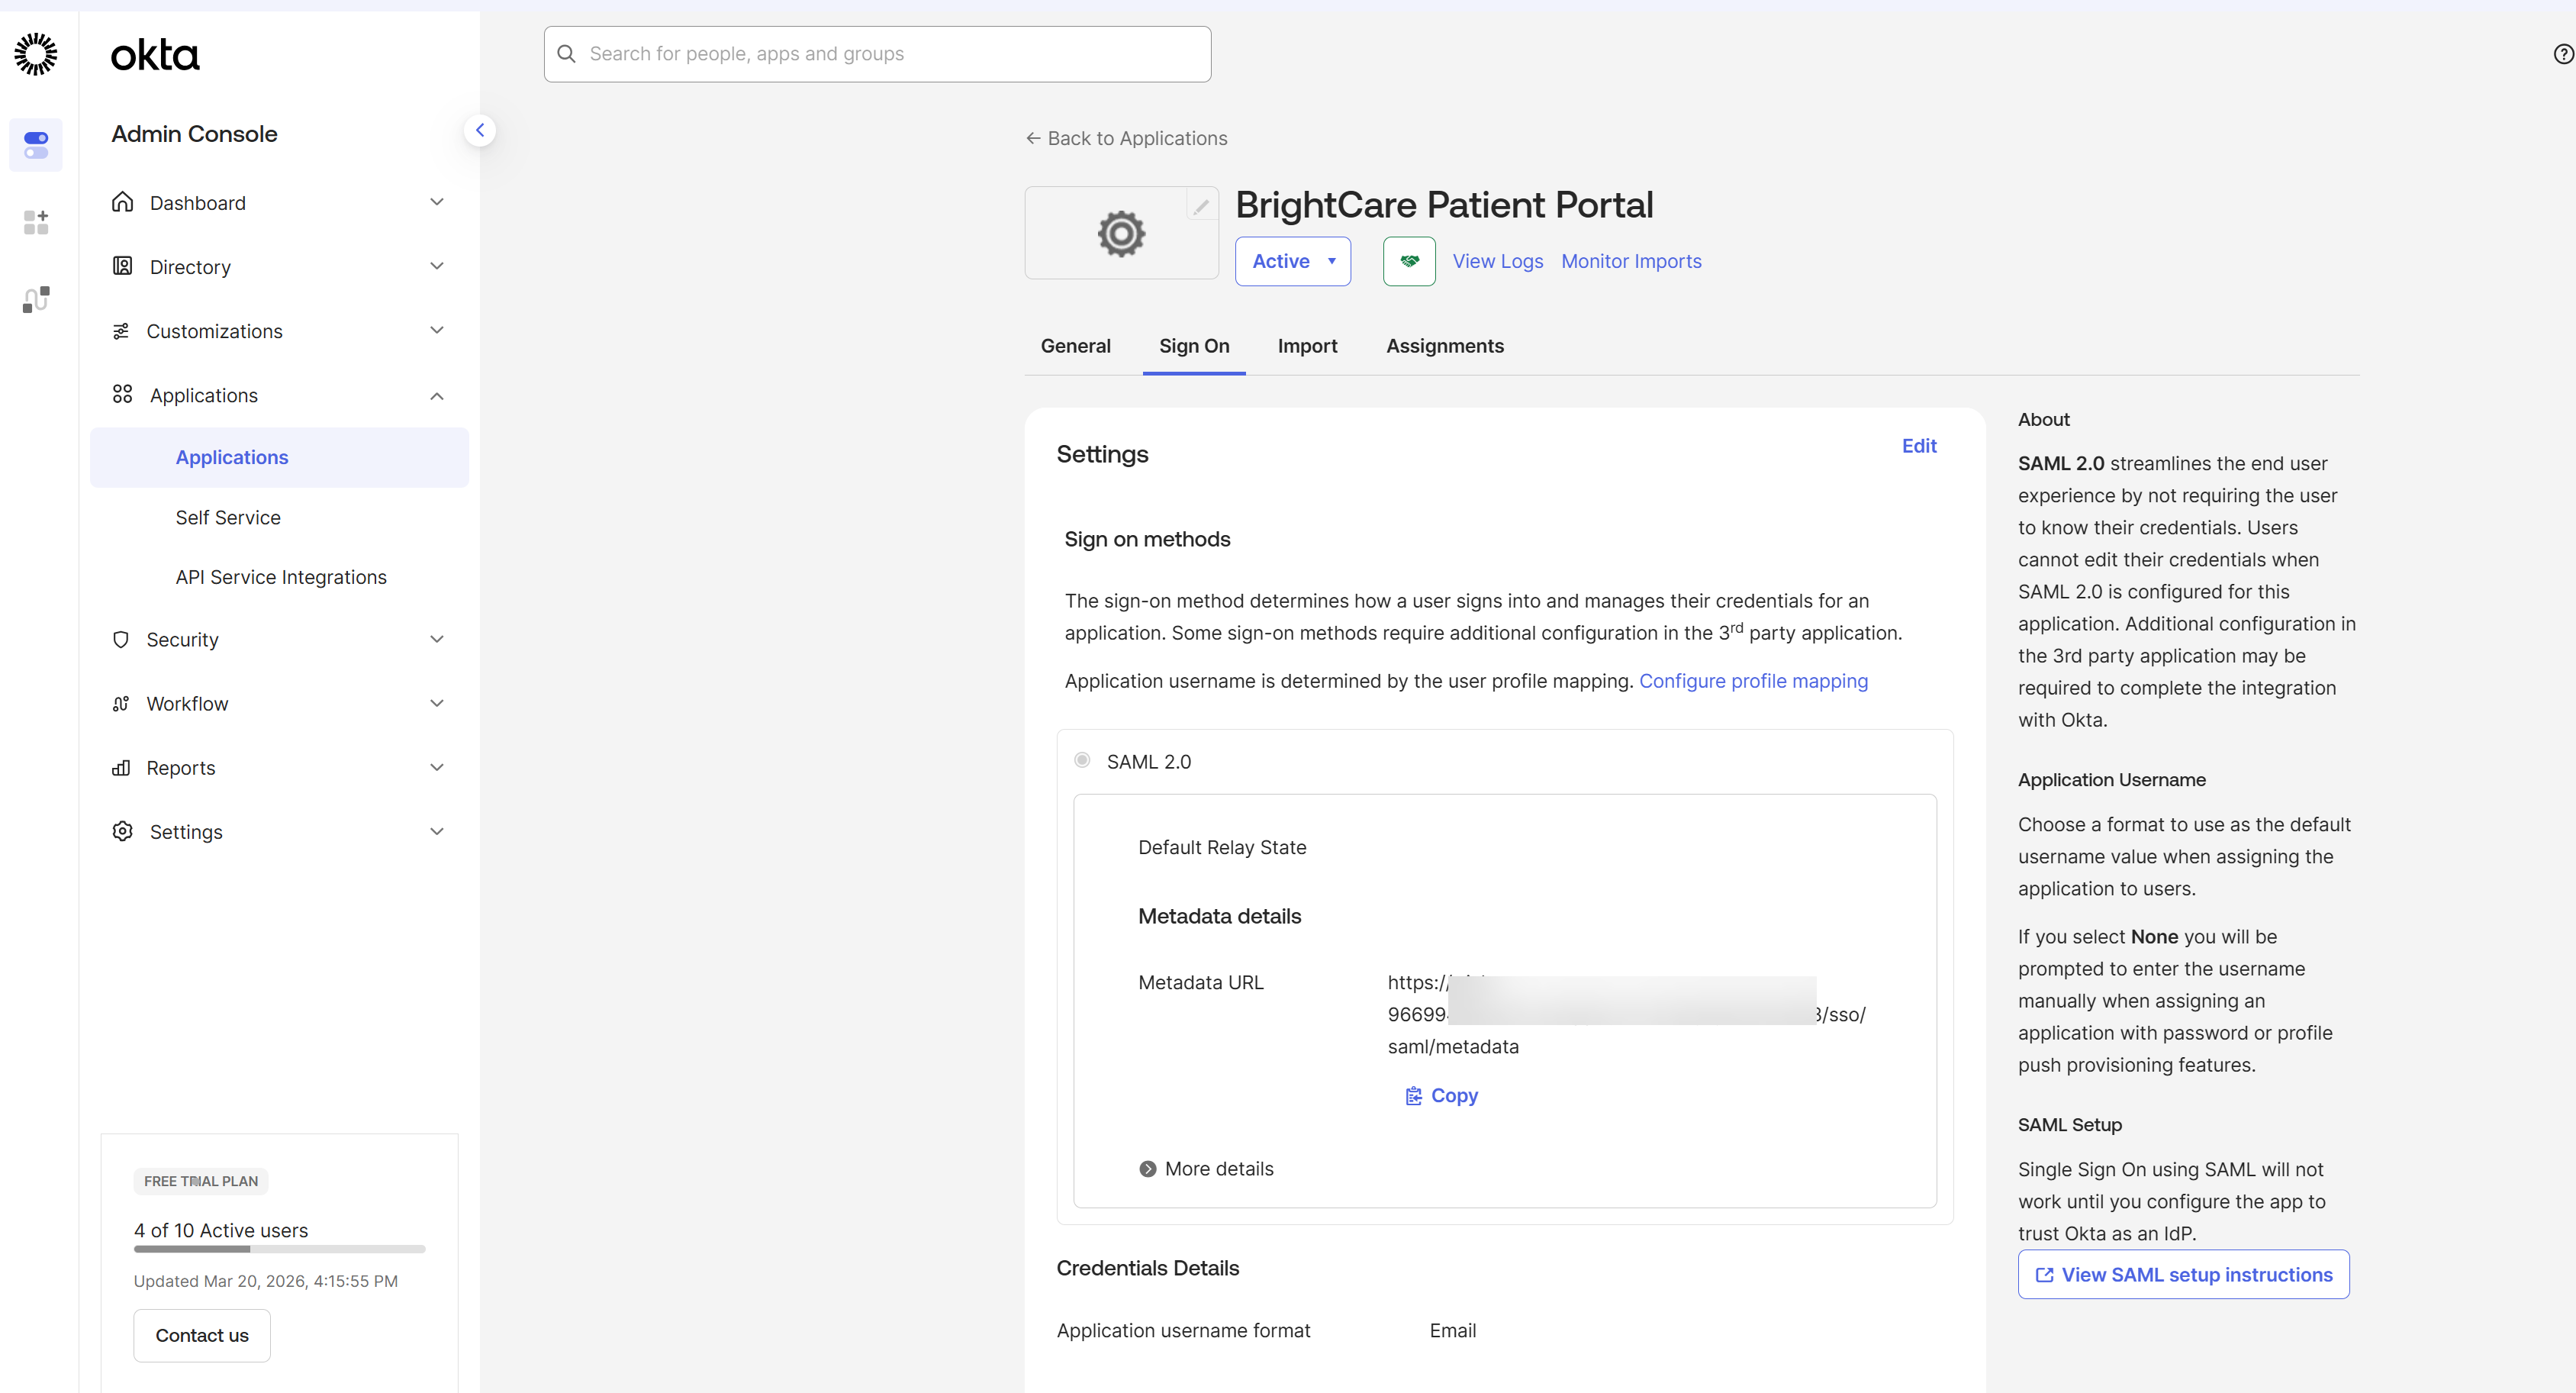
Scroll to Attribute Settings. Expand the Show Legacy option and select Edit.
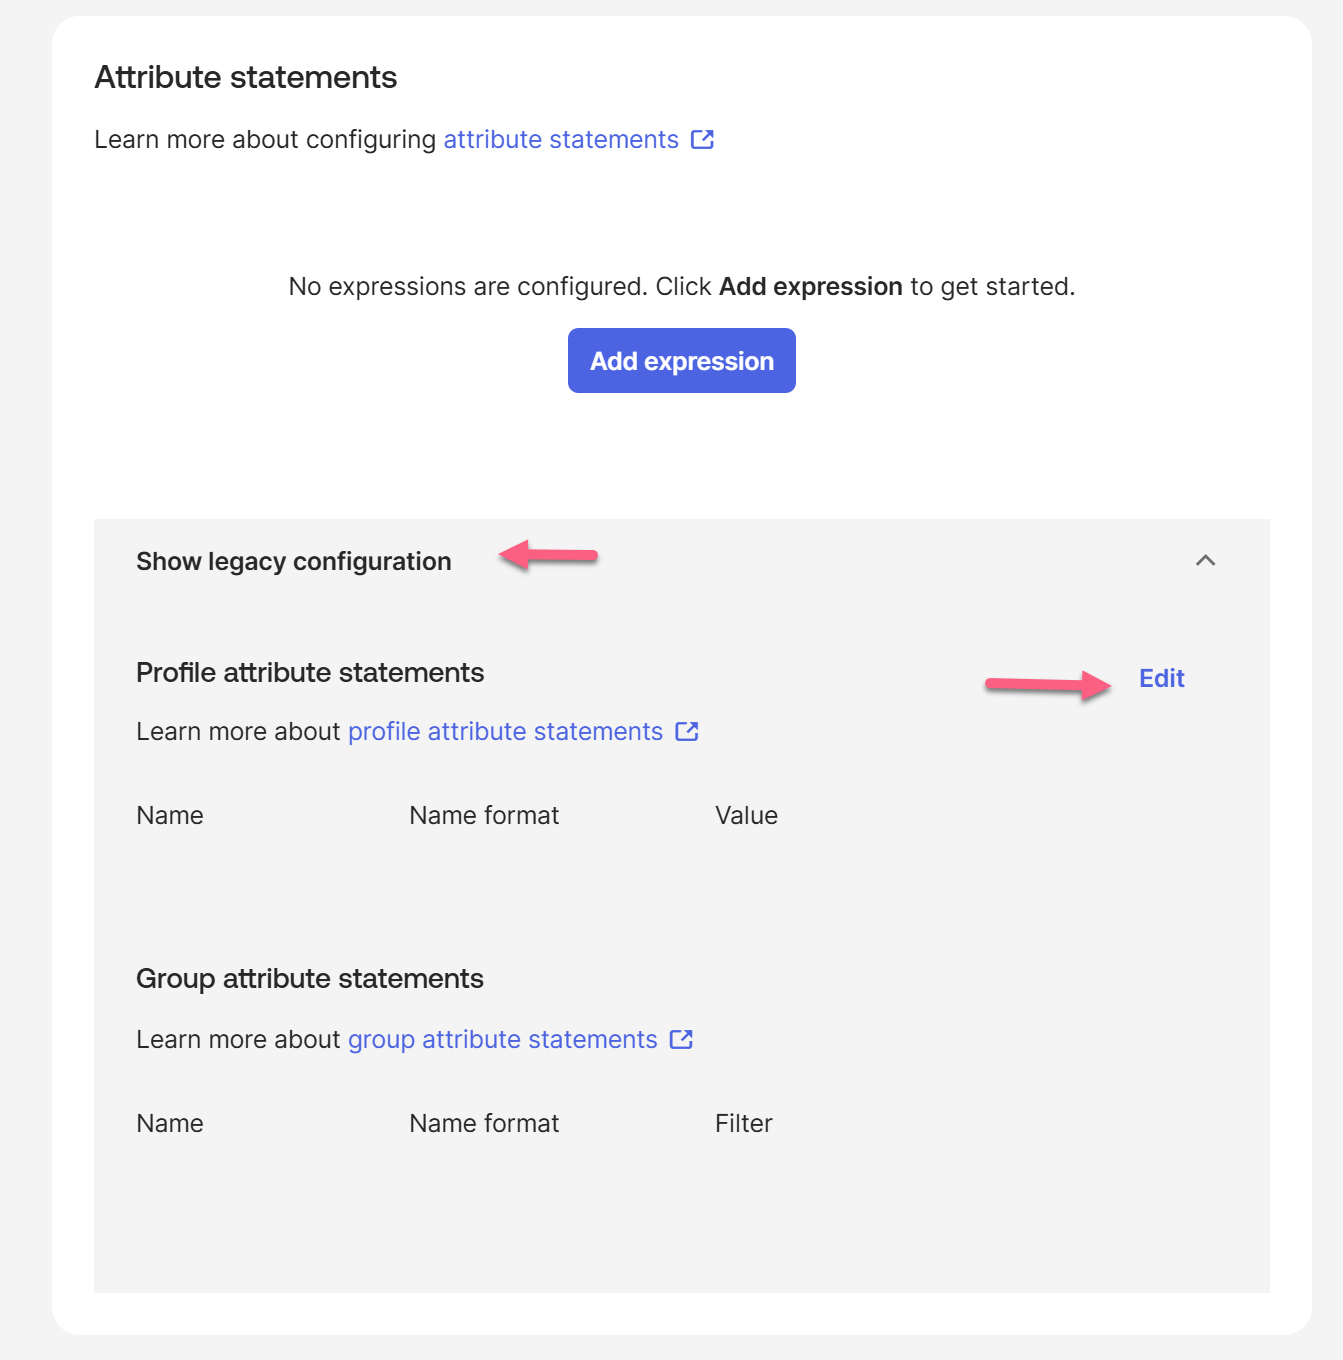
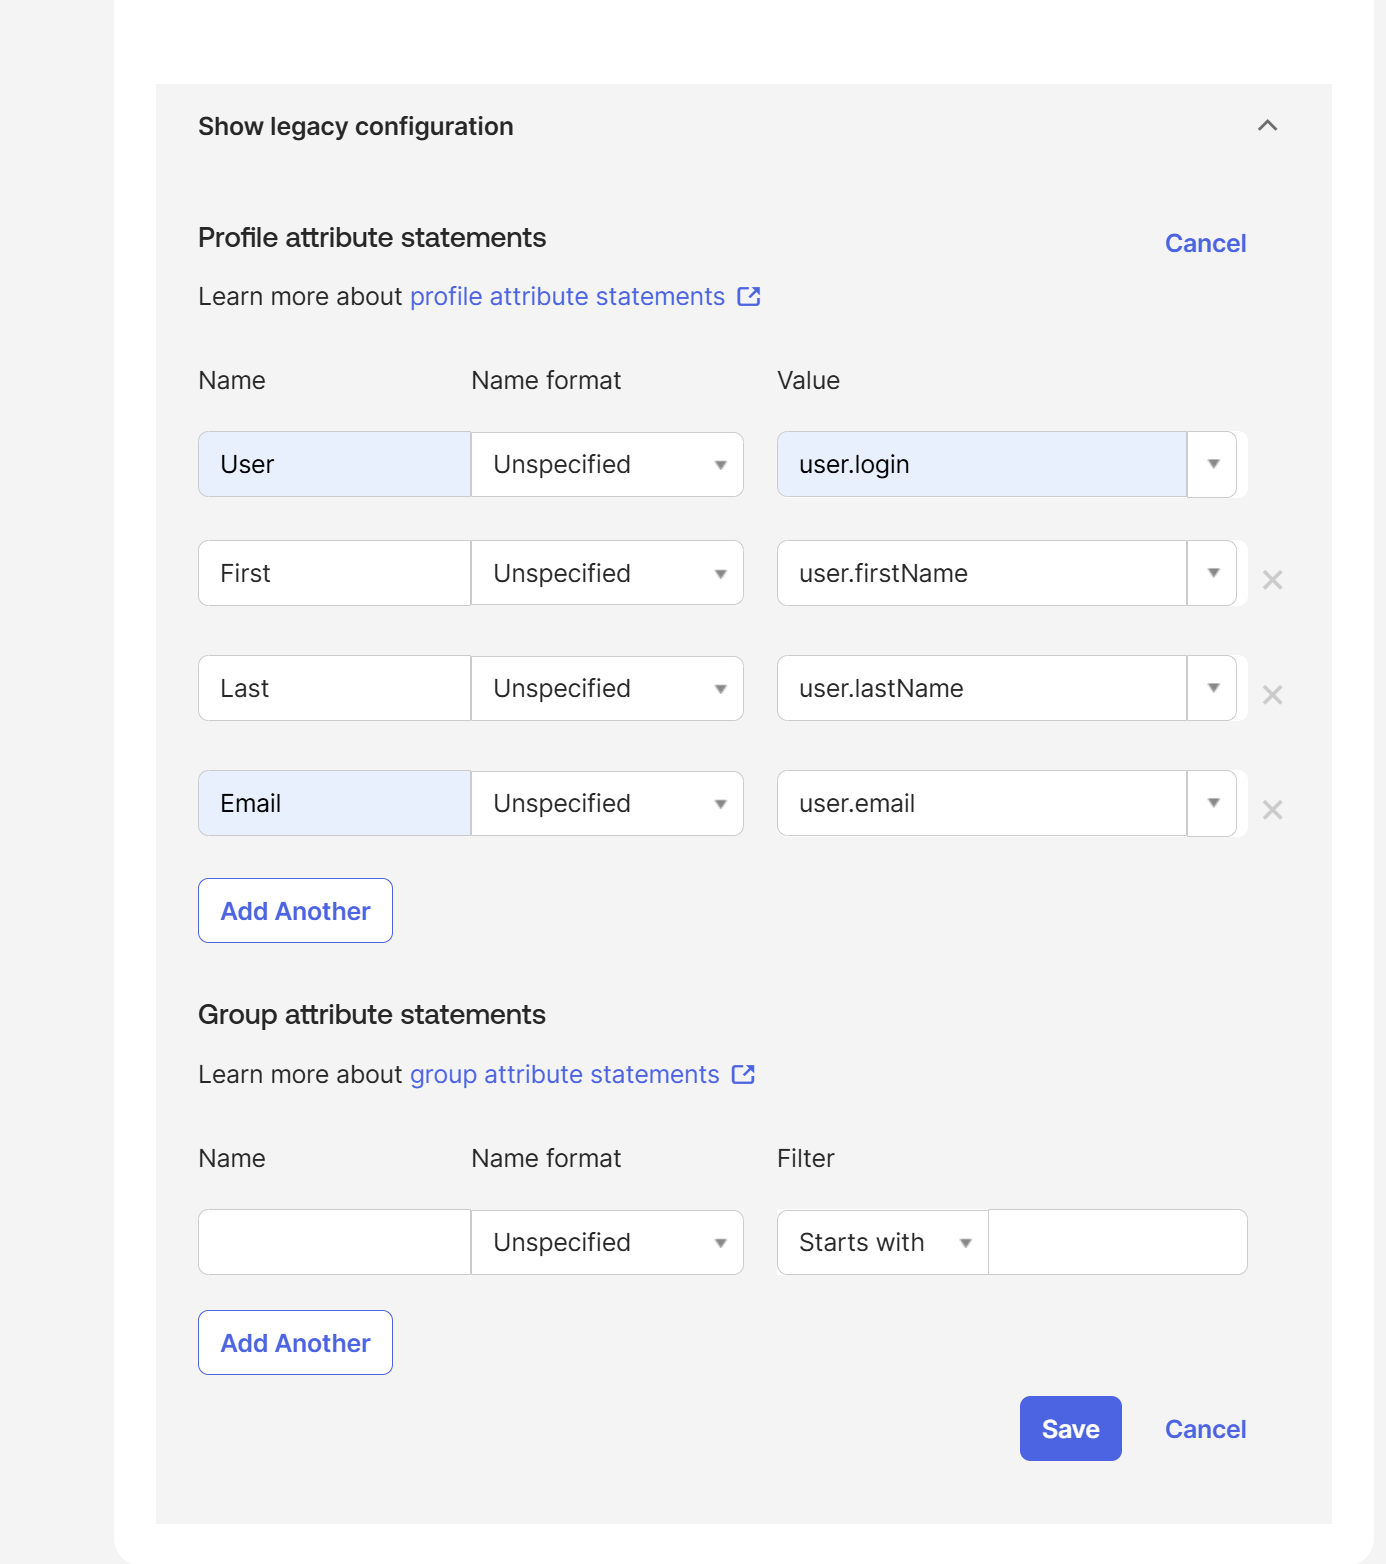
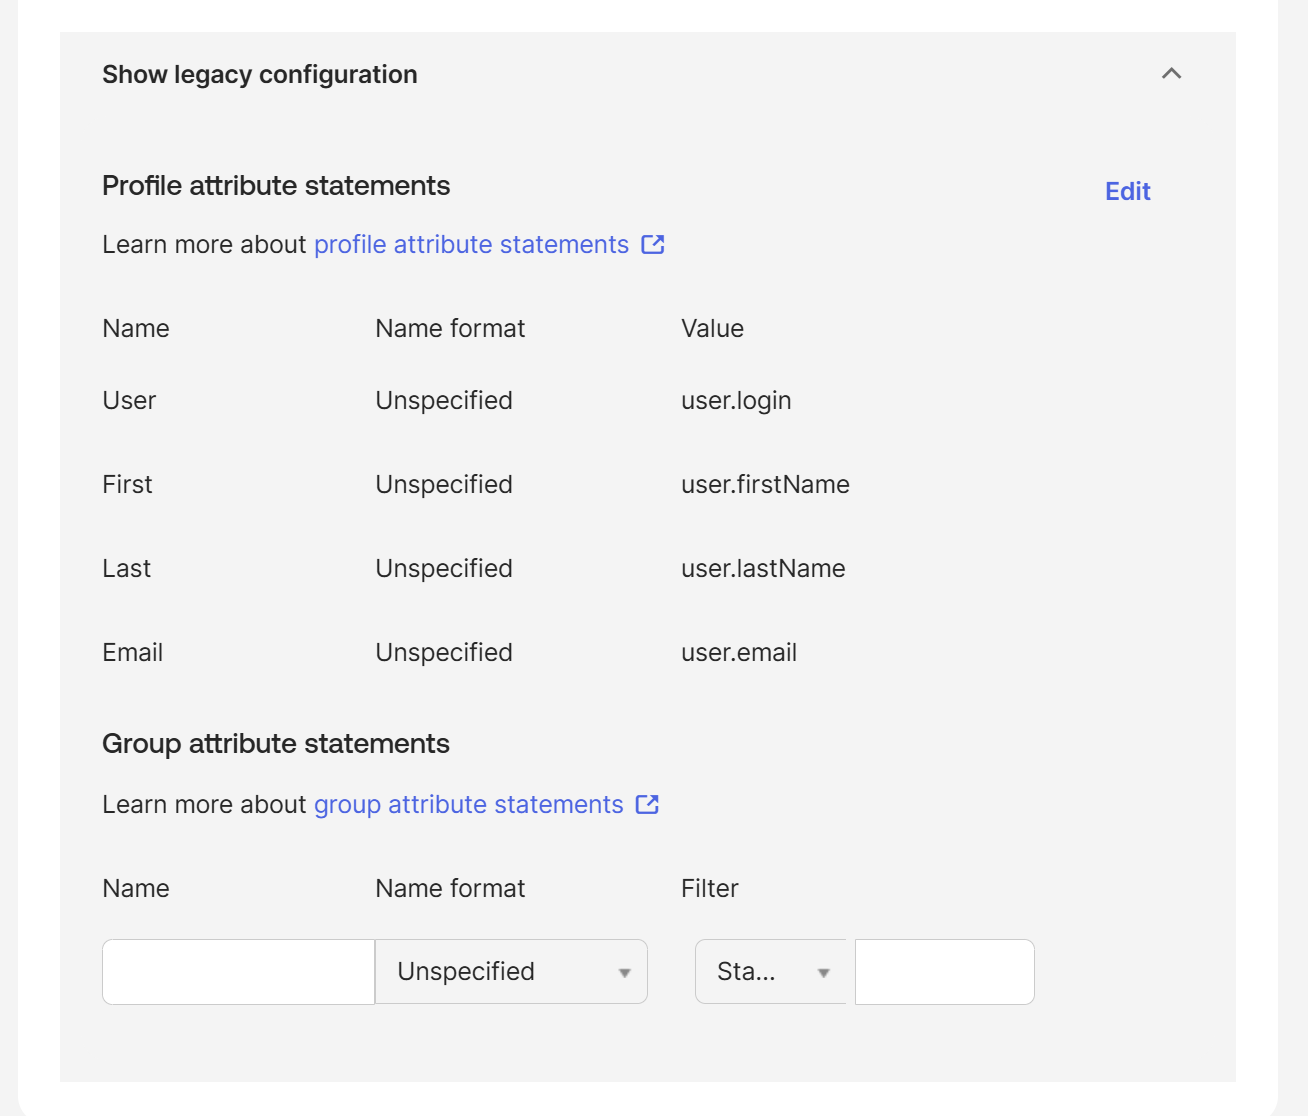
Add the following four attribute mappings exactly as shown. Capitalization matters — these names must match what you'll enter in Knack. Click Save.
| Name | Name Format | Value |
|---|---|---|
User | Unspecified | user.login |
First | Unspecified | user.firstName |
Last | Unspecified | user.lastName |
Email | Unspecified | user.email |
Step 6: Copy Okta's Settings Back into Knack
After finishing the Okta setup, Okta provides the real values you need to finalize your Knack configuration.
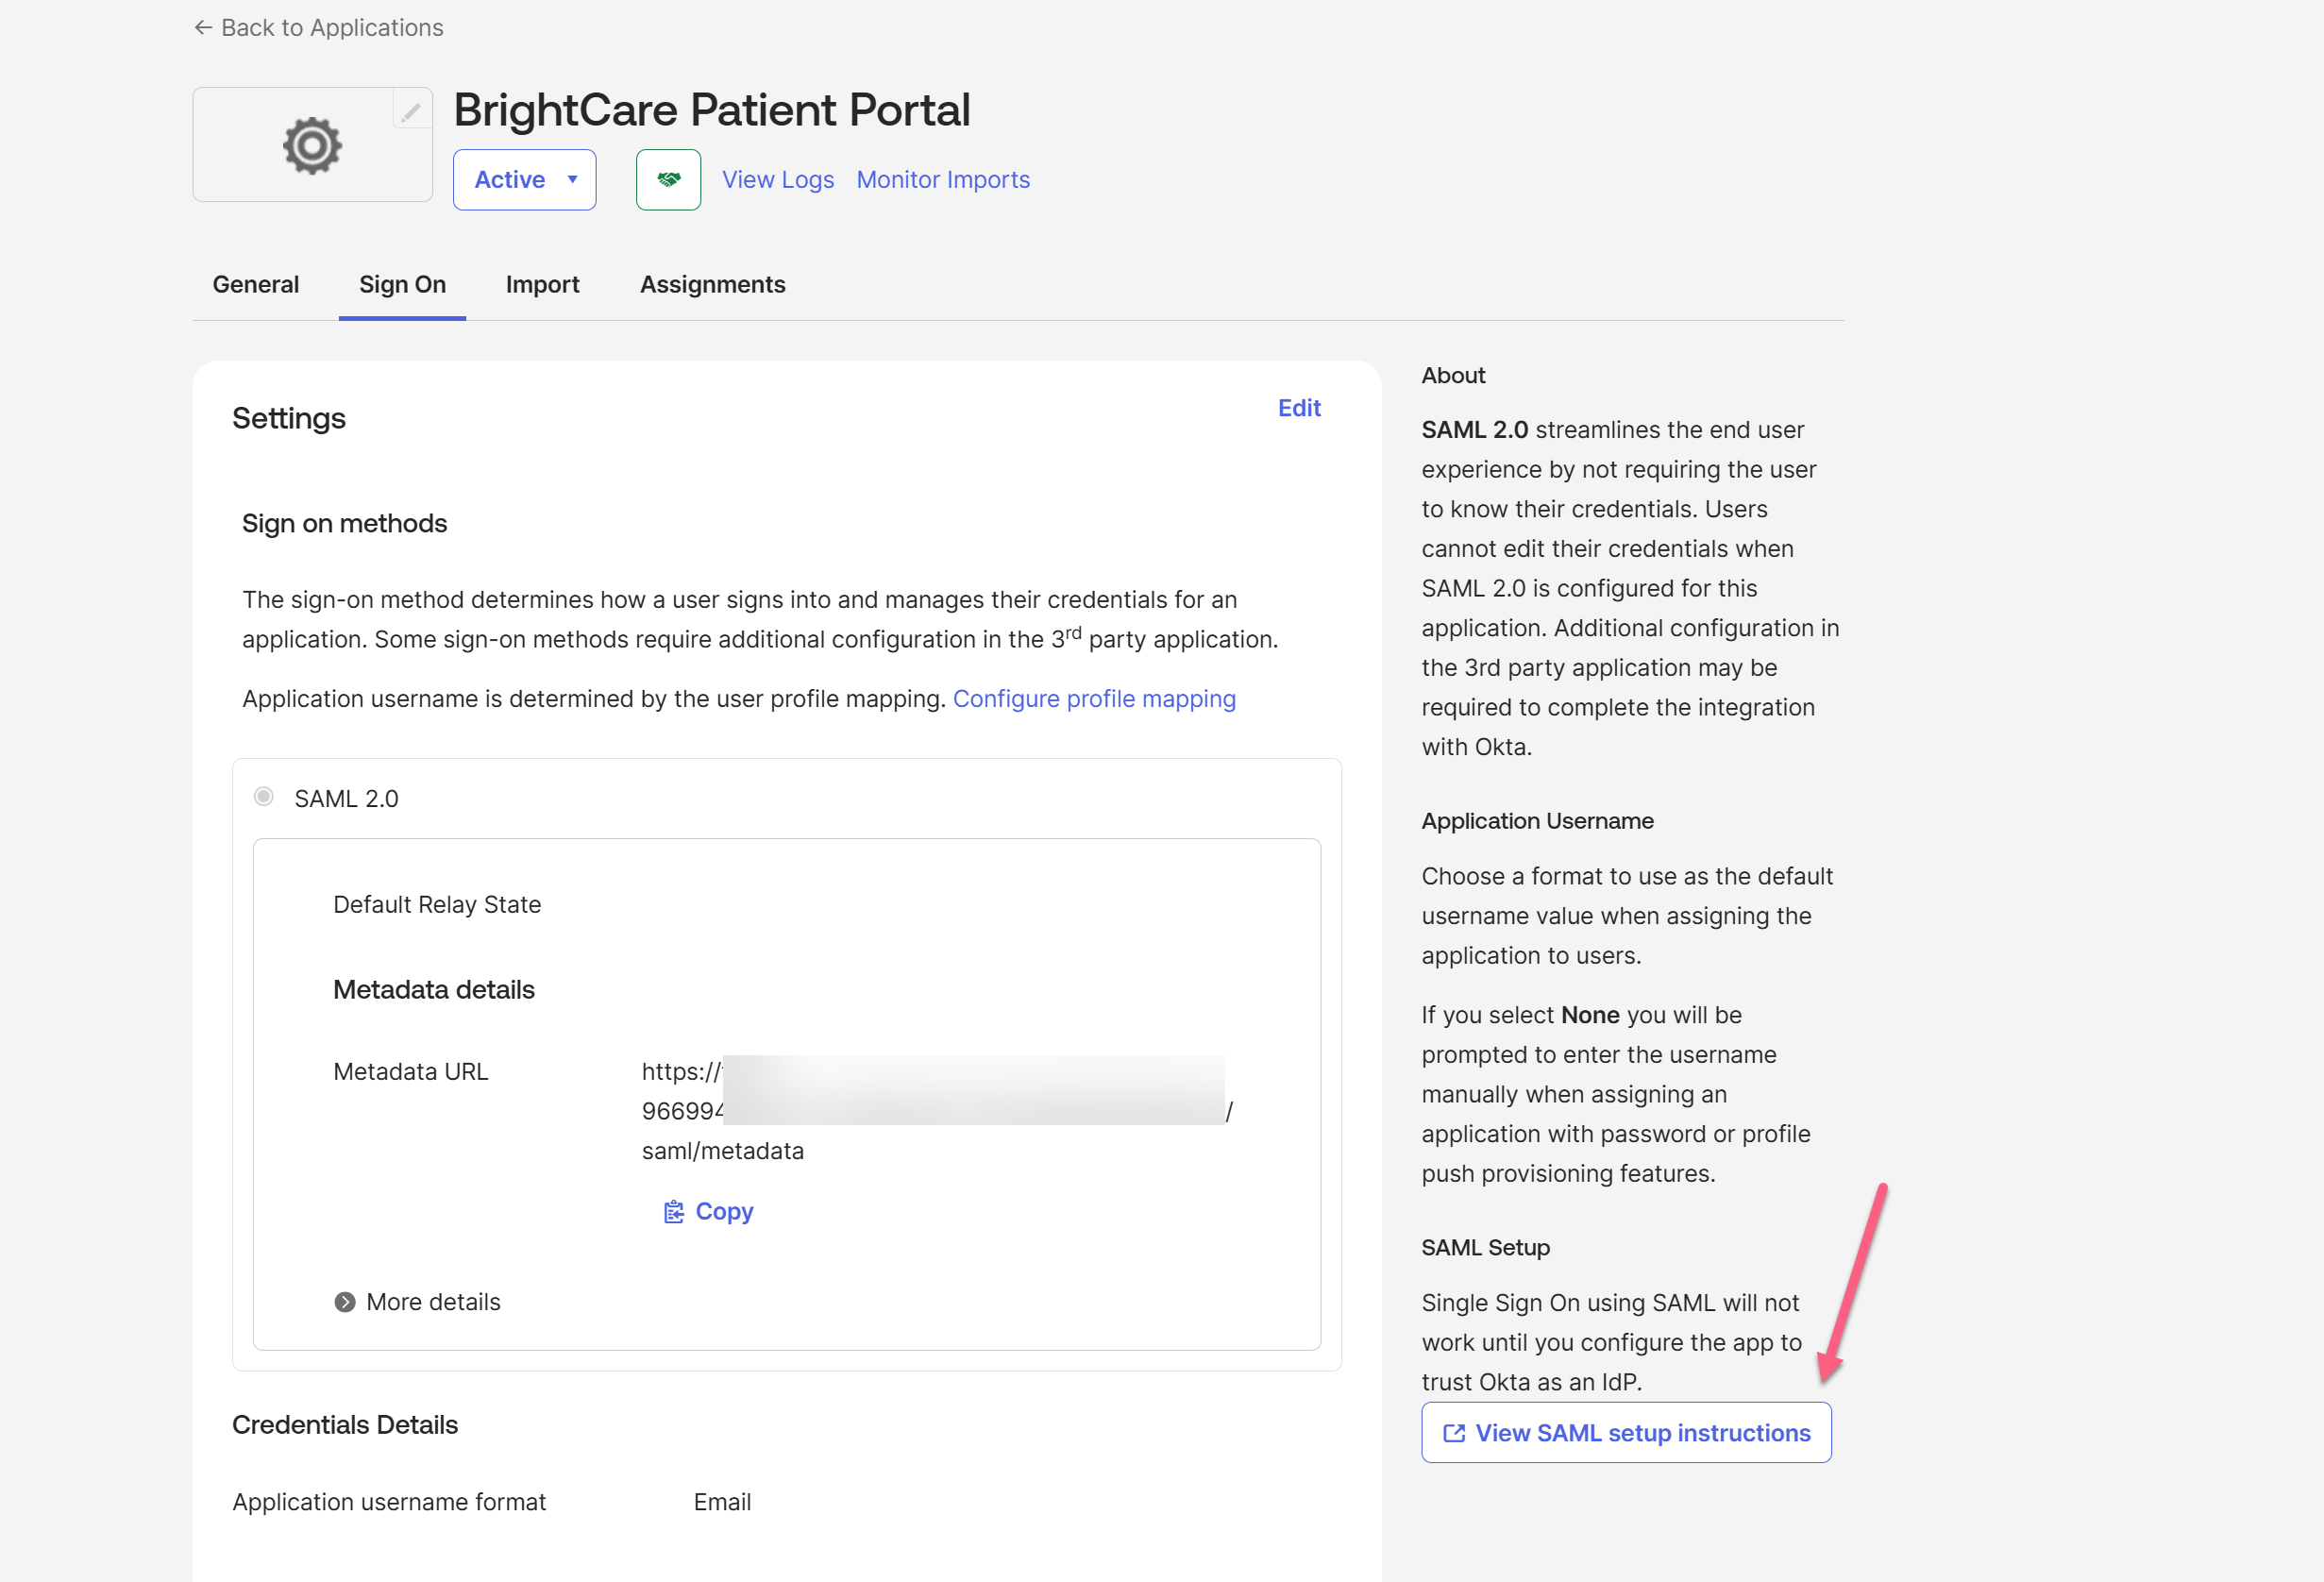
- In Okta, while on the Sign On tab, scroll to the SAML Setup on the right pane
- Click View SAML setup instructions (or click the Identity Provider metadata link if available).
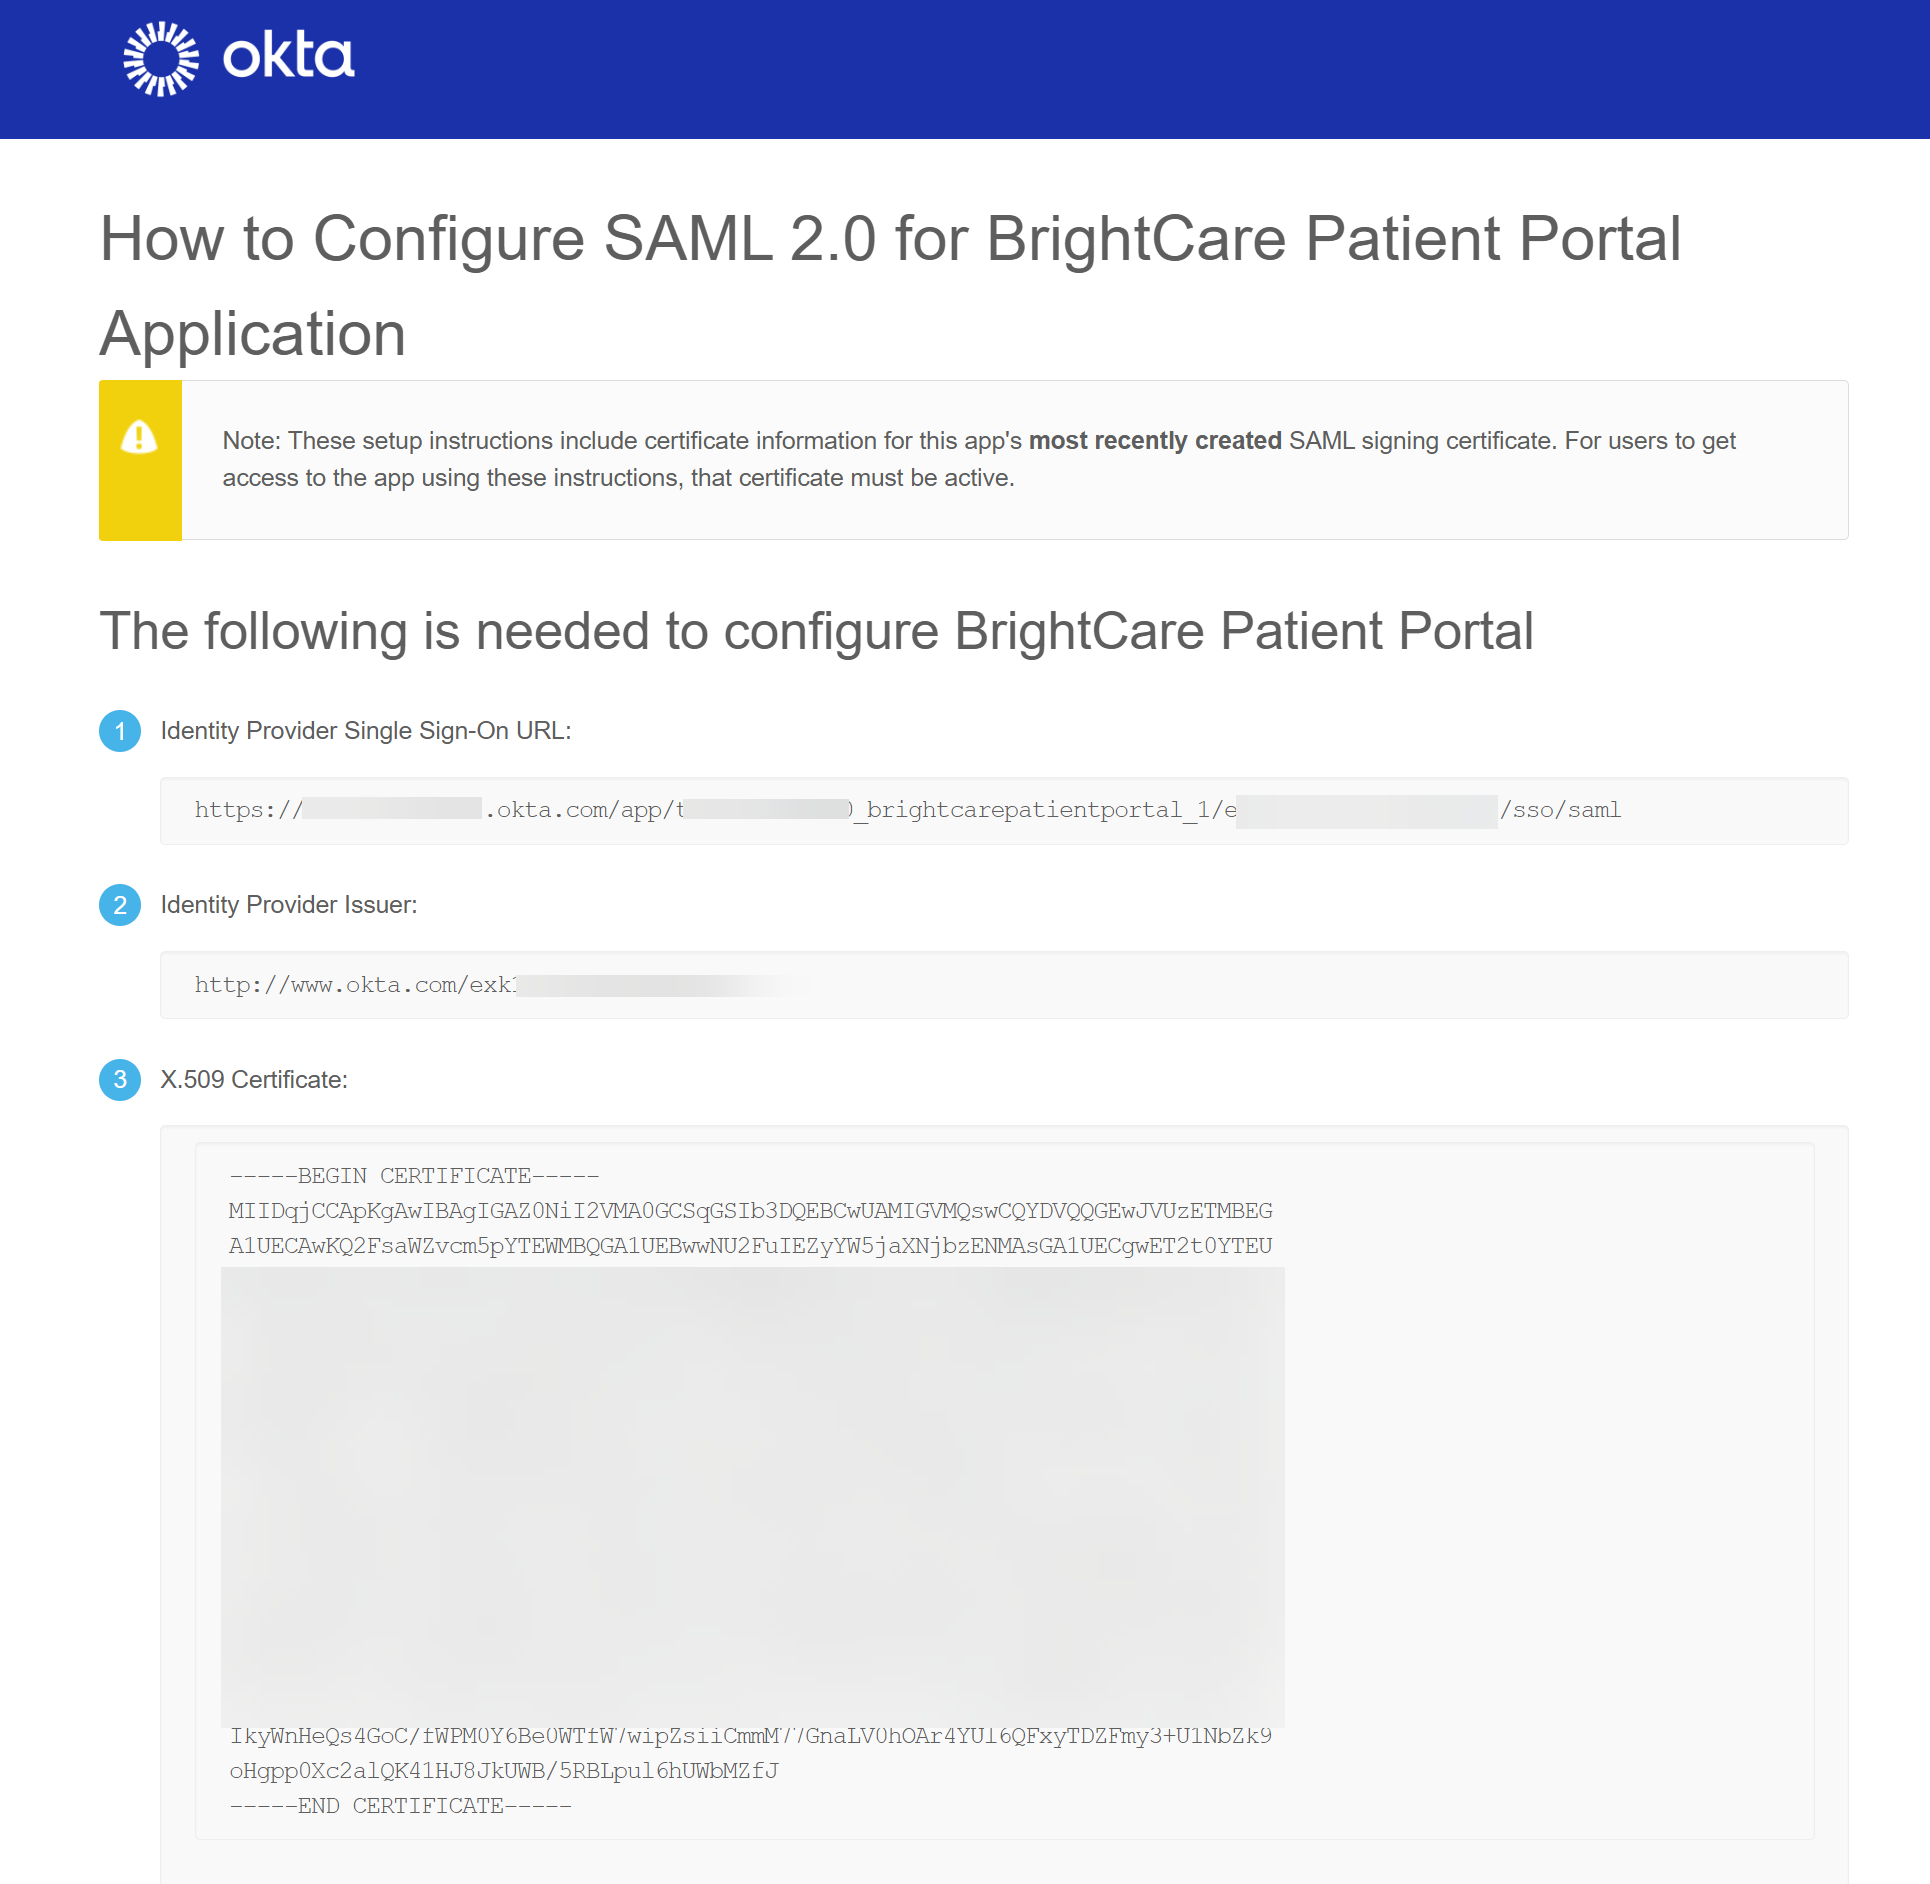
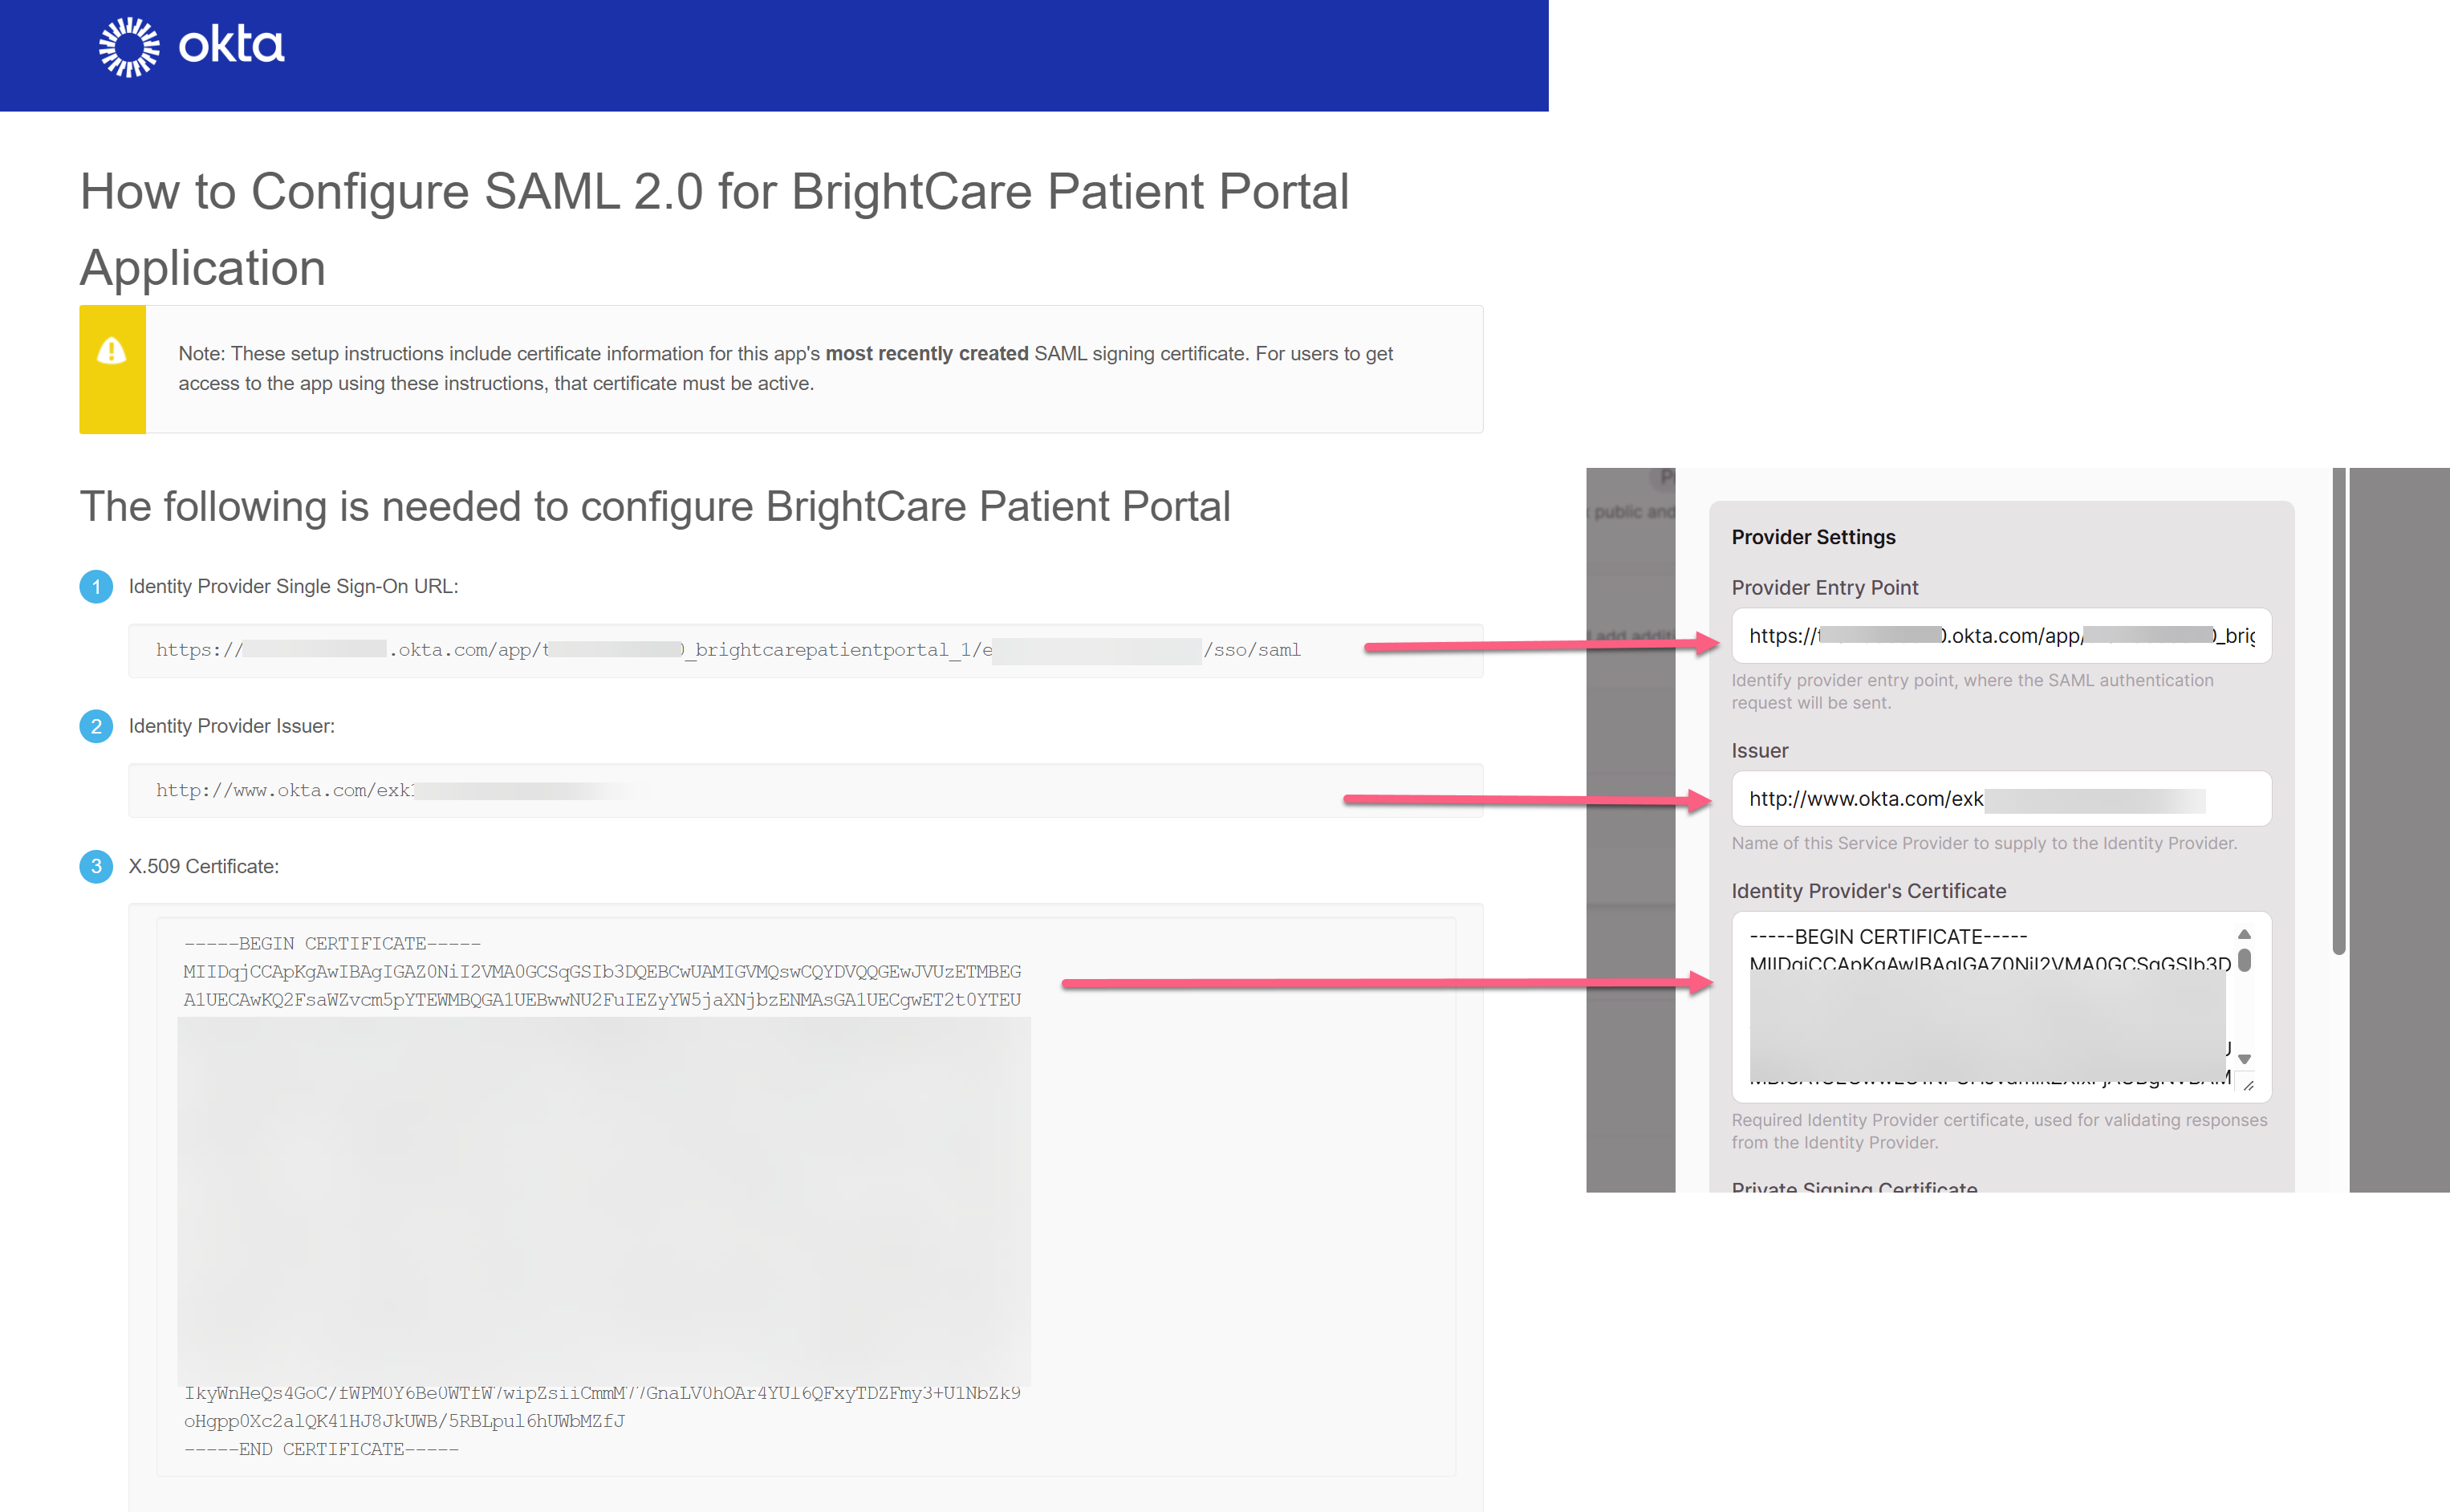
- From the setup instructions page, copy the following three values:
- Identity Provider Single Sign-On URL → this goes into Knack's Provider Entry Point field
- Identity Provider Issuer → this goes into Knack's Issuer field
- X.509 Certificate → this goes into Knack's Identity Provider's Certificate field
- Go back to your Knack Builder and open the SAML provider you created in Step 1.
- Replace the placeholder values with the real ones from Okta:
| Knack Field | Value from Okta |
|---|---|
| Provider Entry Point | Identity Provider Single Sign-On URL |
| Issuer | The Live App URL - e.g. https://apps.knack.com/accountslug/appslug |
| Identity Provider's Certificate | X.509 Certificate (include the -----BEGIN CERTIFICATE----- and -----END CERTIFICATE----- lines) |
- Scroll down to the user property mapping section and enter the attribute names exactly as you defined them in Okta:
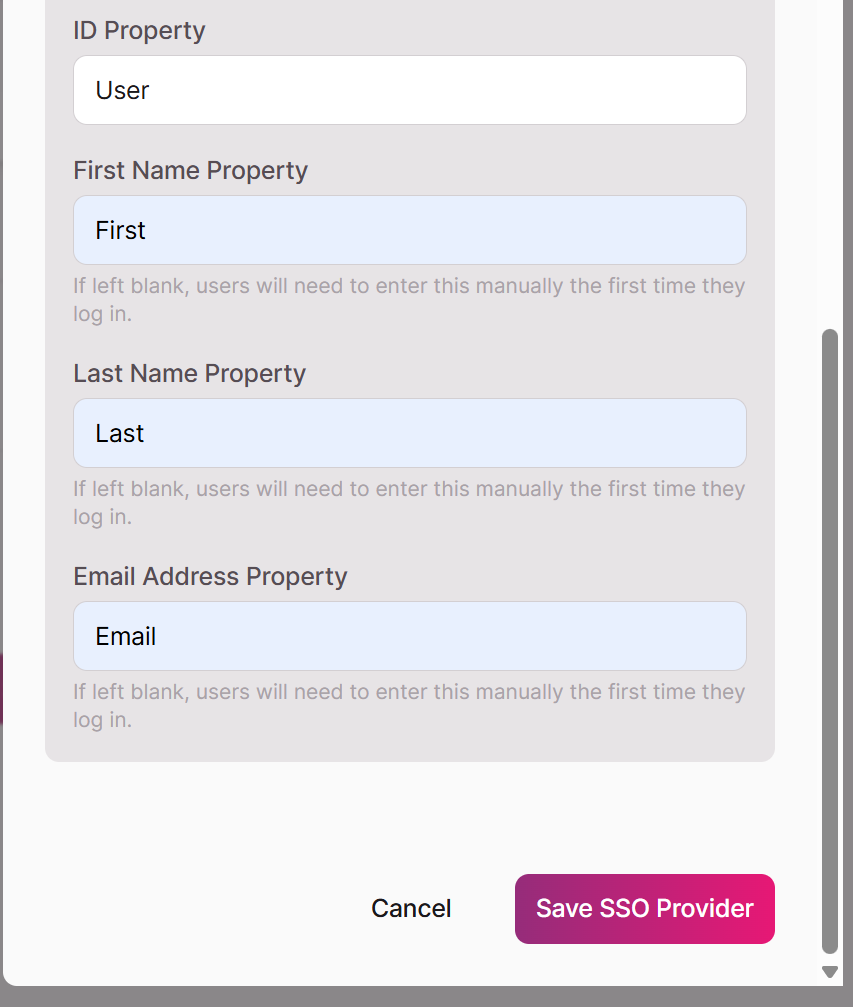
- Click Save SSO Provider.
Your SAML SSO can now be added to any login page.
Step 7: Assign Users in Okta
The configuration is complete, but users won't be able to log in until they're assigned to the app in Okta.
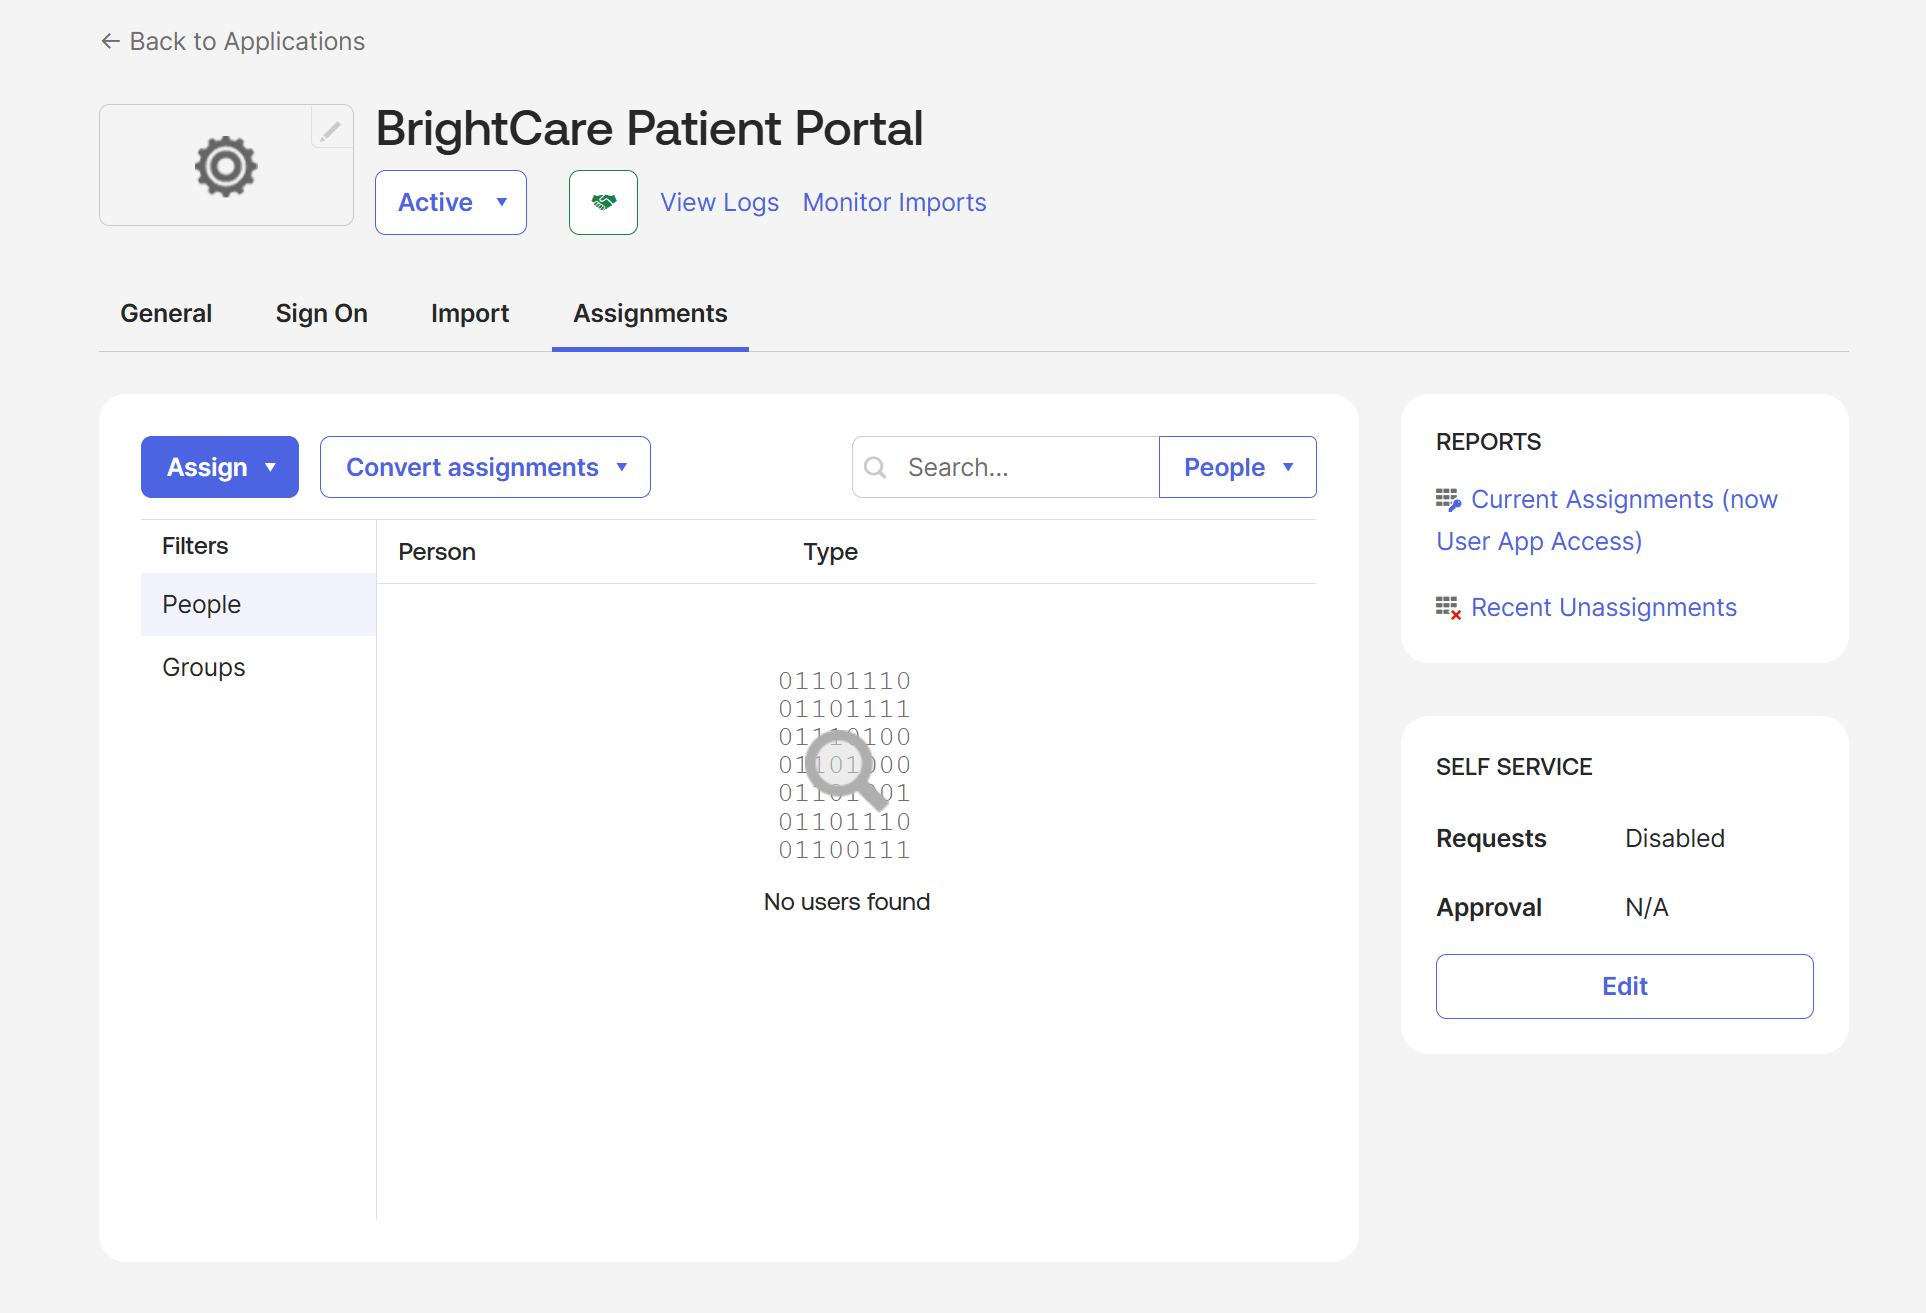
- In Okta, go to the Assignments tab of your app.
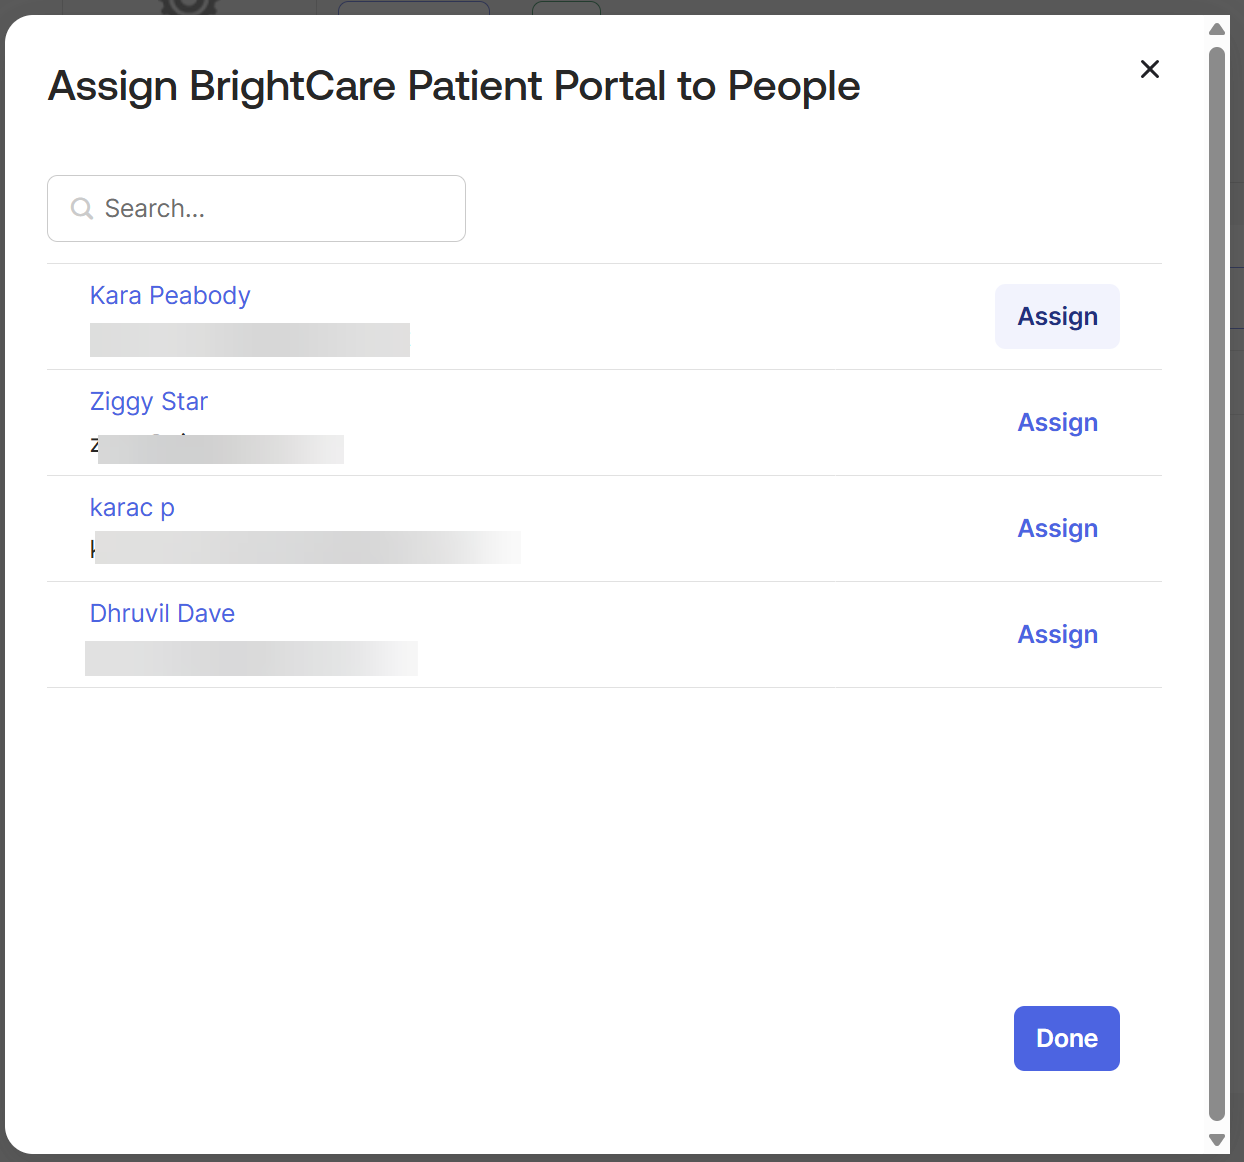
- Click Assign and choose either Assign to People or Assign to Groups.
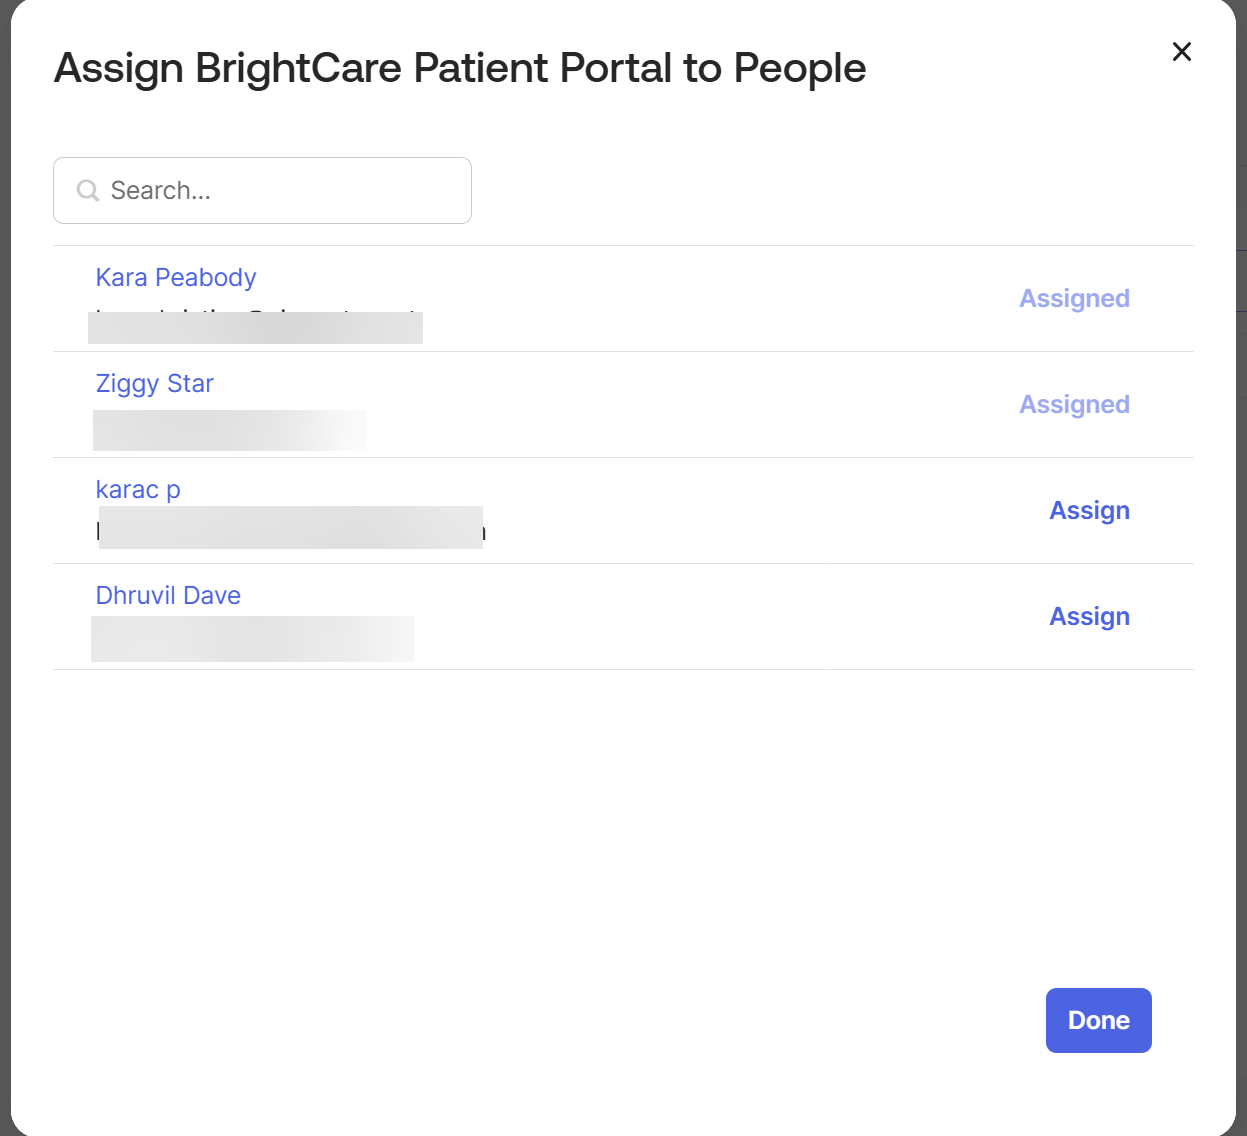
- Select the users or groups who should have access to your Knack app.
- Click Assign, confirm any user-specific settings, and click Save and Go Back.
- Click Done.
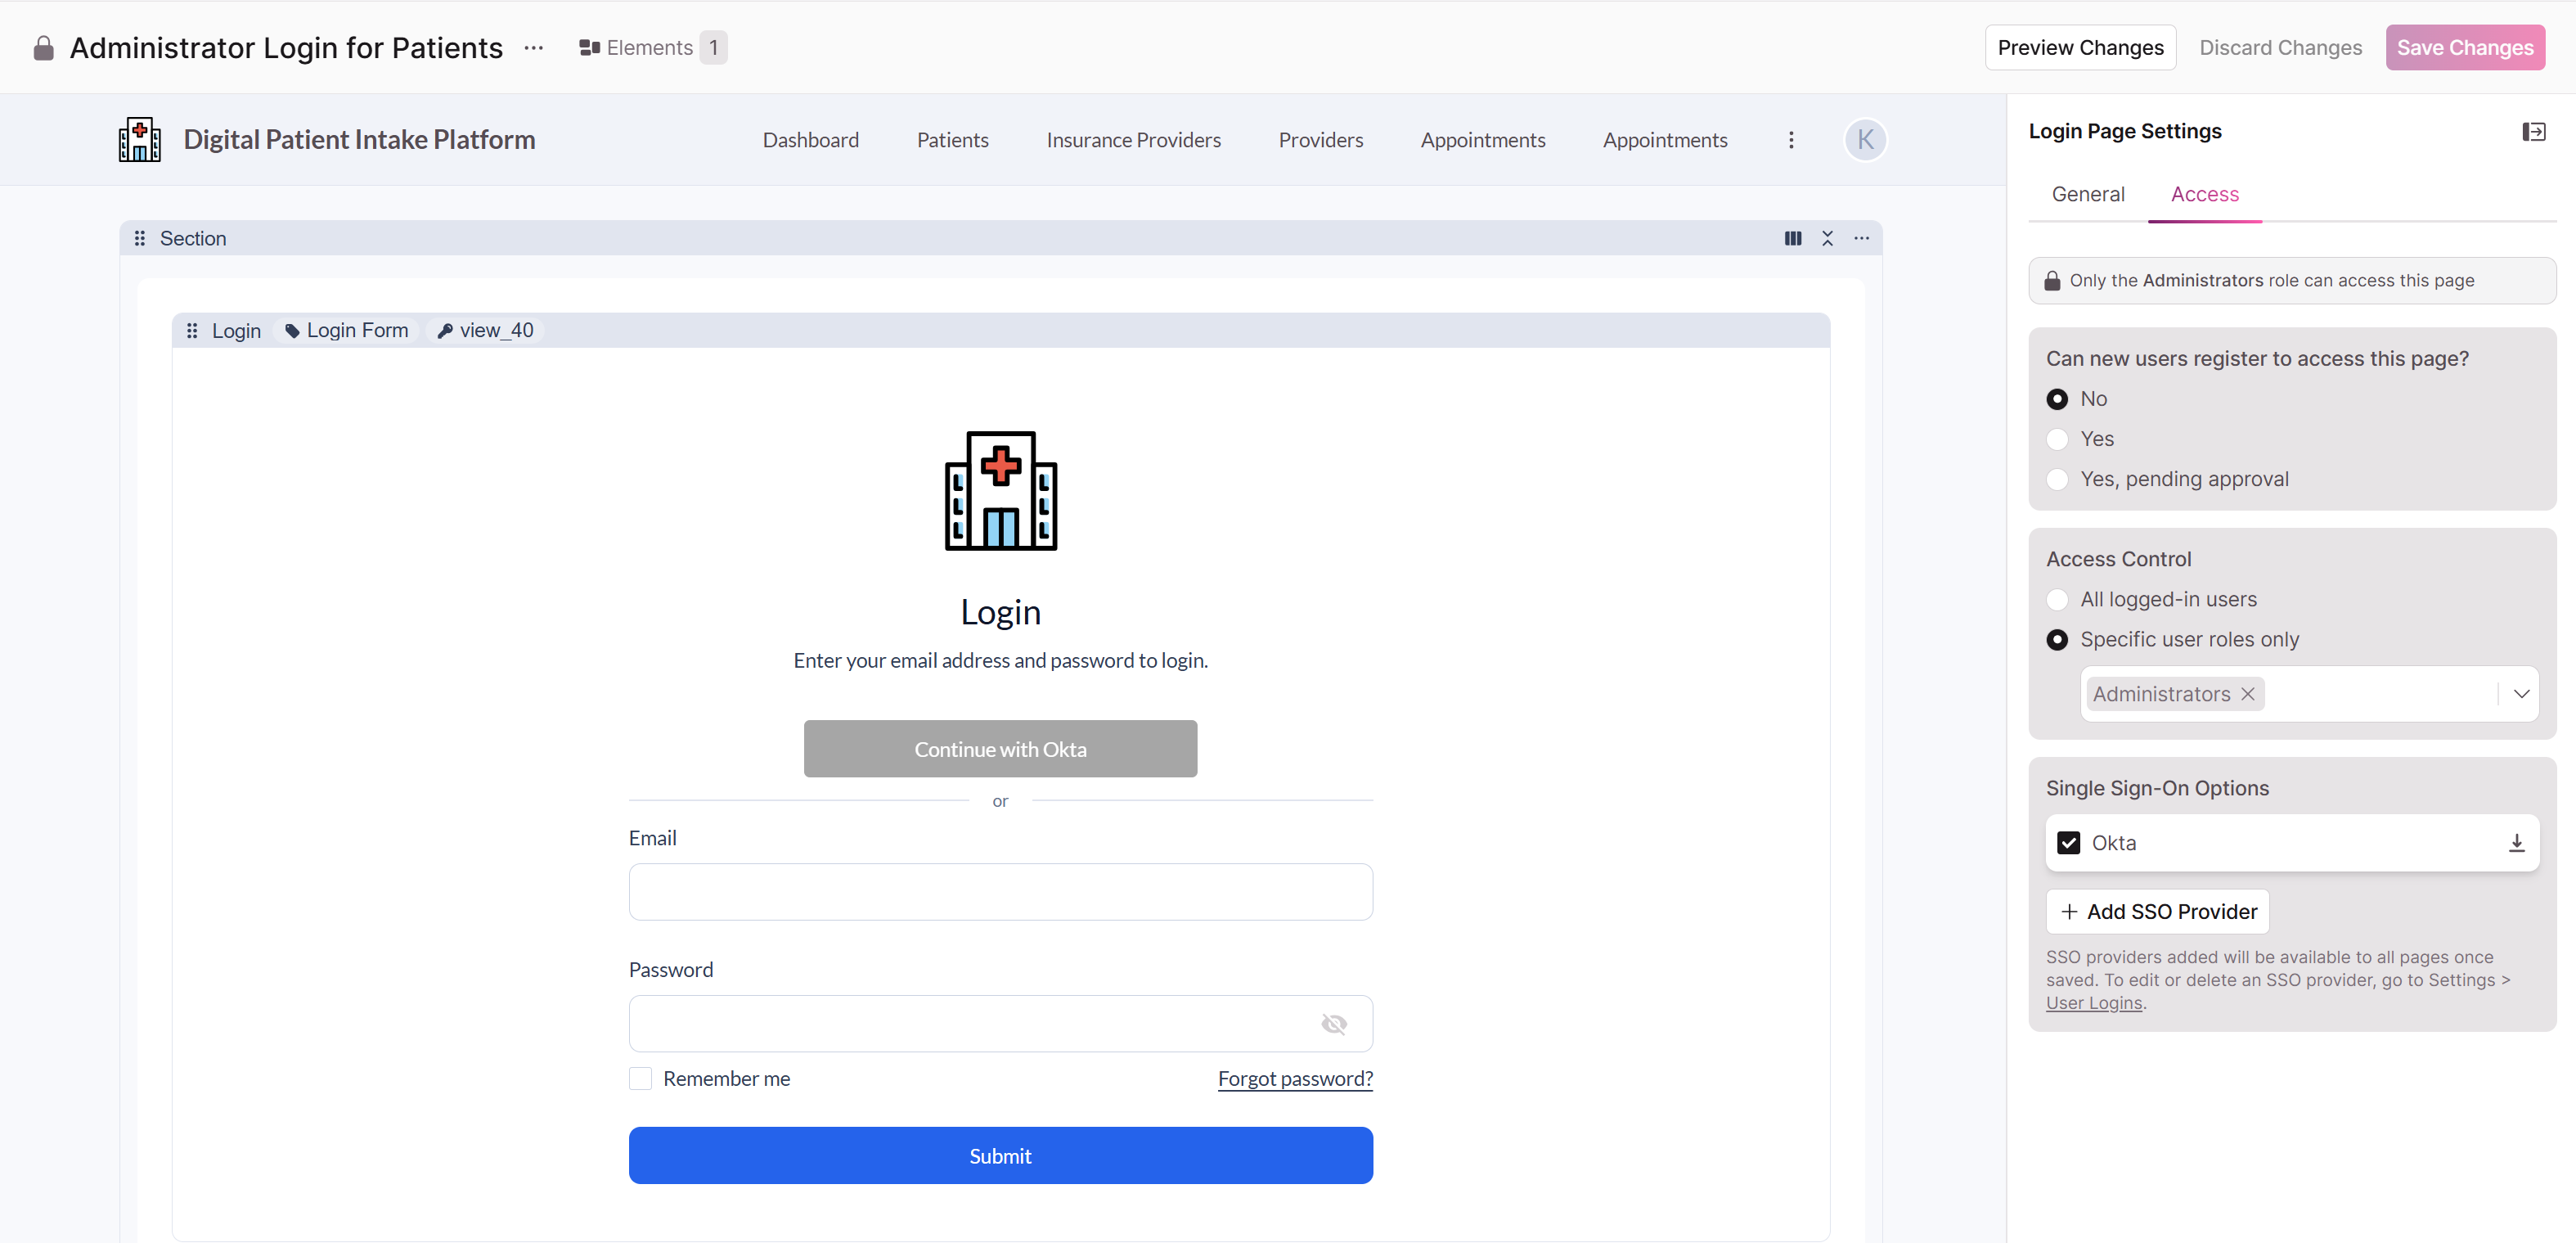
How New Users Are Handled in Knack
When someone logs in via SSO for the first time, Knack needs to know how to handle their account. You have two options:
Option 1 — Allow signups: If signups are enabled on your login page, Knack will automatically create a new user record the first time someone logs in via Okta. Their name and email will be populated from the attribute mappings you configured.
Option 2 — Pre-provision users: If signups are disabled, you'll need to manually add users to the appropriate User Role object in your Knack database before they attempt to log in. Their email address in Knack must exactly match their email address in Okta.
Tip: For most internal-use apps, pre-provisioning gives you more control over who has access. For external-facing apps or self-service scenarios, enabling signups is more practical.
Testing Your Setup
Once everything is configured and users are assigned in Okta:
- Open your Knack Live App in an incognito or private browsing window.
- Navigate to the page with your SSO login view.
- Click the SSO login button — you should be redirected to the Okta sign-in page.
- Log in with an Okta user who has been assigned to the app.
- After successful authentication, you should be redirected back to your Knack app and logged in automatically.
Troubleshooting
The login button redirects to Okta but returns an error.
Double-check that the Single sign-on URL and Audience URI in Okta exactly match the Location URL from the Knack metadata file. Even a trailing slash difference can cause a mismatch.
The user is authenticated by Okta but Knack shows an error.
Verify that the attribute statement names in Okta (User, First, Last, Email) exactly match the property names entered in Knack's ID Property, First Name Property, Last Name Property, and Email Address Property fields. Capitalization must match exactly.
The user logs in successfully but their name or email is blank.
Check that the Okta attribute values (user.login, user.firstName, etc.) are actually populated for that user in Okta's user profile. You can verify this in the Okta Admin Console under Directory > People.
A user gets an "access denied" or "user not found" error.
If signups are disabled in Knack, the user must already exist in your Knack database with a matching email address. Either enable signups or add the user manually to the appropriate User Role object.
Field Reference
The table below summarizes every field in the Knack SAML provider settings panel.
Login Button
| Field | Required | Description |
|---|---|---|
| Provider Name | Yes | The text displayed on the SSO login button. No spaces allowed. Cannot be changed after saving. |
| Button Icon | No | An optional image displayed on the login button (5 MB max). |
| Button Color | No | The background color of the login button. |
| Button Font Color | No | The text/icon color on the login button. |
Provider Settings
| Field | Required | Description |
|---|---|---|
| Provider Entry Point | Yes | The Identity Provider Single Sign-On URL from Okta. This is where Knack sends the SAML authentication request. |
| Issuer | Yes | The Identity Provider Issuer URL from Okta. Identifies the IdP to Knack. |
| Identity Provider's Certificate | Yes | The X.509 certificate from Okta, used to verify that SAML responses are genuinely from your IdP. Must include the BEGIN CERTIFICATE and END CERTIFICATE header/footer lines. |
| Private Signing Certificate | No | An optional private certificate used to sign outgoing SAML requests from Knack to Okta. |
| Decryption Private Certificate | No | An optional private key used to decrypt encrypted SAML assertions received from Okta. |
| Decryption Public Certificate | No | The public certificate paired with the Decryption Private Certificate above. |
| Logout URL | No | A URL to redirect users to after they sign out of Knack. Useful for triggering a full Okta logout. |
| Authentication Context | No | Specifies the authentication method Okta should use (e.g., Password, Multi-factor). Defaults to Password. |
| ID Property | Yes | The name of the SAML attribute that contains the user's unique identifier. Must match the attribute name configured in Okta. |
| First Name Property | No | The SAML attribute name for the user's first name. If blank, users will be prompted to enter it on first login. |
| Last Name Property | No | The SAML attribute name for the user's last name. If blank, users will be prompted to enter it on first login. |
| Email Address Property | No | The SAML attribute name for the user's email address. If blank, users will be prompted to enter it on first login. |
SAML in embedded contexts
SAML authentication (via Okta, and other IDP's) does not function correctly when a Knack application is embedded in an iframe, and this is a known limitation with no available workaround on our end.
Why iframe embedding fails
When the SAML flow is initiated, the browser is redirected to the Okta login endpoint. Okta responds with a Content-Security-Policy: frame-ancestors 'self' header, which explicitly prevents the Okta login page from loading inside a cross-origin iframe. The browser enforces this restriction and throws the following CSP error:
Framing 'https://integrator-3233526.okta.com/' violates the following Content Security Policy directive: "frame-ancestors 'self'"
This is enforced at the browser level based on headers set by Okta. It cannot be overridden by changes to Knack's frontend or backend.
Why pop-up mode also fails
While SAML can technically be initiated in a pop-up window (sidestepping the iframe framing restriction), this approach is also unreliable in embedded scenarios due to the nature of the SAML protocol itself.
SAML is a server-driven, redirect- and POST-based protocol. After successful authentication, Okta posts the SAML assertion to our ACS endpoint and the pop-up navigates directly to the application - unlike OAuth, there is no clean client-side redirect with query parameters that would allow us to notify the parent window, close the pop-up, and refresh the embedded iframe.
As a result:
- The pop-up does not automatically close after authentication.
- The application loads inside the pop-up rather than the embedded iframe.
- The embedded iframe does not reliably recognize the authenticated session.
- Browser third-party cookie restrictions can further prevent session sharing with the iframe..
Recommendation
SAML via pop-up is not a reliable or supported authentication method for embedded Knack applications. Builders who require SSO in an embedded context should use an alternative authentication method.
Scenarios
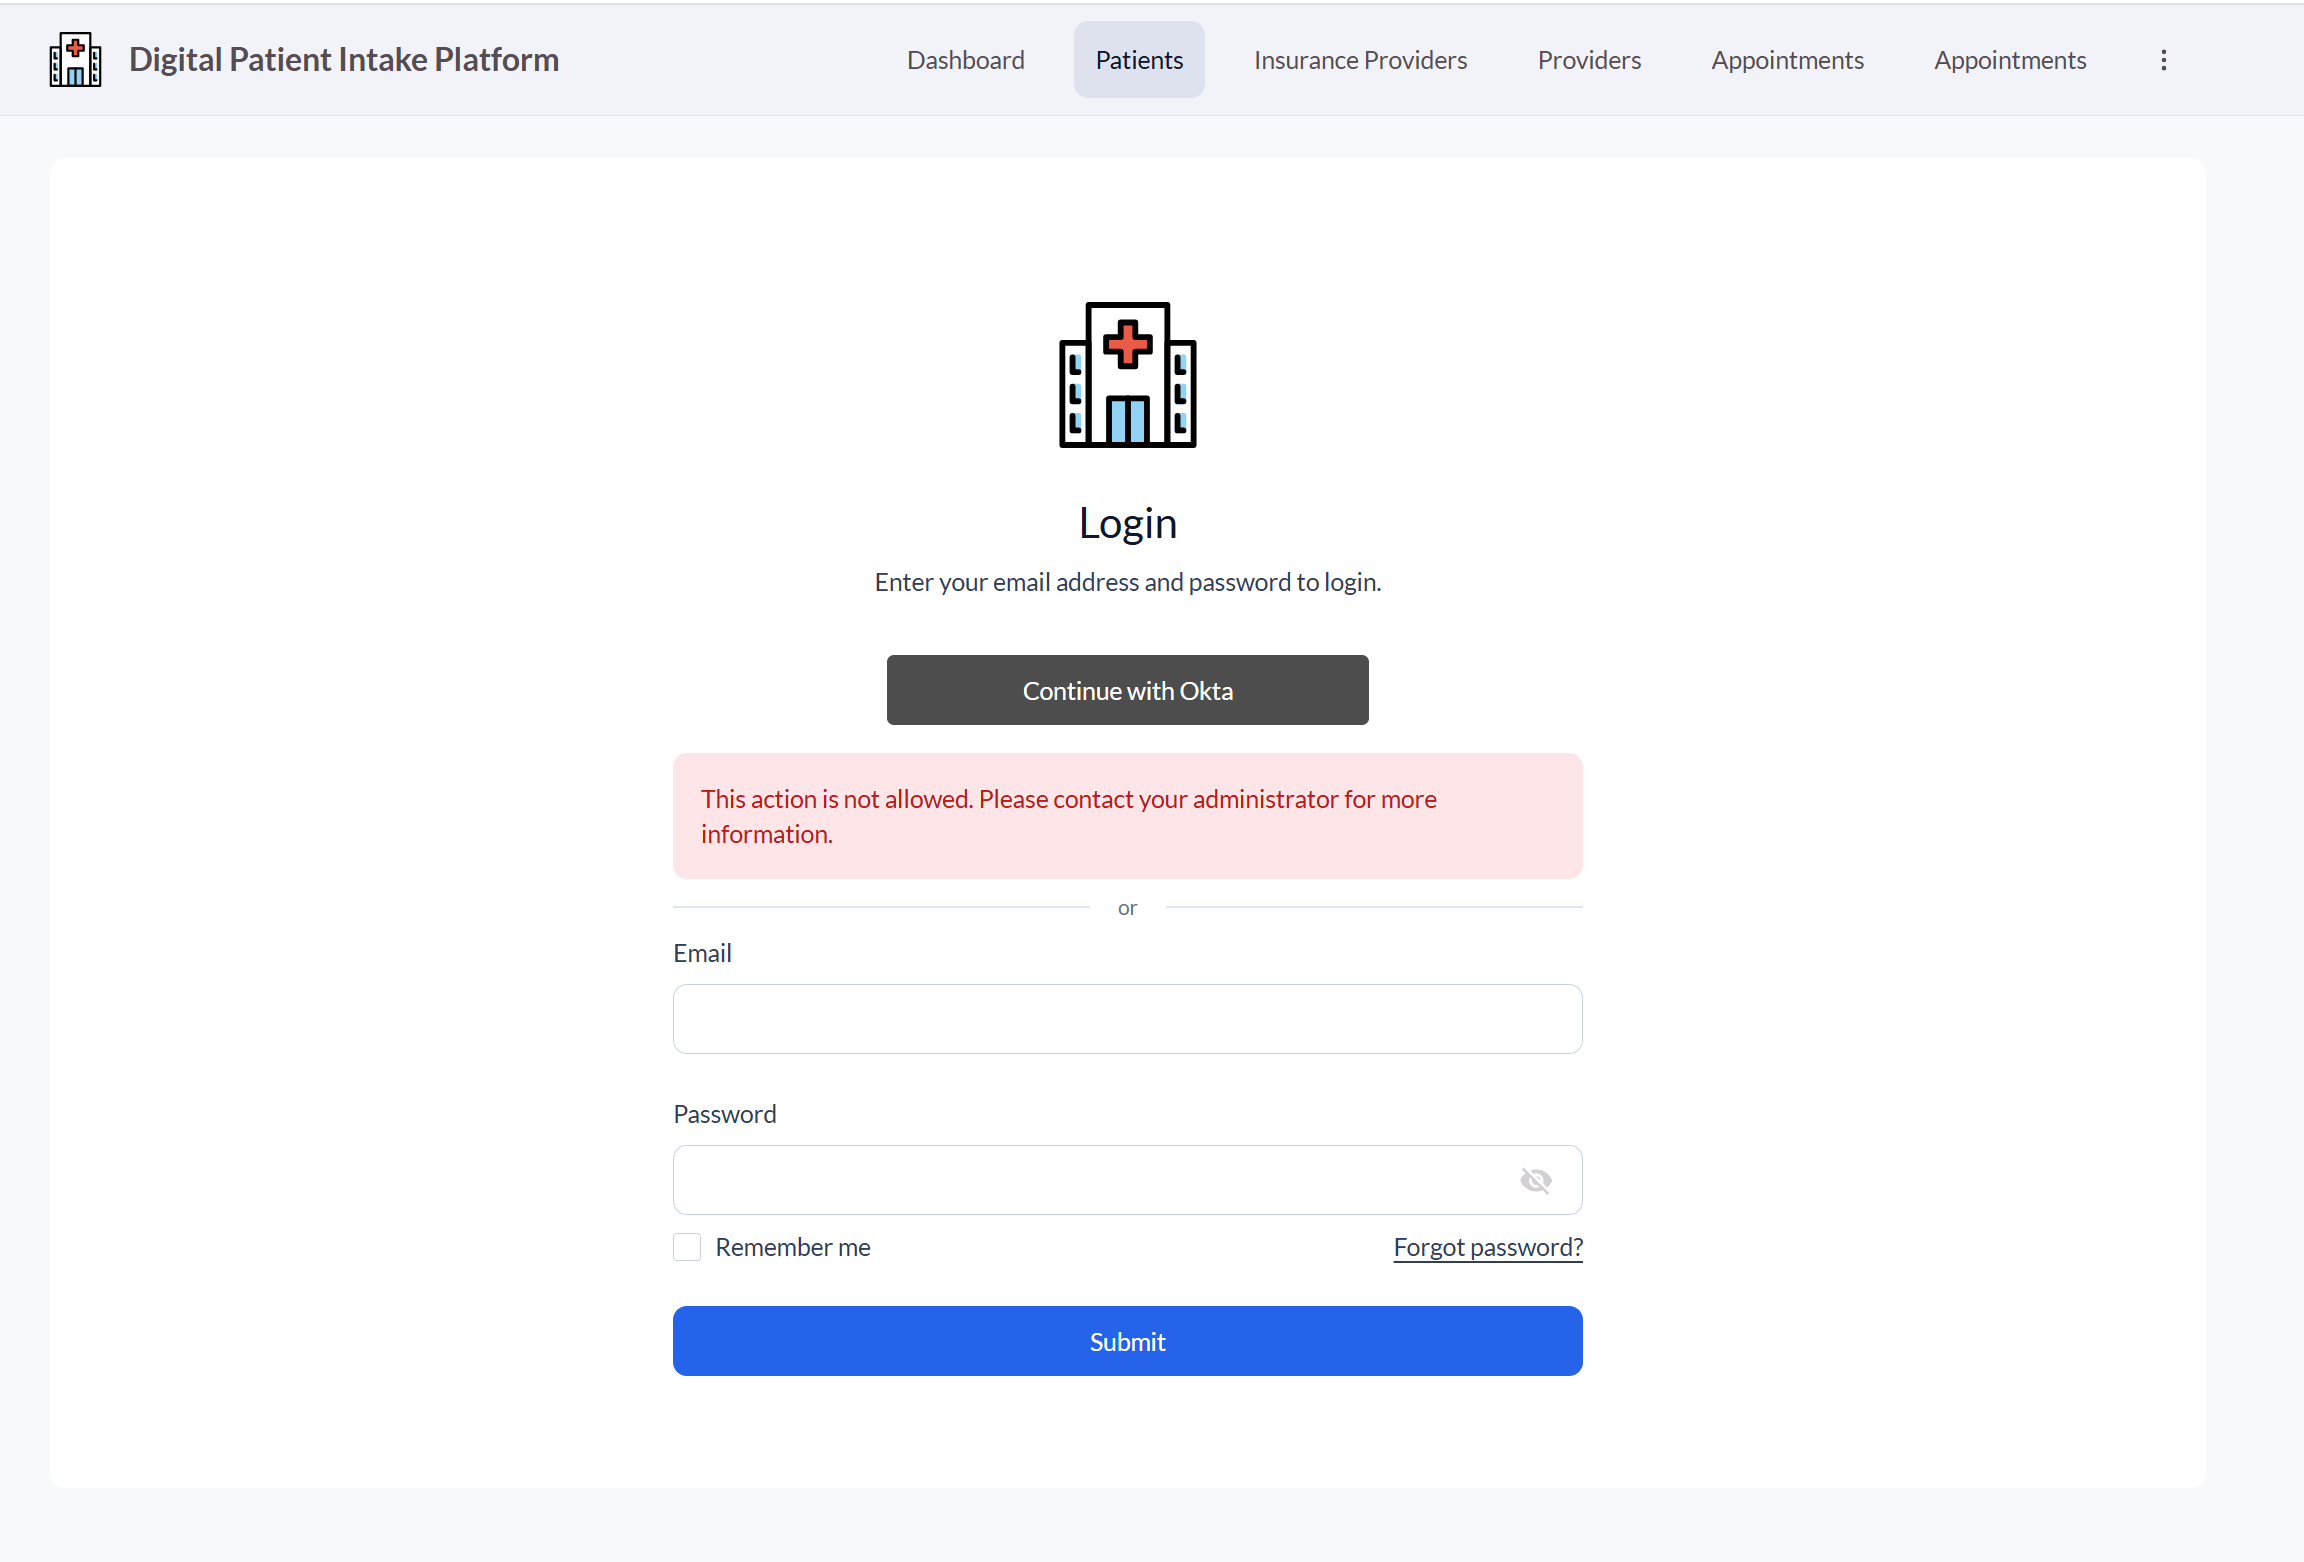
- User Registration is not allowed:
The user will see an error message when trying to log in:
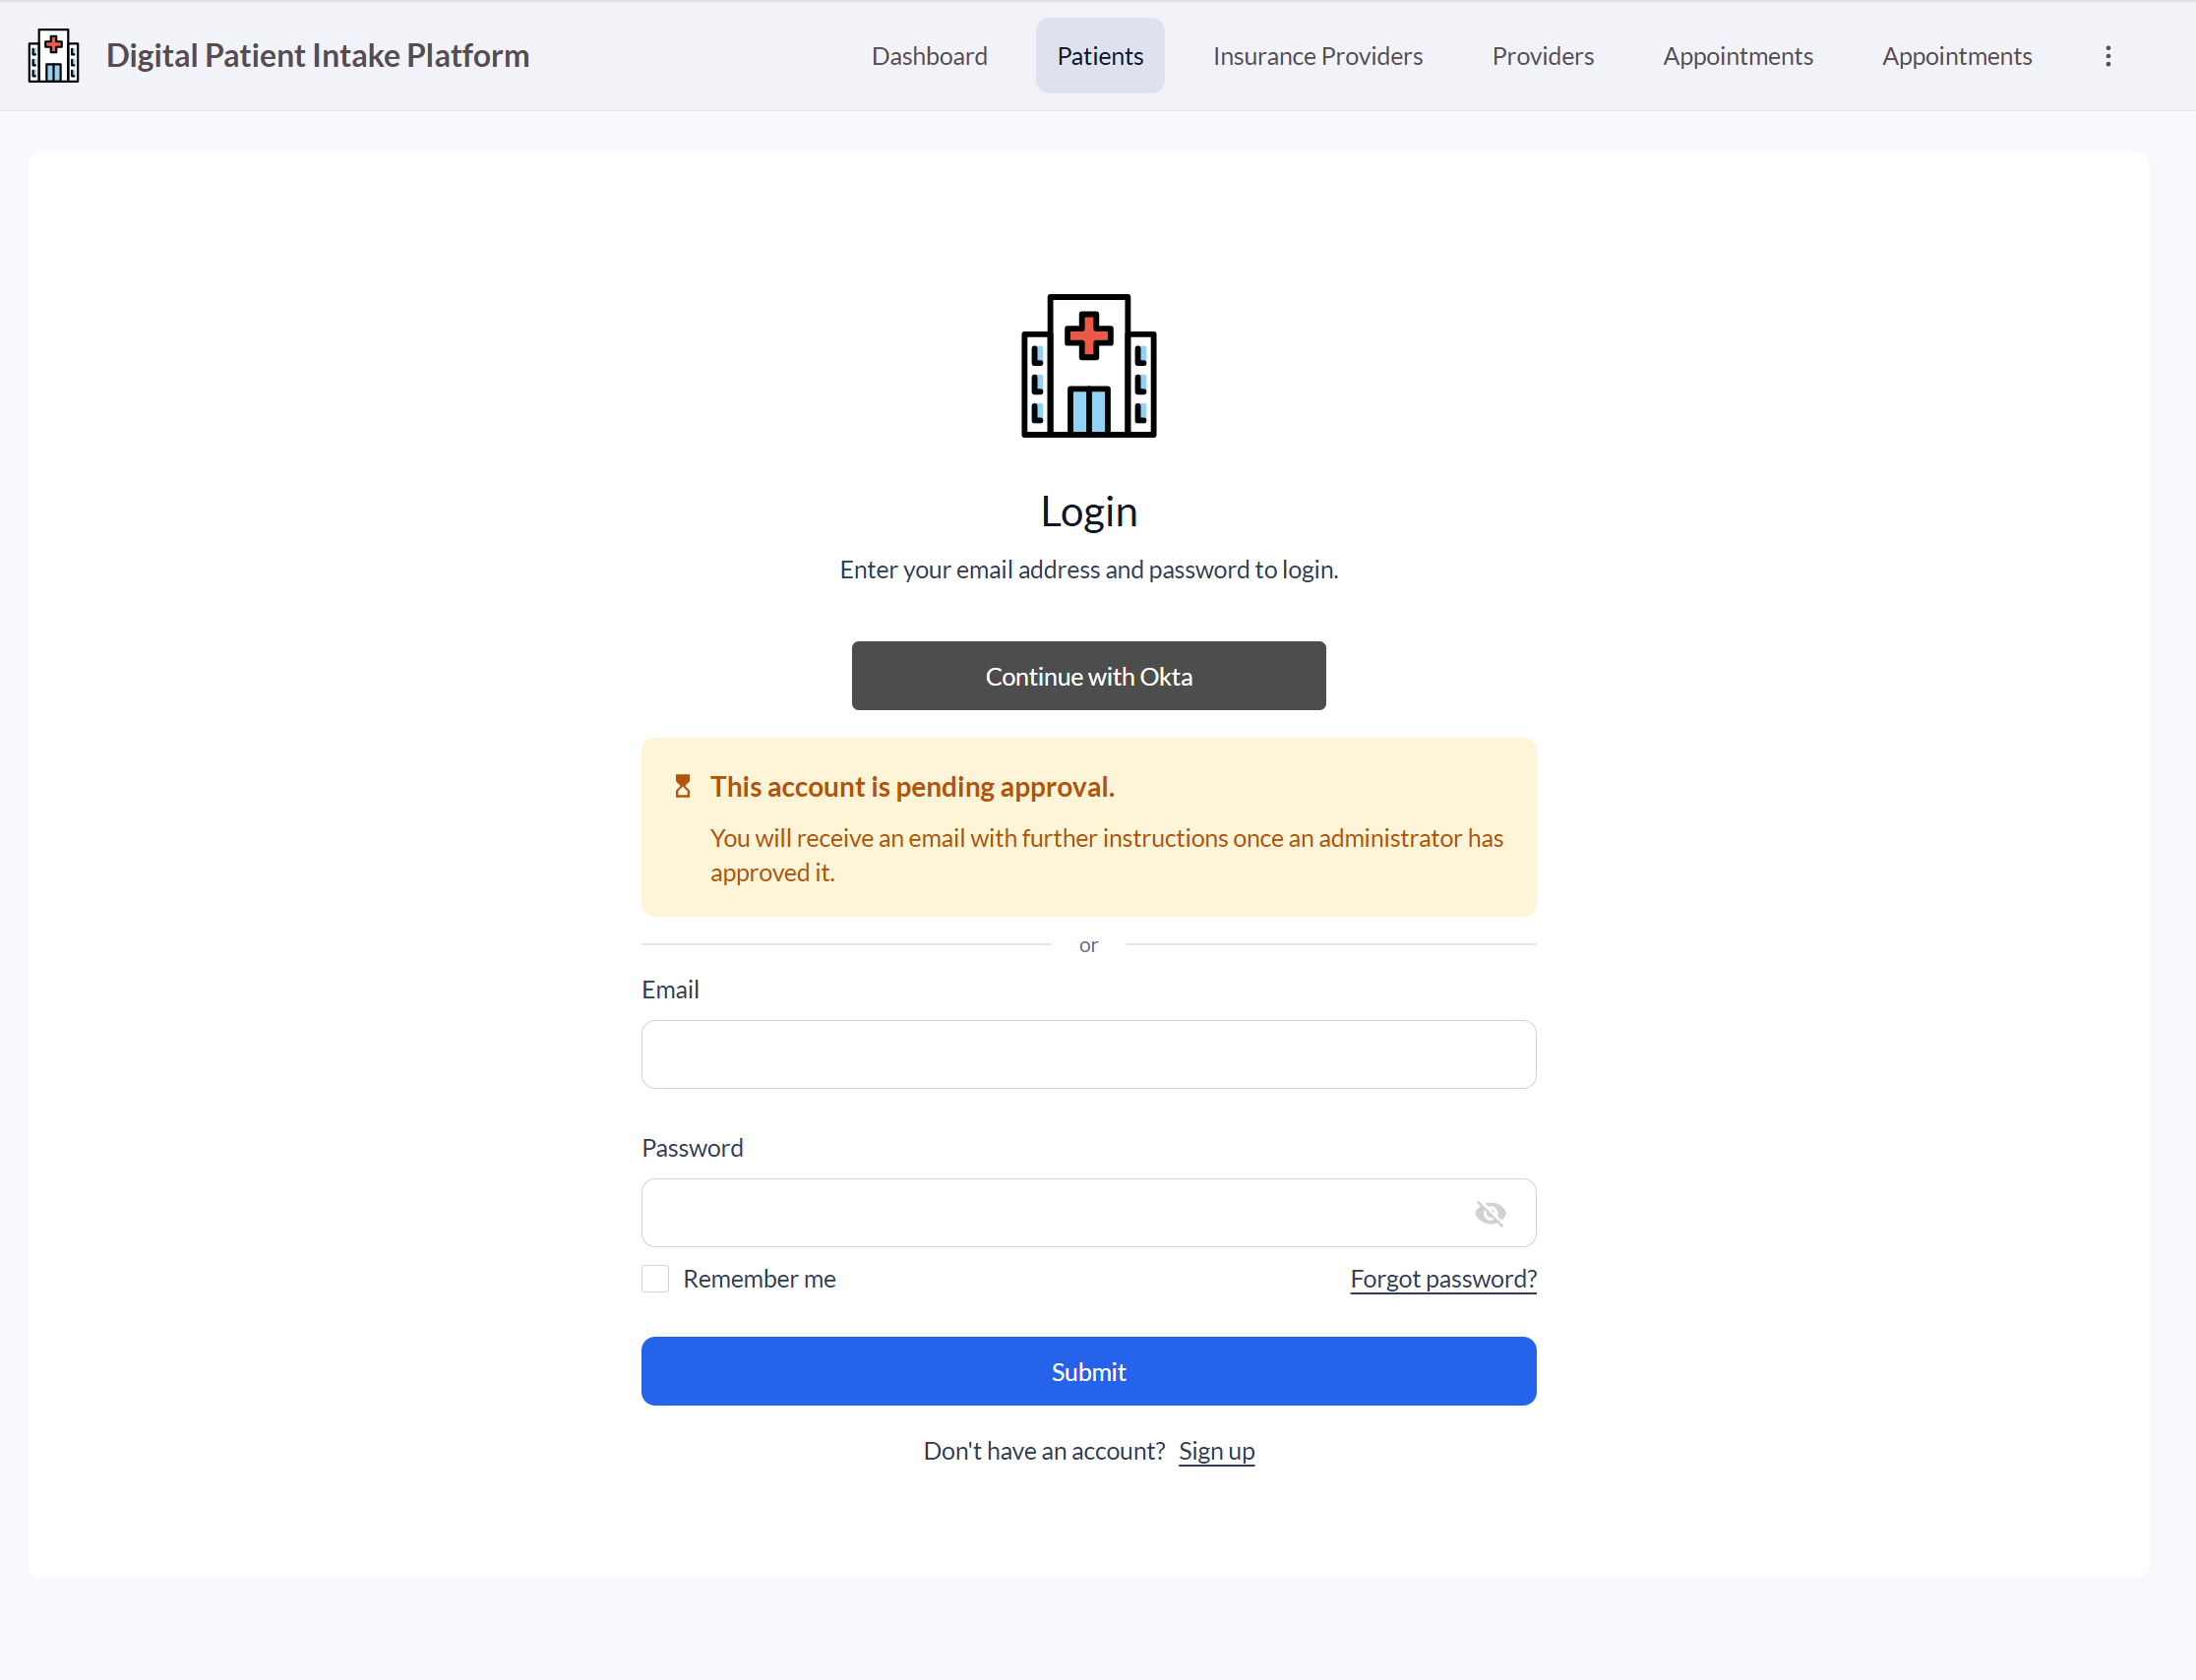
- User registration is set to Yes, Pending Approval:
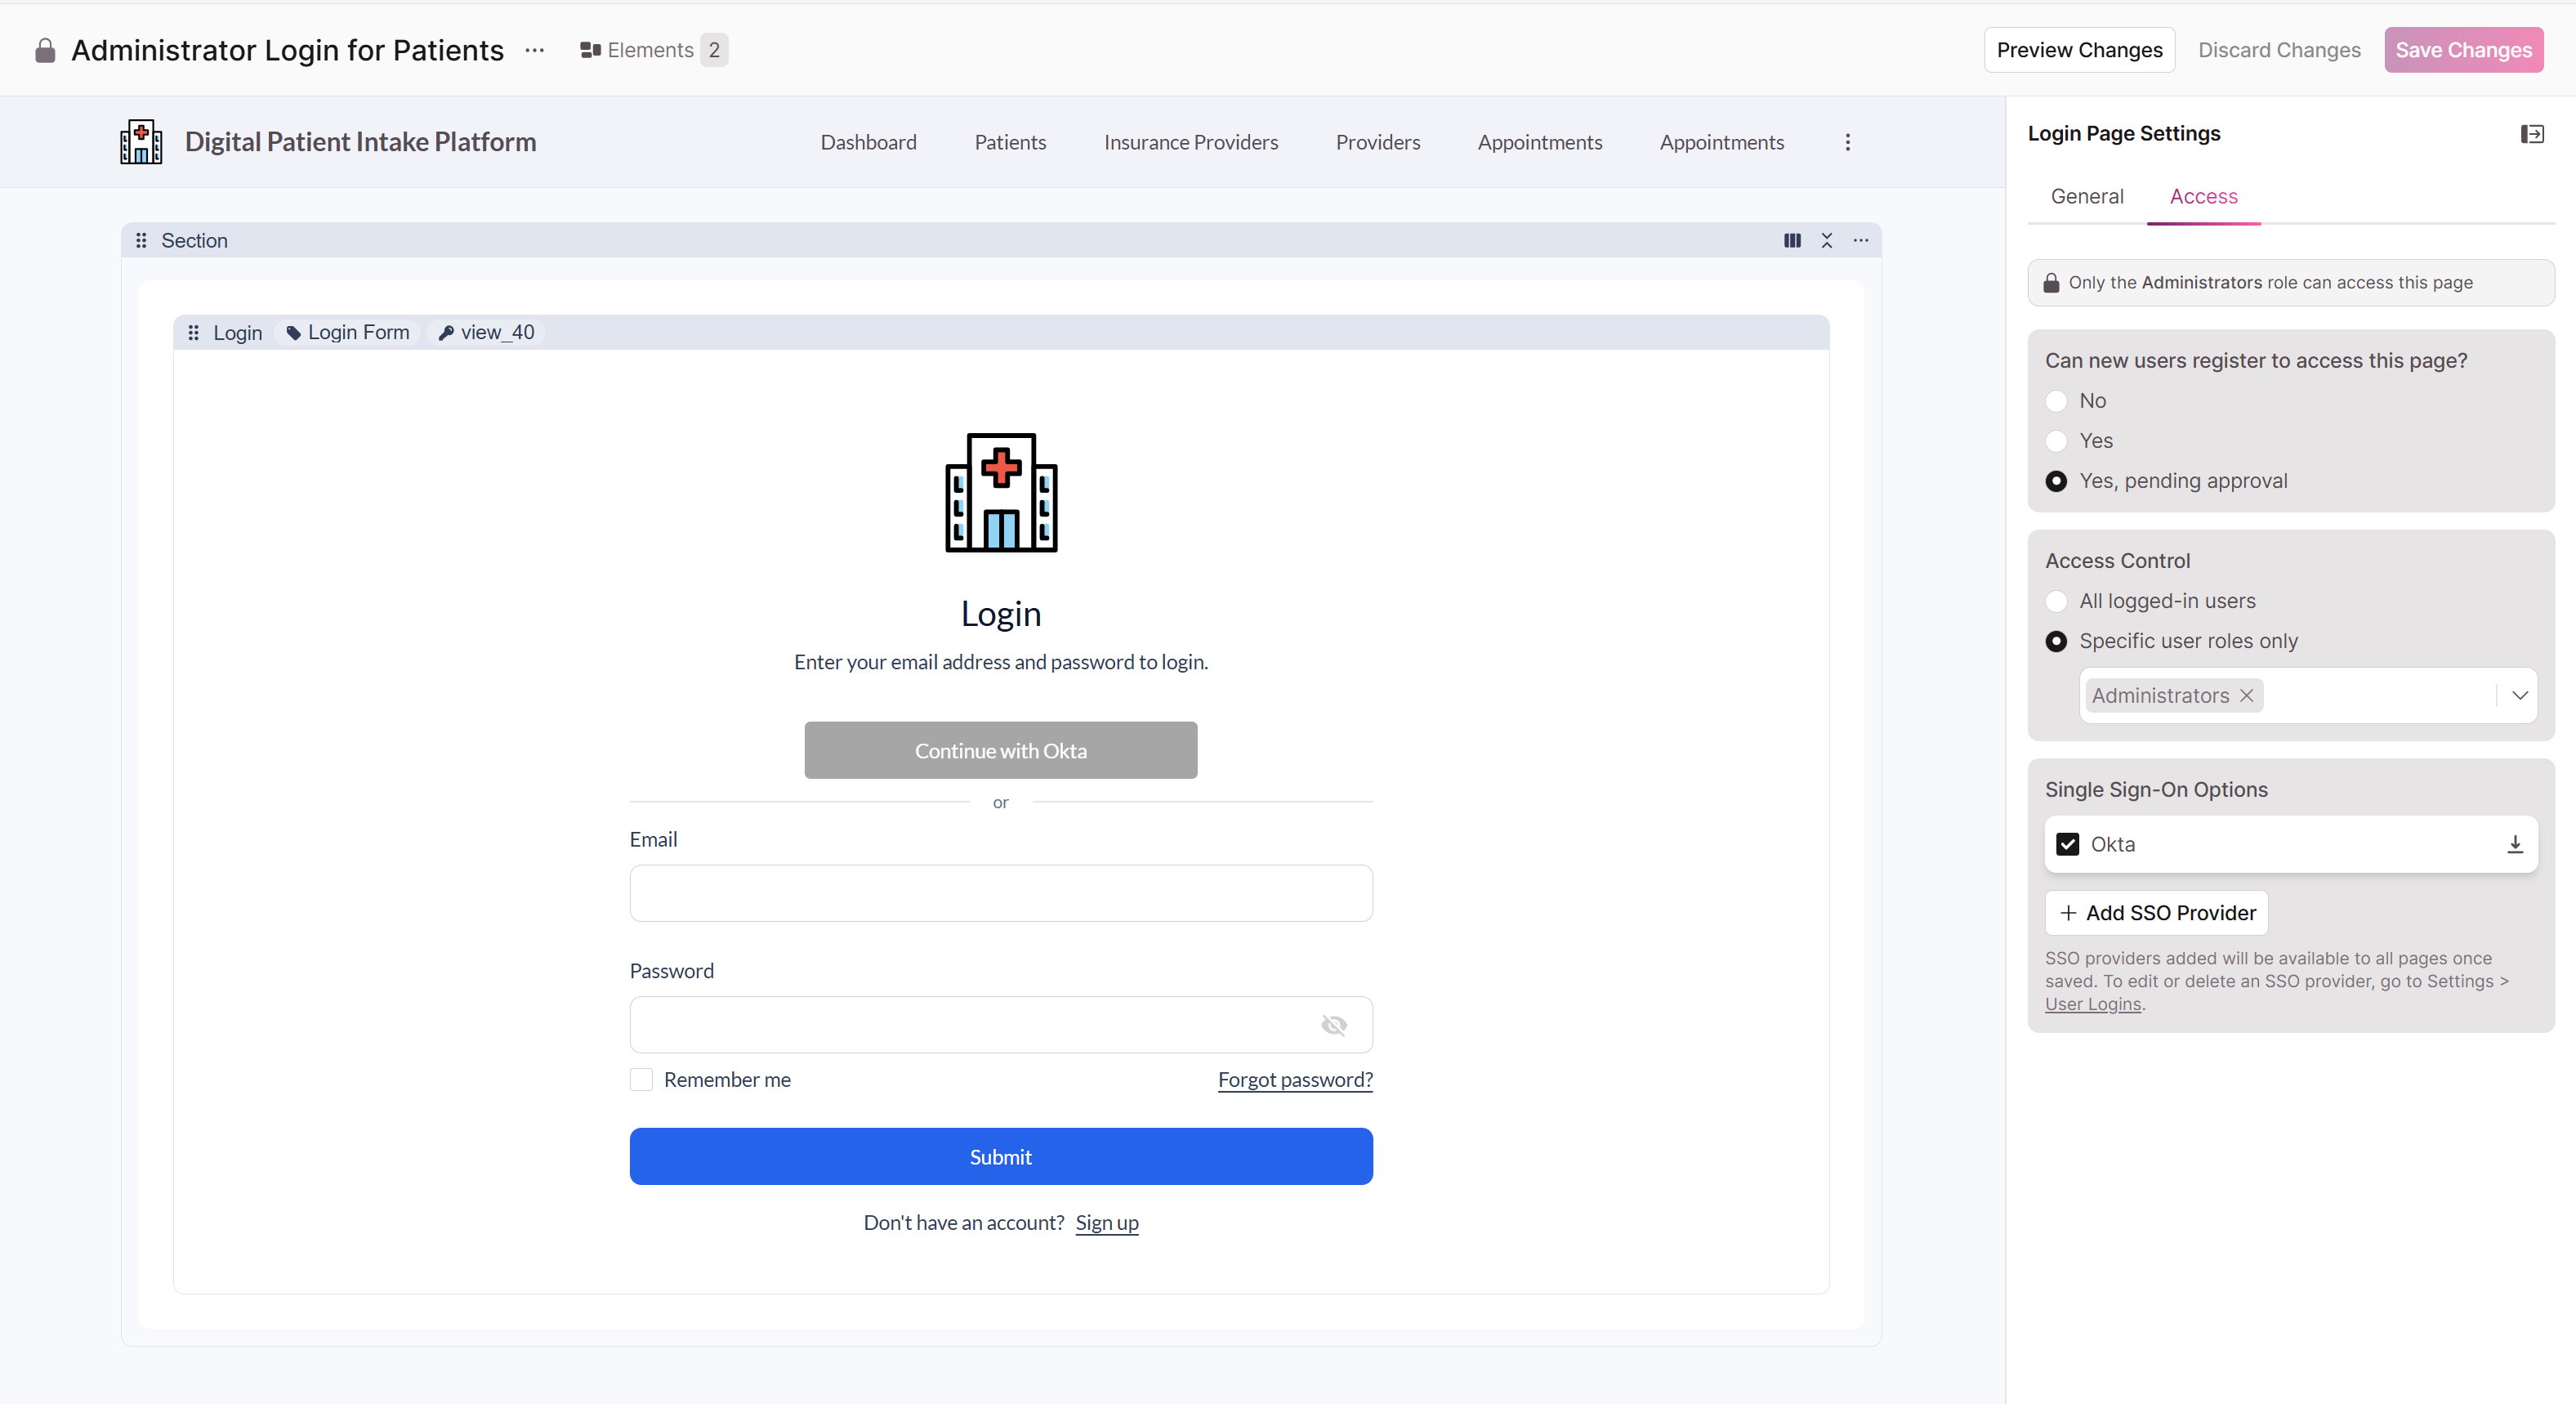
The user will see a Pending Approval message. The account admin will receive an email that access was requested.
- The user is allowed to register, but have not been assigned to the application in the IdP:
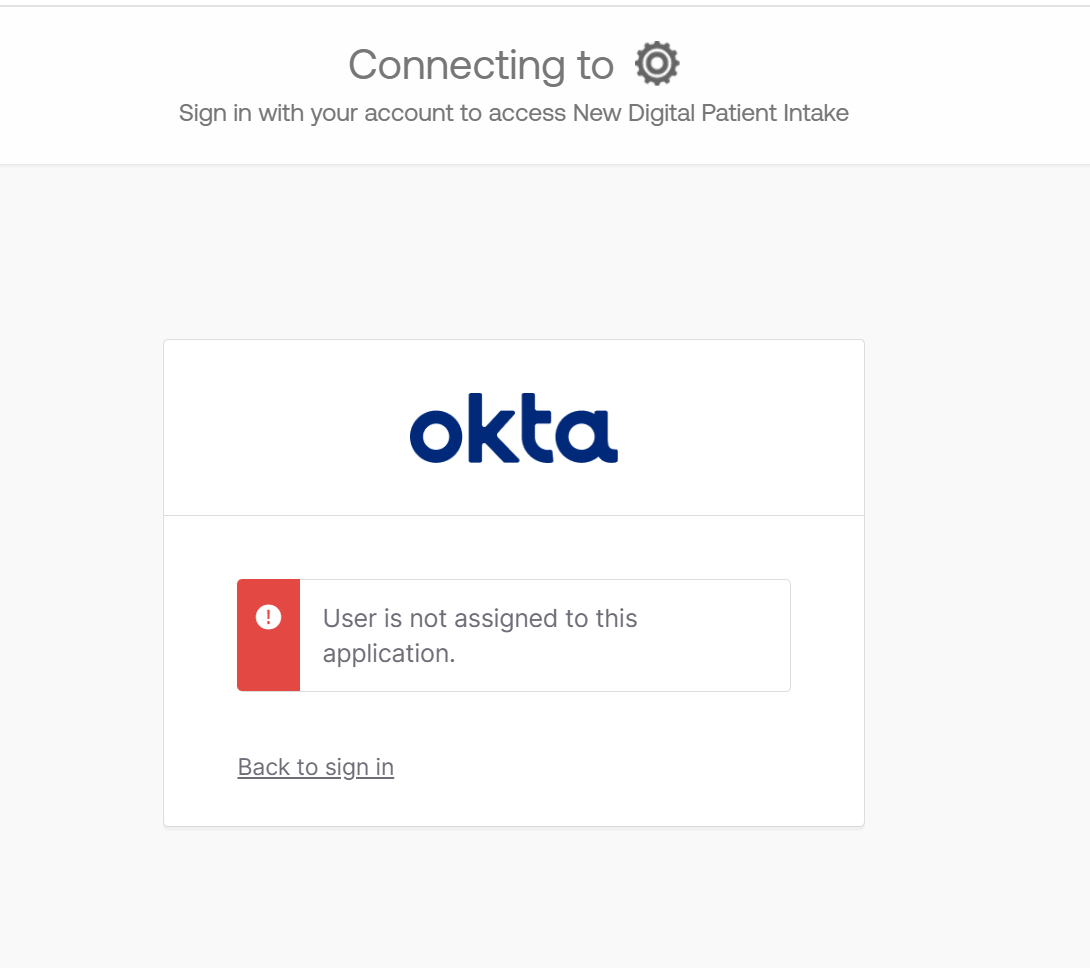
-
User Registration is set to Yes:
The user is logged in and assigned the appropriate role
Updated 3 months ago