Data Access Control
This guide will help you understand how Data Access Control works, how to configure it for different User Roles, and how to enable enforcement in your Live App.
This document provides a comprehensive review of the Data Access feature based on the official Knack documentation. It outlines how the feature works, its primary benefits, and key architectural considerations to support your product planning.
At a Glance
The Data Access Control feature introduces centralized, data-layer security for tables in Knack applications. Instead of managing permissions strictly at the UI layer (e.g., page-by-page access rules), builders can now enforce security rules directly on the underlying tables. This ensures that security policies are automatically and consistently applied across all pages, views, search functions, API endpoints, and data exports.
How Data Access Control Works
Permissions are defined at the User Role level and applied to every table in your app. For each role and table combination, you configure two settings:
- "Owned By" User: Controls what a user can do with records they created or are assigned to. Read this Owned by article for more information on how it relates to Data Access Control.
- All Other Records: Controls what a user can do with records belonging to other users.
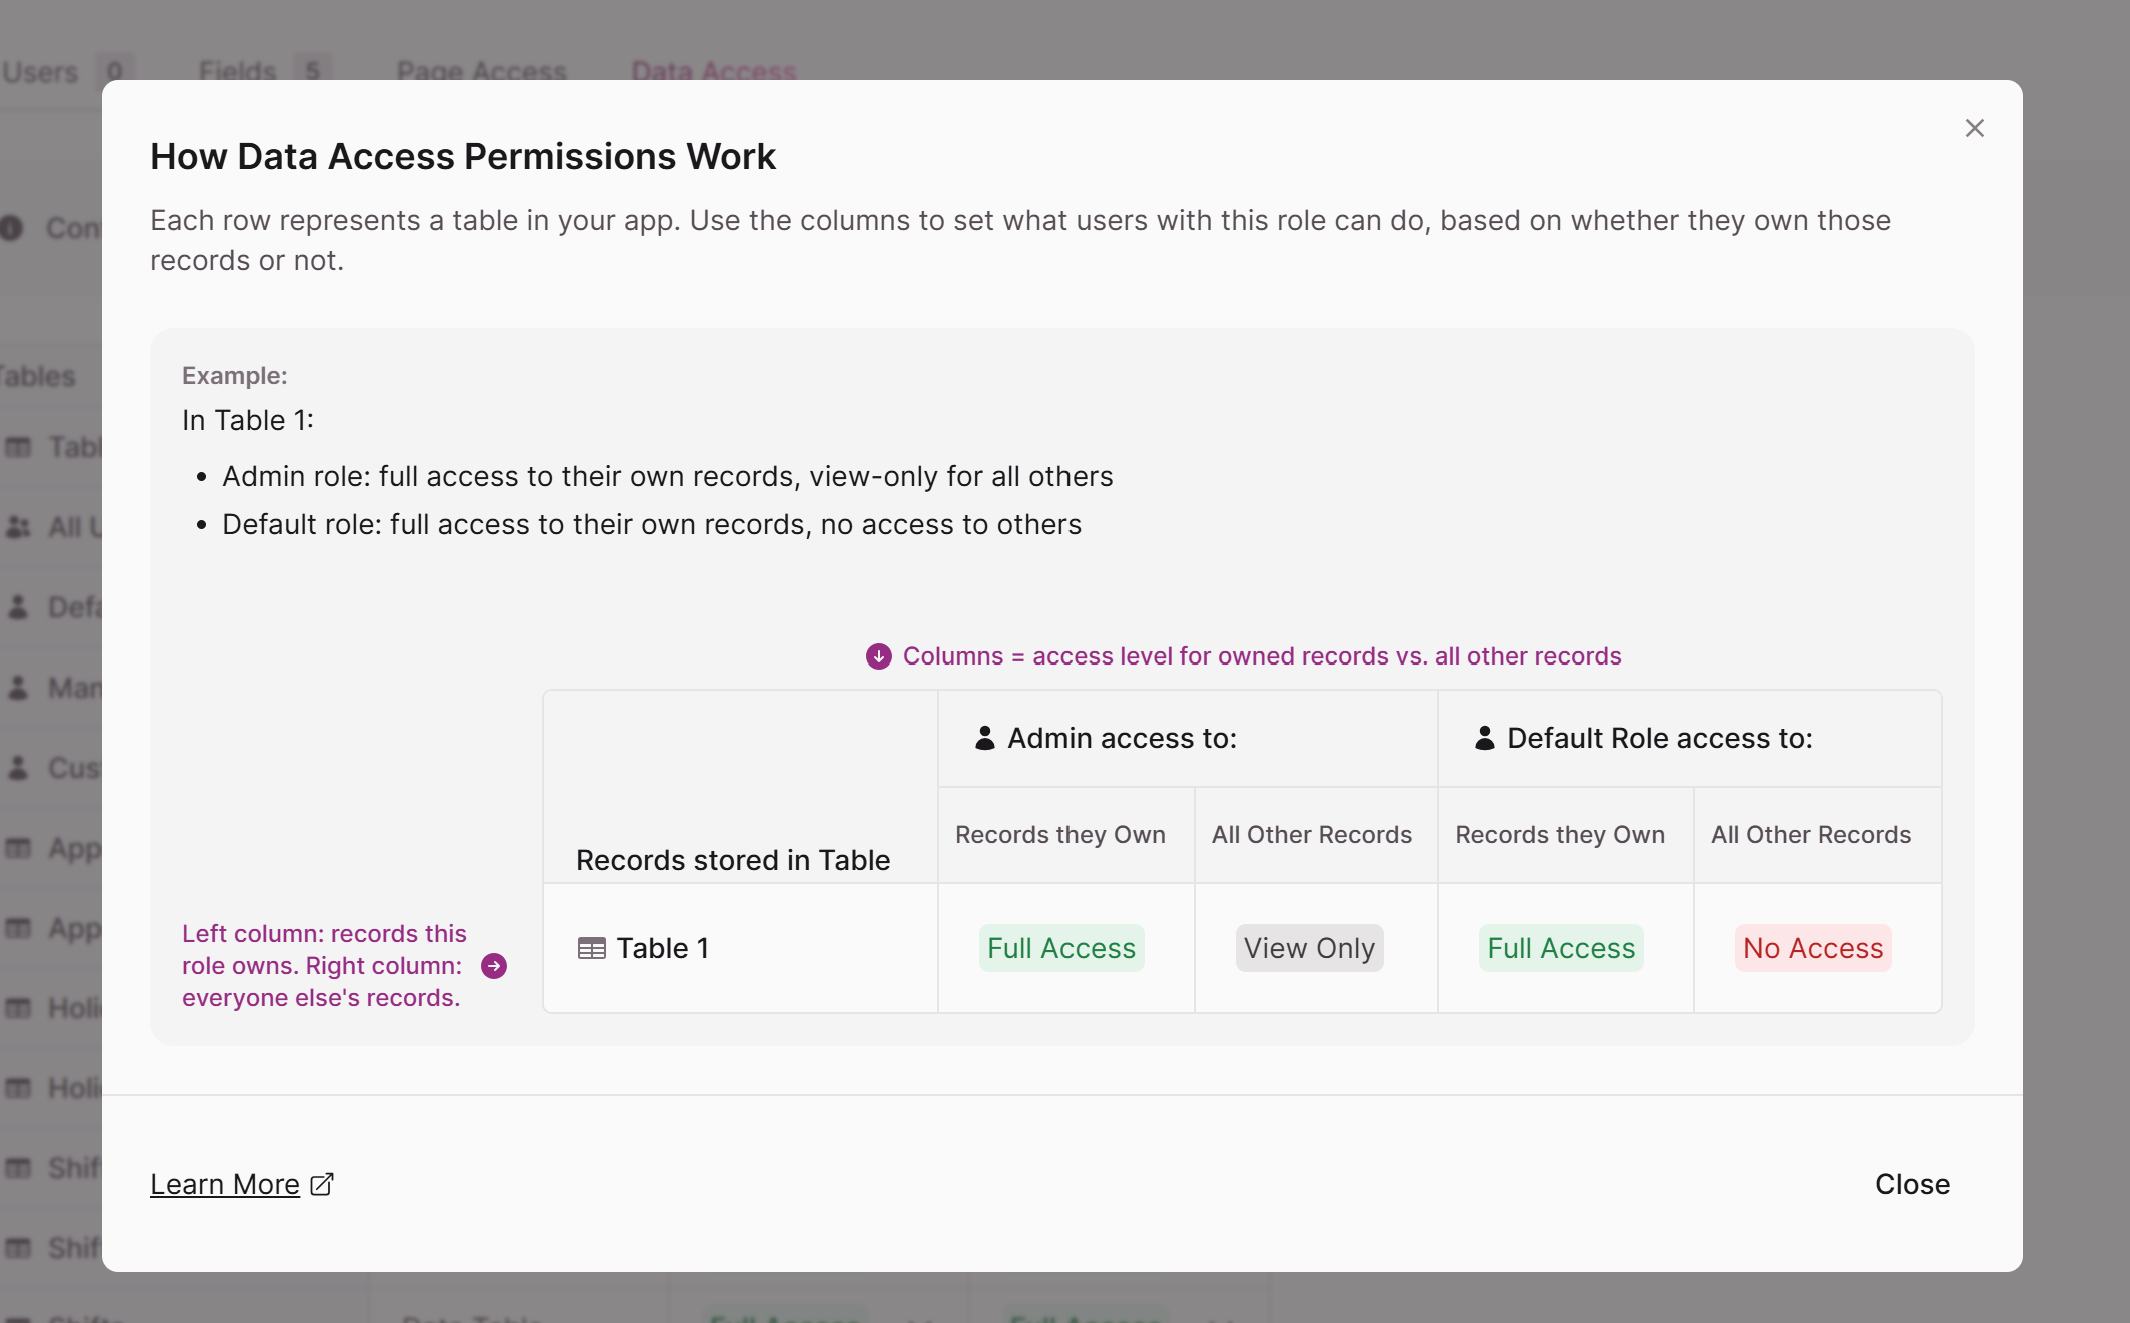
Access Levels
For each of the two settings above, you can assign one of the following access levels:
| Access Level | Allowed Operations | Scope Availability |
|---|---|---|
| Full Access | Create, edit, view, and delete records. | "Owned By" & "All Other Records" |
| Edit Only | Create, edit, and view records (cannot delete). | "Owned By" & "All Other Records" |
| View Only | View records only. | "Owned By" & "All Other Records" |
| No Access | Cannot view or interact with records at all. | Only available for "All Other Records" |
Note: Live App users always retain at least some level of access to records they own; therefore, No Access cannot be applied to the "Owned By" User category.
How Data Access Rules Are Enforced in the Live App
Once you enable enforcement, Data Access rules are applied at the data layer — not just the UI layer. This means Knack checks your configured permissions on every request, including form submissions, record deletions, and record creation attempts. If a user's role does not permit an action, the request is rejected at the server level with an HTTP 403 response, and the Live App surfaces a clear message explaining why.
This enforcement happens consistently across all surfaces: pages, views, inline edits, modals, and API calls.
View-Only Access: How Forms Behave
When a user has View Only access to a record, the form renders in a read-only state. Fields are non-interactive, connection field dropdowns are disabled, and the Save or Submit button is not available. A message is displayed to the user explaining that they cannot edit the record.
"Your access to this record is view-only."
This prevents a user from filling out a form and attempting to save, only to have the save fail.
Restricted Delete: How Record Deletion Behaves
When a user's role does not include delete permissions for a table, any attempt to delete a record is blocked at the server level and returns an HTTP 403. The Live App surfaces a toast message to the user:
"Your access to this record doesn't include deletion."
Restricted Create: How Record Creation Behaves
When a user's role does not include create permissions for a table, any attempt to add a new record is blocked and returns an HTTP 403. The Live App surfaces a toast message:
"Your access doesn't include adding records here."
Summary: Permission Enforcement by Action
| Action | Restricted Behavior | User-Facing Message |
|---|---|---|
| Edit / Save | Form renders as read-only; Save is disabled | "Your access to this record is view-only." |
| Delete | Request blocked (HTTP 403) | "Your access to this record doesn't include deletion." |
| Create | Request blocked (HTTP 403) | "Your access doesn't include adding records here." |
Tip: These messages are surfaced automatically by Knack when Data Access rules are active. You do not need to configure any additional display rules or page logic to communicate permission restrictions to your users.
How Data Access Rules Interact with the Knack API
Data Access rules are enforced on API requests in the same way they are enforced in the Live App. When a request is made via the Knack API and the authenticated user's role does not permit the attempted operation, the API returns an HTTP 403 Forbidden response.
This applies to PUT (edit), DELETE, and POST (create) requests. Builders and developers integrating with the Knack API should handle 403 responses in their code and surface appropriate messaging to end users rather than assuming all requests will succeed.
Core Setup Workflow
1. Initial Setup
When you open the Data Access tab for the first time (Users > All Users > Data Access), you click Start Setup. This creates the centralized Data Access Grid and sets default permissions for all existing roles and tables.
Learn how the "Owned By" field works here
2. Configuration & Default Permissions
- The Grid: A multi-dimensional configuration interface where tables are rows and User Roles are column groups (split into Owned by User and All Other Records).
- Role Filtering: Builders can filter the grid to focus on specific roles or individual roles to simplify management.
- Public Role: The Public (Not Logged-In) role defaults to No Access for All Other Records on all tables, ensuring a secure-by-default posture for unauthenticated traffic.
- Table Defaults: To streamline scaling, builders can set default permissions for new tables under User Role Settings. Any newly created table automatically inherits these defaults.
Owned by defaults differently depending on the record type:User Role records are automatically assigned to the user they represent, while records in the Data Table are assigned to the user who created them.
3. Safe Enforcement
Configuring rules does not immediately impact active users. A yellow Action Required banner is displayed until the builder explicitly toggles Enforce data access rules for App to ON in the All Users Table. This allows for safe, offline drafting and validation of security policies.
4. Reversibility
Enforcement can be toggled off at any time. When disabled, users access records as if no rules are in place, but the configured grid settings are preserved so they can be re-enabled instantly.
Key Benefits
- Unified Security Model (Data-Layer Enforcement): Security is enforced at the database level. Rules automatically apply to Classic and Next-Gen Live Apps, as well as searches, API endpoints, and data exports, eliminating the risk of security gaps from missed page-level permissions.
- Separation of Concerns: Page Access Permissions continue to control where users can go (UI navigation), while Data Access Permissions control what records they can see and manipulate once they get there.
- Safe Drafting & Testing: The separation between configuration and enforcement allows builders to design and review complex security grids without disrupting live production environments.
- Secure-by-Default Defaults: Automated default rules (like Public defaulting to No Access) prevent accidental data leaks when new tables are created or when unauthenticated users browse the app.
Getting Started
Step 1: Start Setup
When you open the Data Access tab for the first time after creating a new app (via Users > All Users > Data Access), you will see a prompt to begin setup. Click Start Setup to open the setup modal.

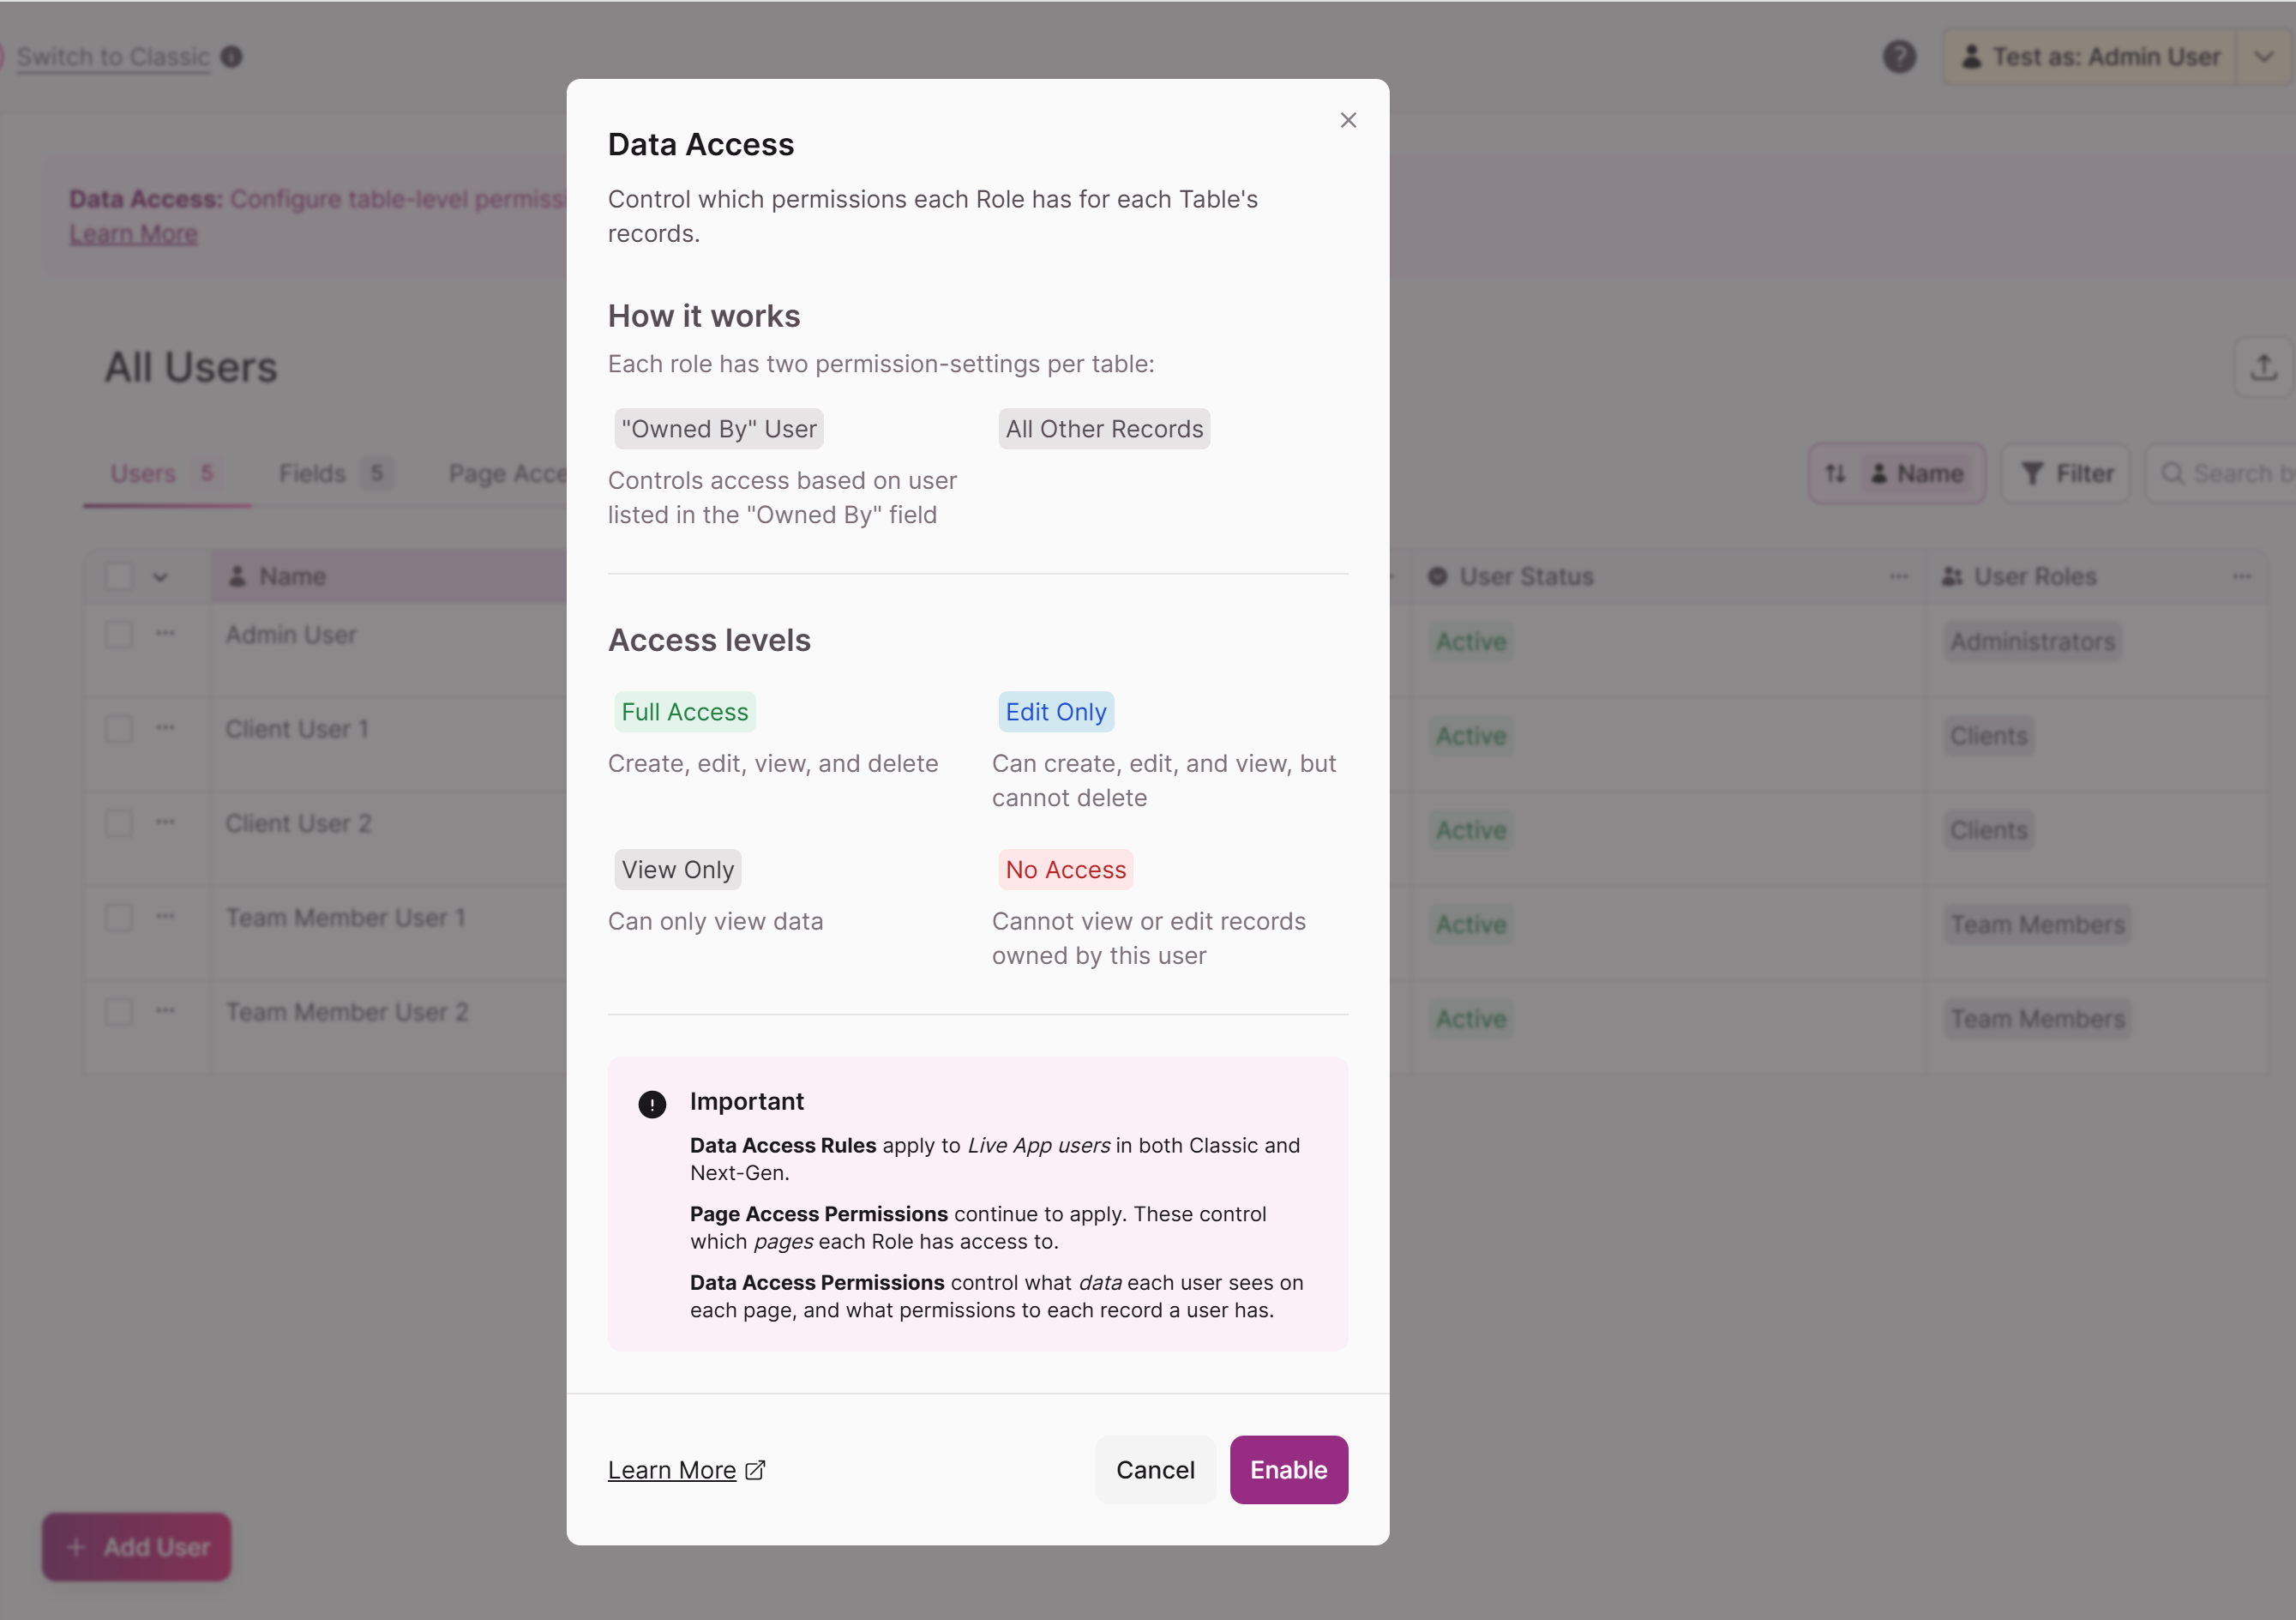
The modal explains the two core concepts — "Owned By" User and All Other Records — and describes each access level. It also includes an important note:
Data Access RulesThe rules apply to Live App users in both Classic and Next-Gen. Page Access Permissions continue to apply and control which pages each Role has access to. Data Access Permissions control what data each user sees on each page, and what permissions each user has for each record.
Click Start Setup to activate Data Access for your app. This creates the Data Access grid and sets default permissions for all your existing roles and tables.
Your Live App is not affected until you've had a chance to configure and review all permissions, and then selecting the option to Enforce data access rules for the app.
Step 2: Configure Permissions
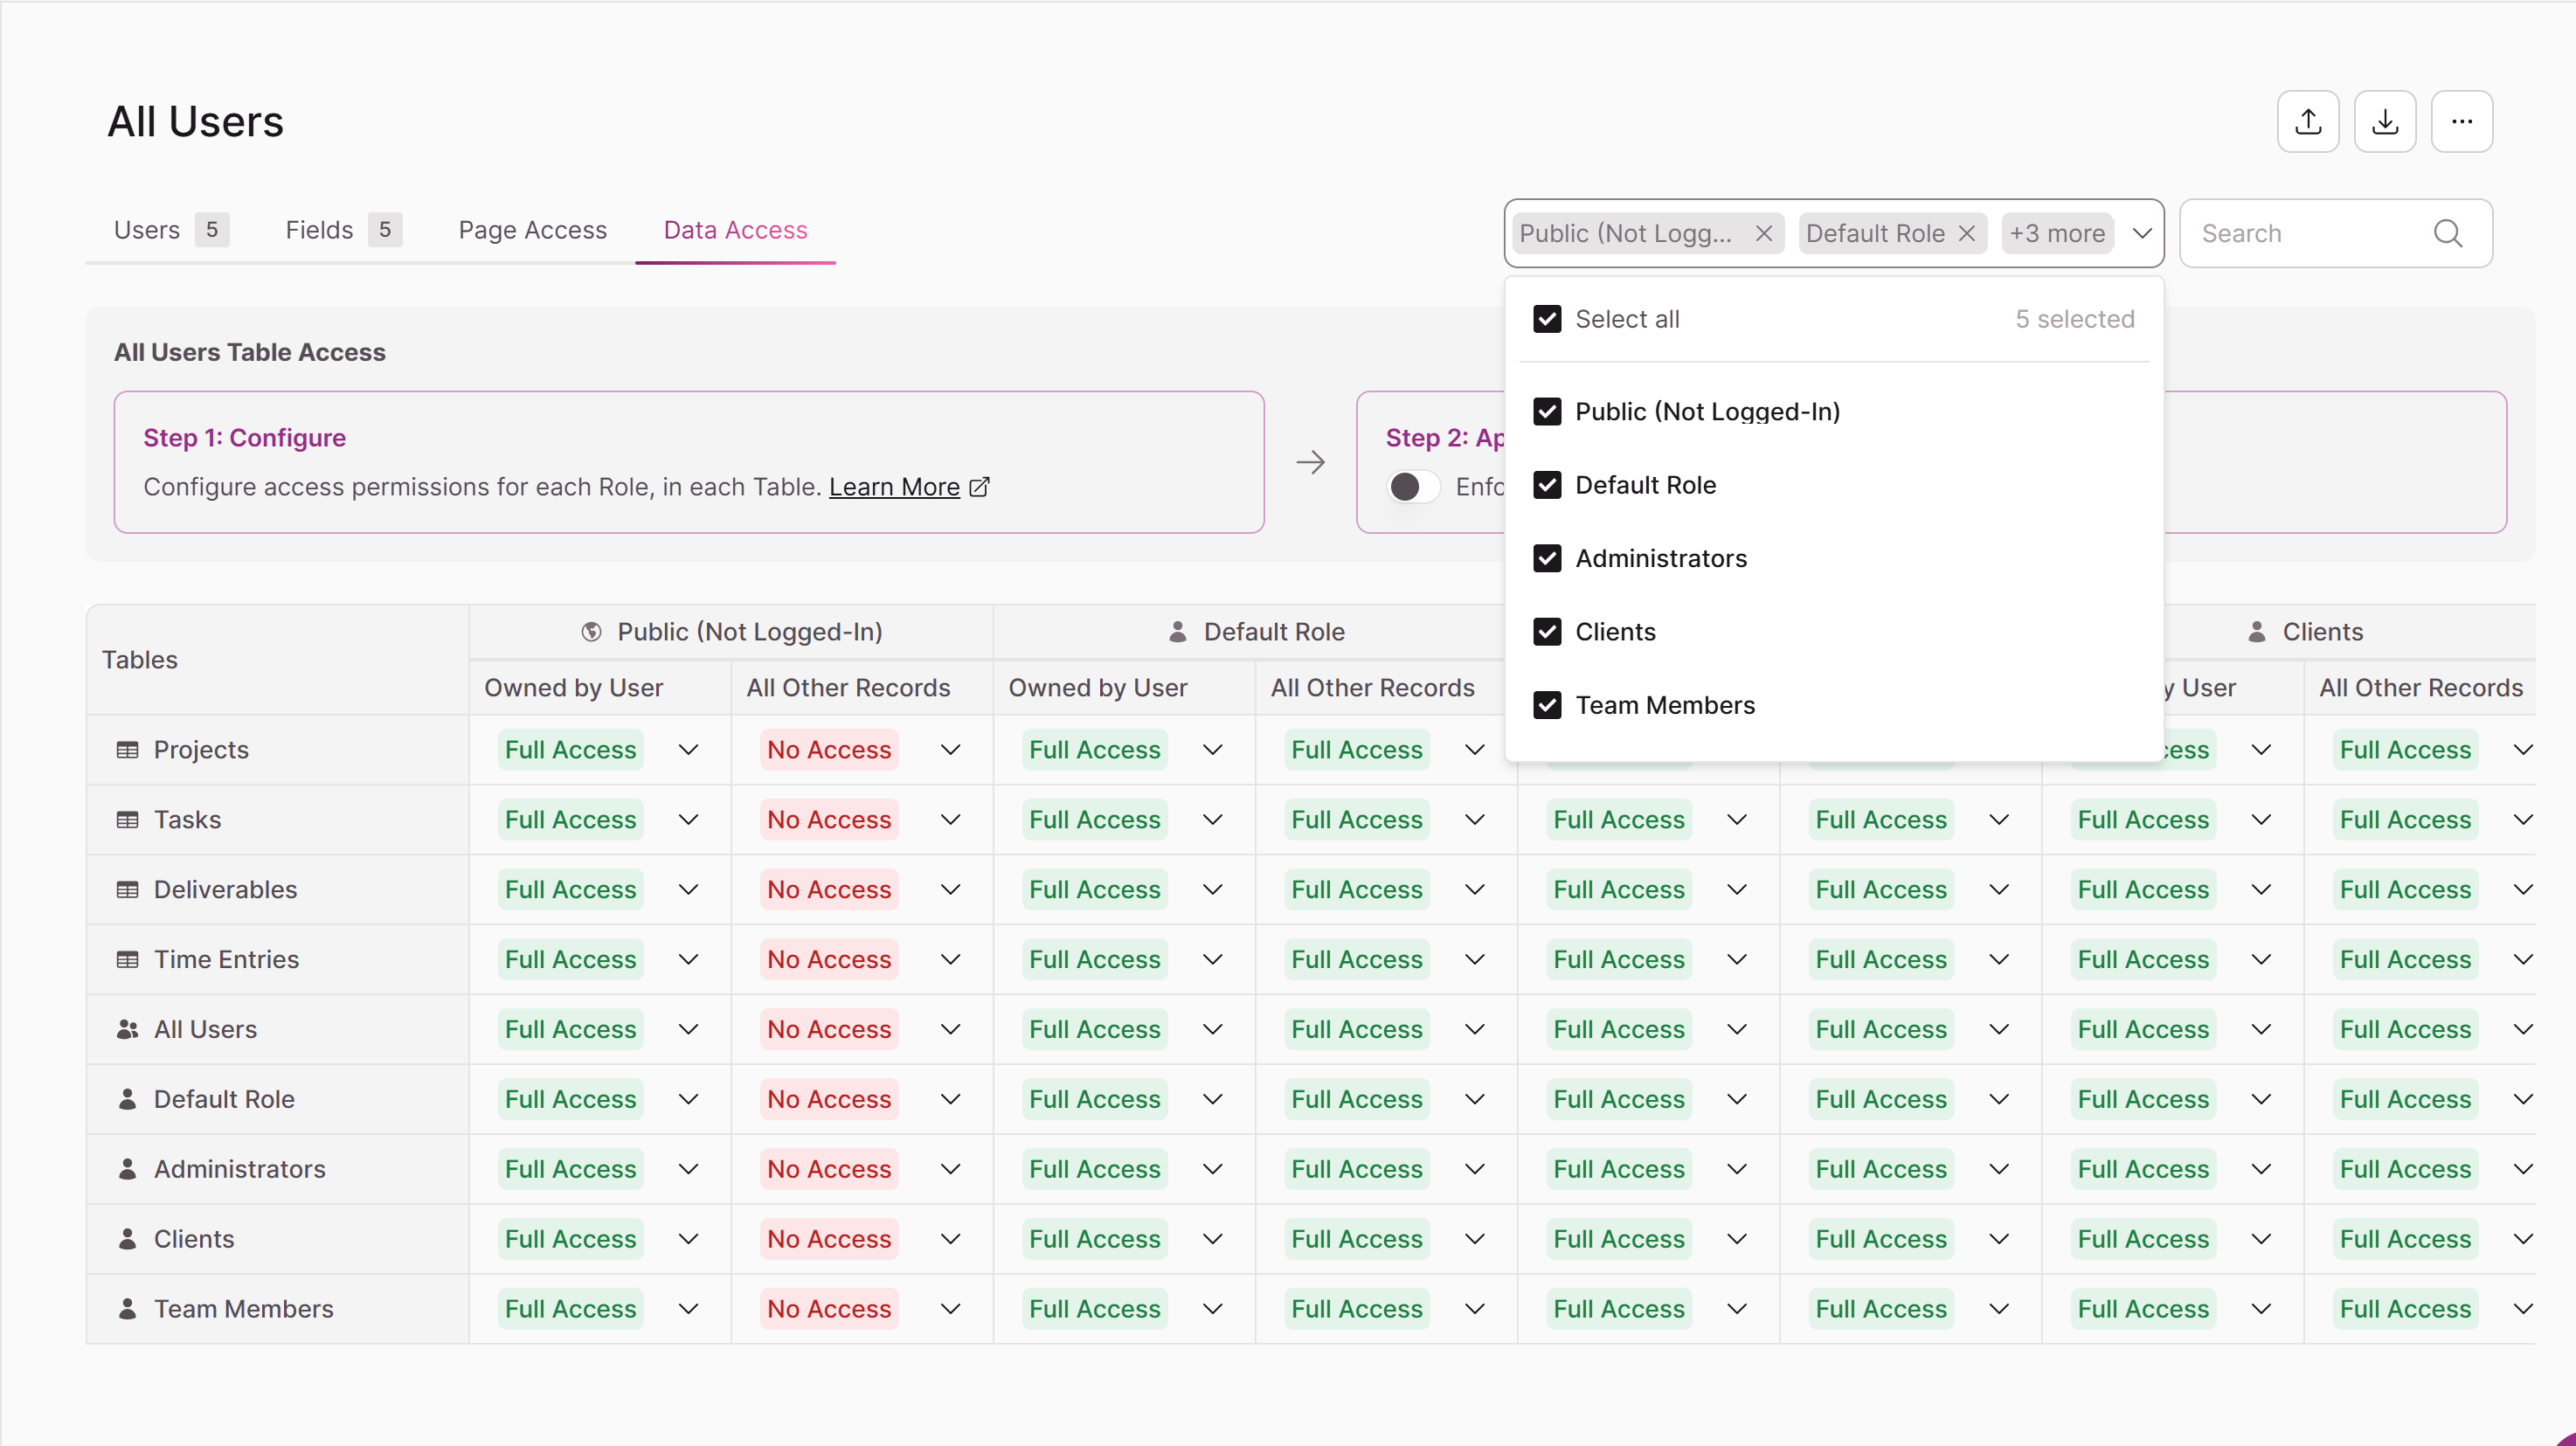
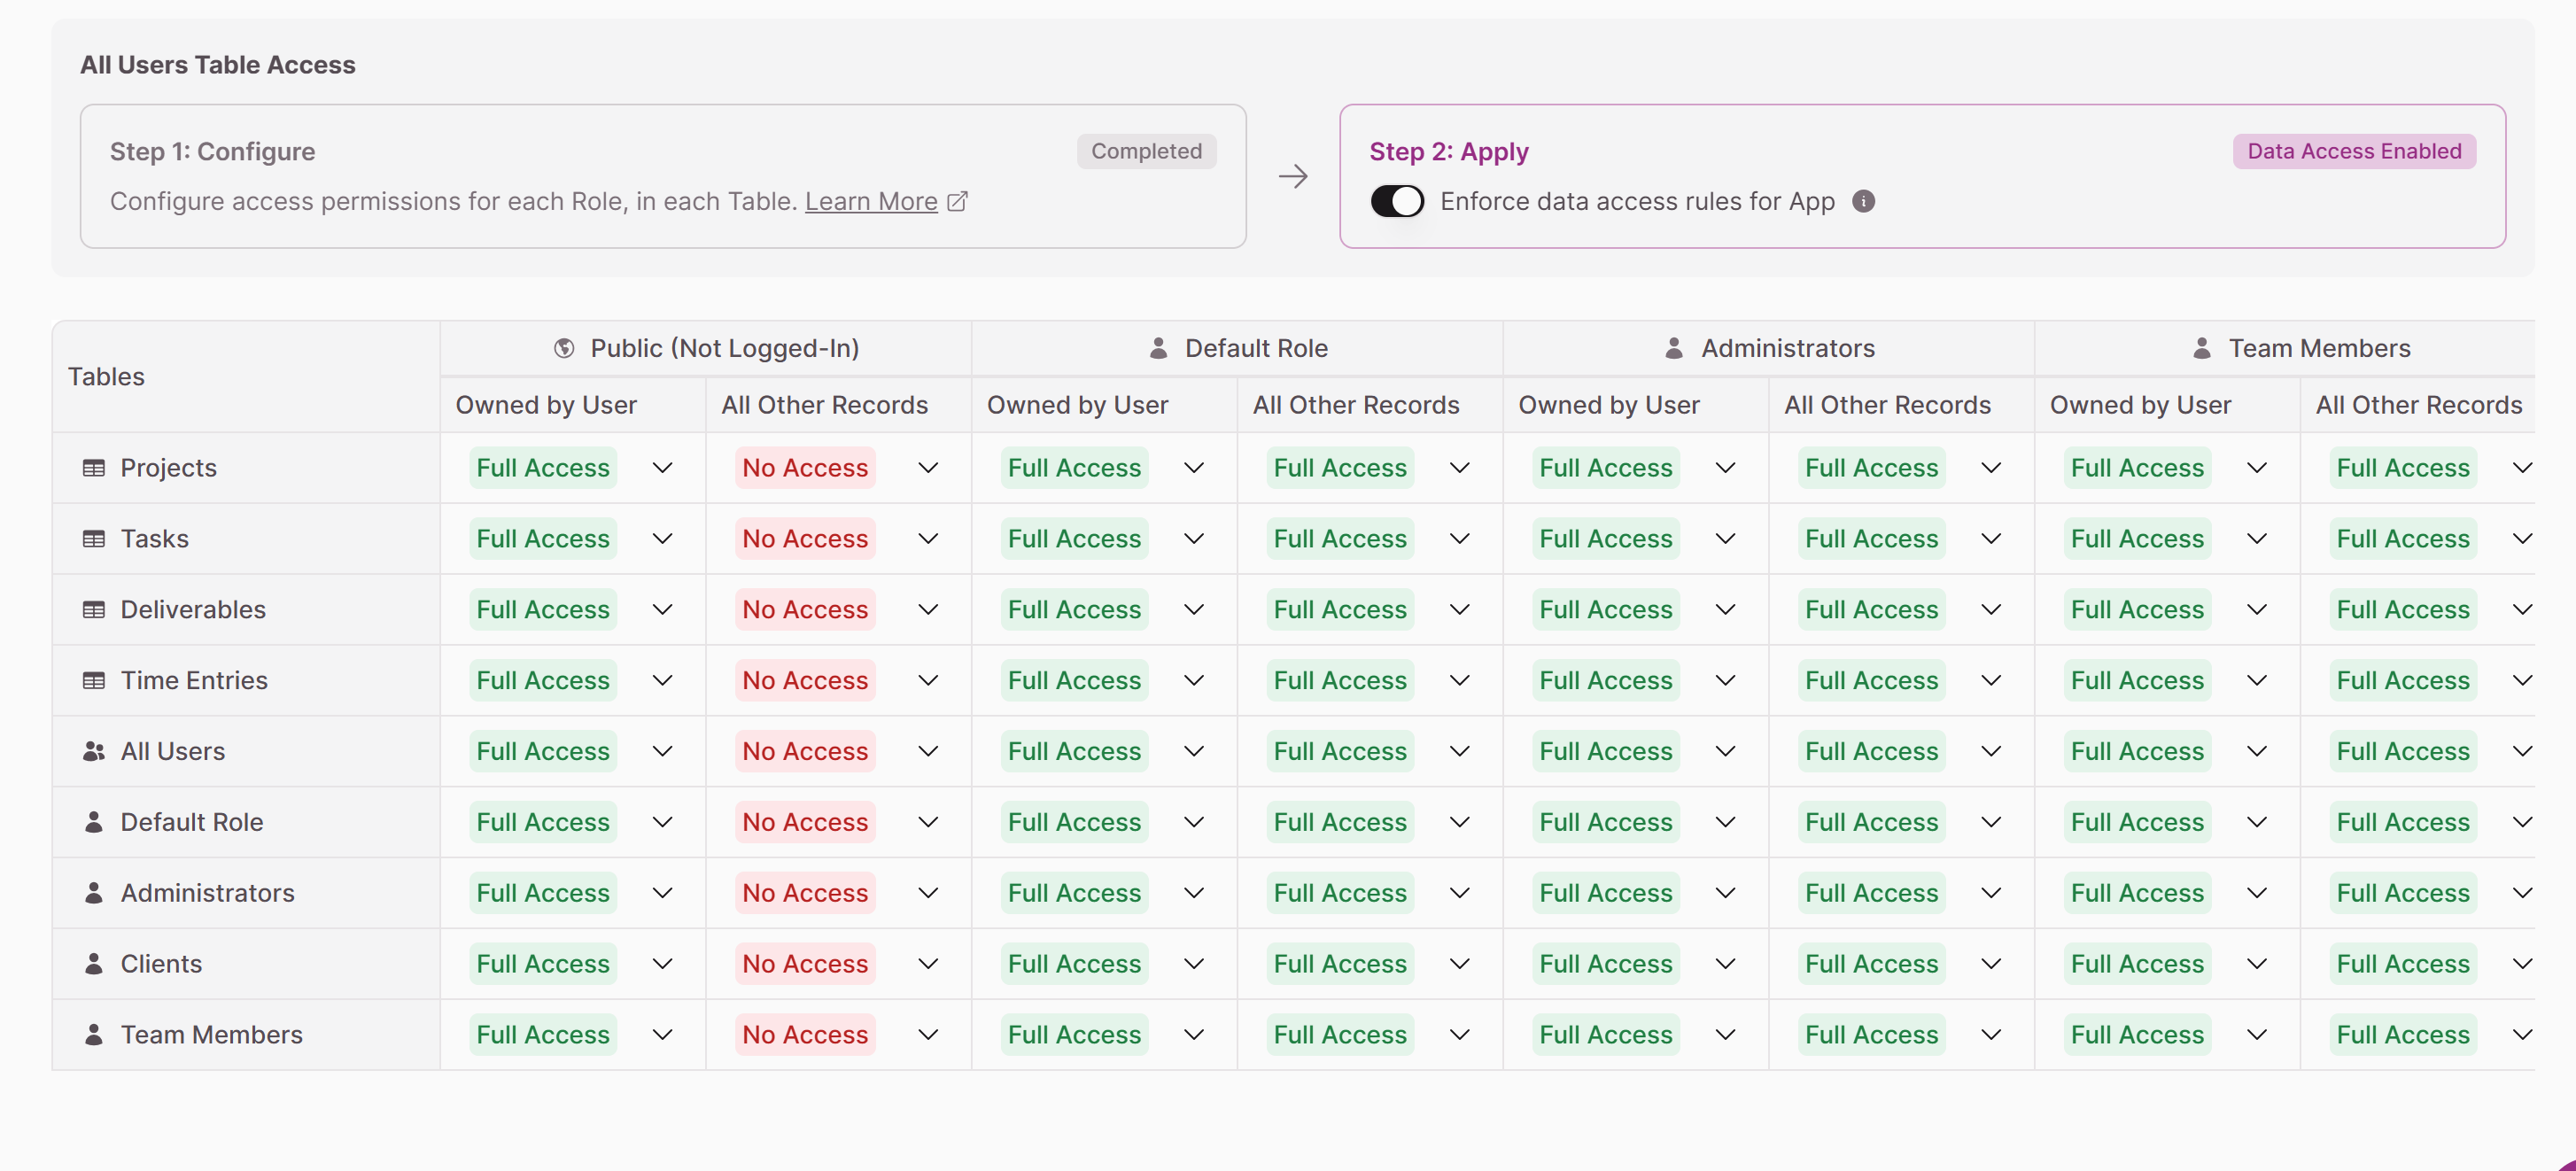
Once Data Access is enabled, you will land on the All Users Data Access grid. This is your central configuration surface, showing all tables as rows and all User Roles as column groups, each split into Owned by User and All Other Records sub-columns.
You can quickly compare permissions across roles, use the search bar or dropdown picker to find specific tables, and adjust dropdowns directly in the grid.
On this grid, you can adjust any permission by clicking the dropdown in the relevant cell.
Filtering by Role
If your app has many roles, you can use the role filter dropdown in the upper right of the grid to focus on specific roles. Click the dropdown to see a checklist of all your User Roles, use Select all to show or hide all roles at once, or check and uncheck individual roles to narrow the view. Selected roles appear as tags above the grid.
Configuring a Single Role
To focus on one role at a time, select it from the dropdown filter or the left-hand role list. The role-specific Data Access tab shows the same grid filtered to just that role, with the same dropdowns for each table.
Tip: The Public (Not Logged-In) role defaults to No Access for All Other Records on all tables. This keeps your data secure by default for unauthenticated users.
Setting Default Permissions for New Tables
As your app grows, you can ensure new tables automatically receive the right permissions for each role without manual configuration each time.
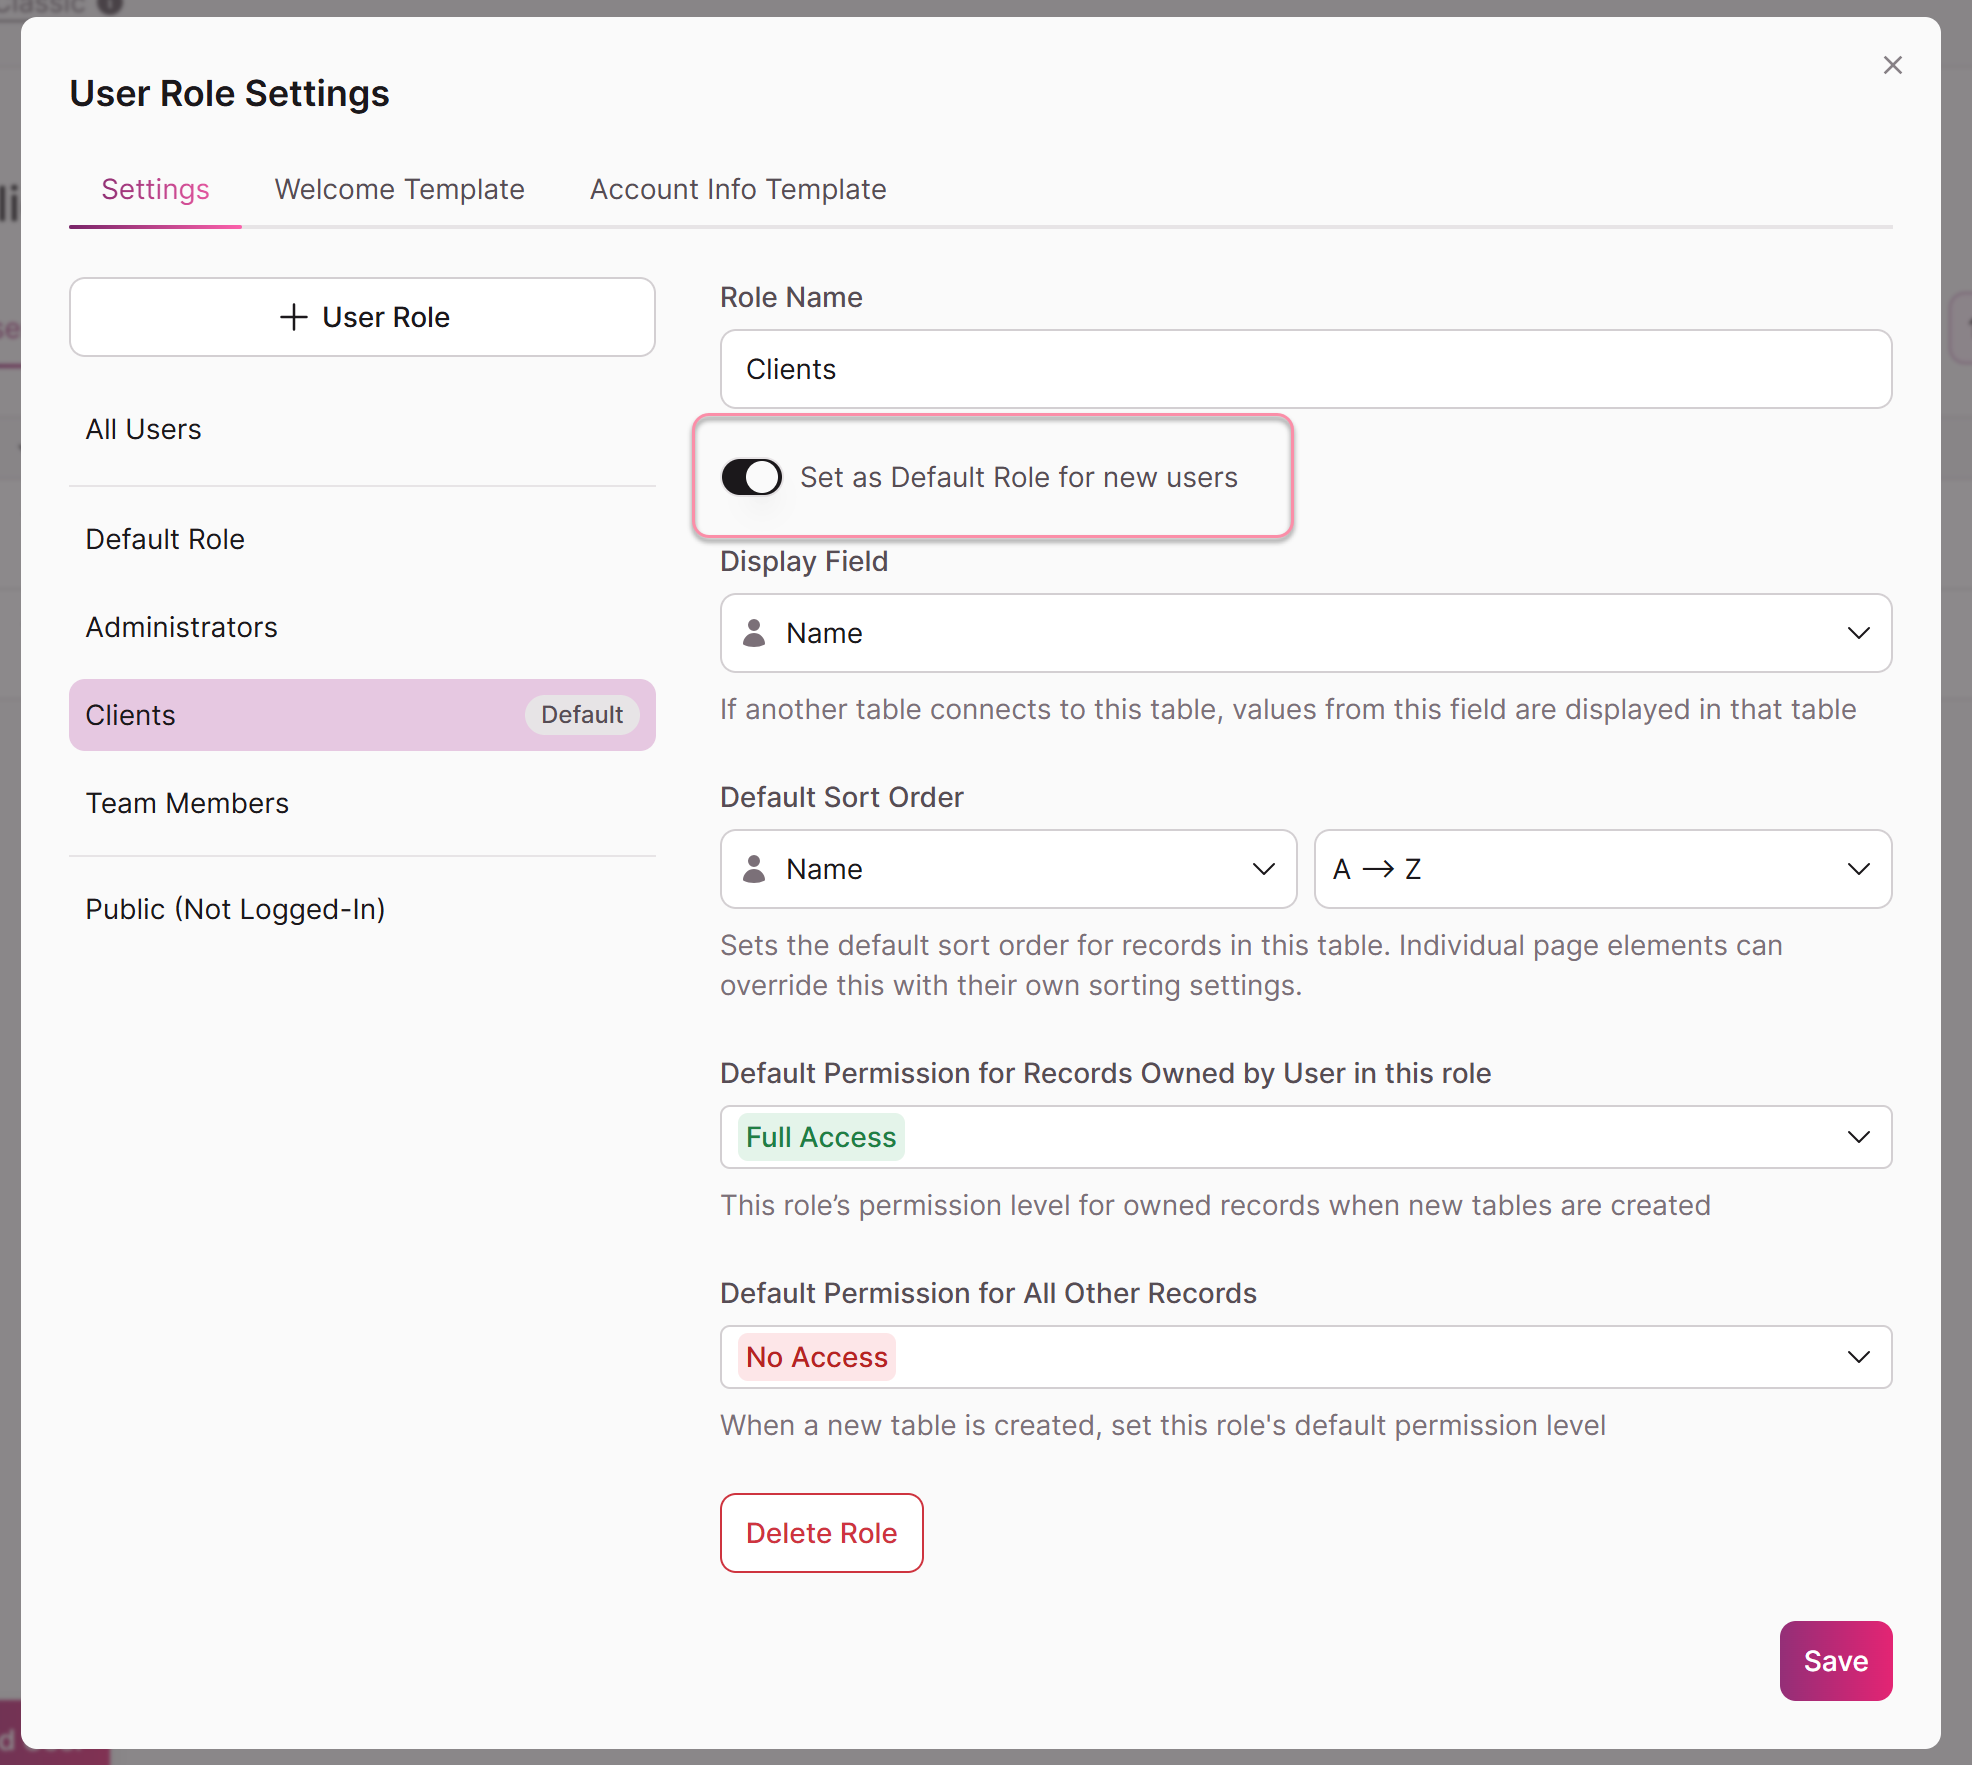
- Navigate to Users > All Users, click the ellipsis (
...) in the upper right, and select User Role Settings. - Select a role from the left-hand list.
- Scroll down to Default Permission for Records Owned by User and Default Permission for All Other Records.
- Set your preferred defaults and click Save.
Any new table you create will automatically inherit these defaults for that role.
Step 3: Enforce Data Access Rules
After enabling Data Access, configuring permissions does not affect your Live App until you explicitly turn on enforcement. This is intentional. It gives you the freedom to set up, review, and refine your entire security model — across every role and every table — without any risk of disrupting active users or accidentally locking someone out. You can take your time, test different configurations, and make sure everything looks right before a single rule goes live.
While enforcement is off, role-specific Data Access pages display a yellow Action Required banner:
Permissions can be configured on this table but will not take effect until 'Enforce' is toggled on in Configuration Step 2 in the All Users Table.
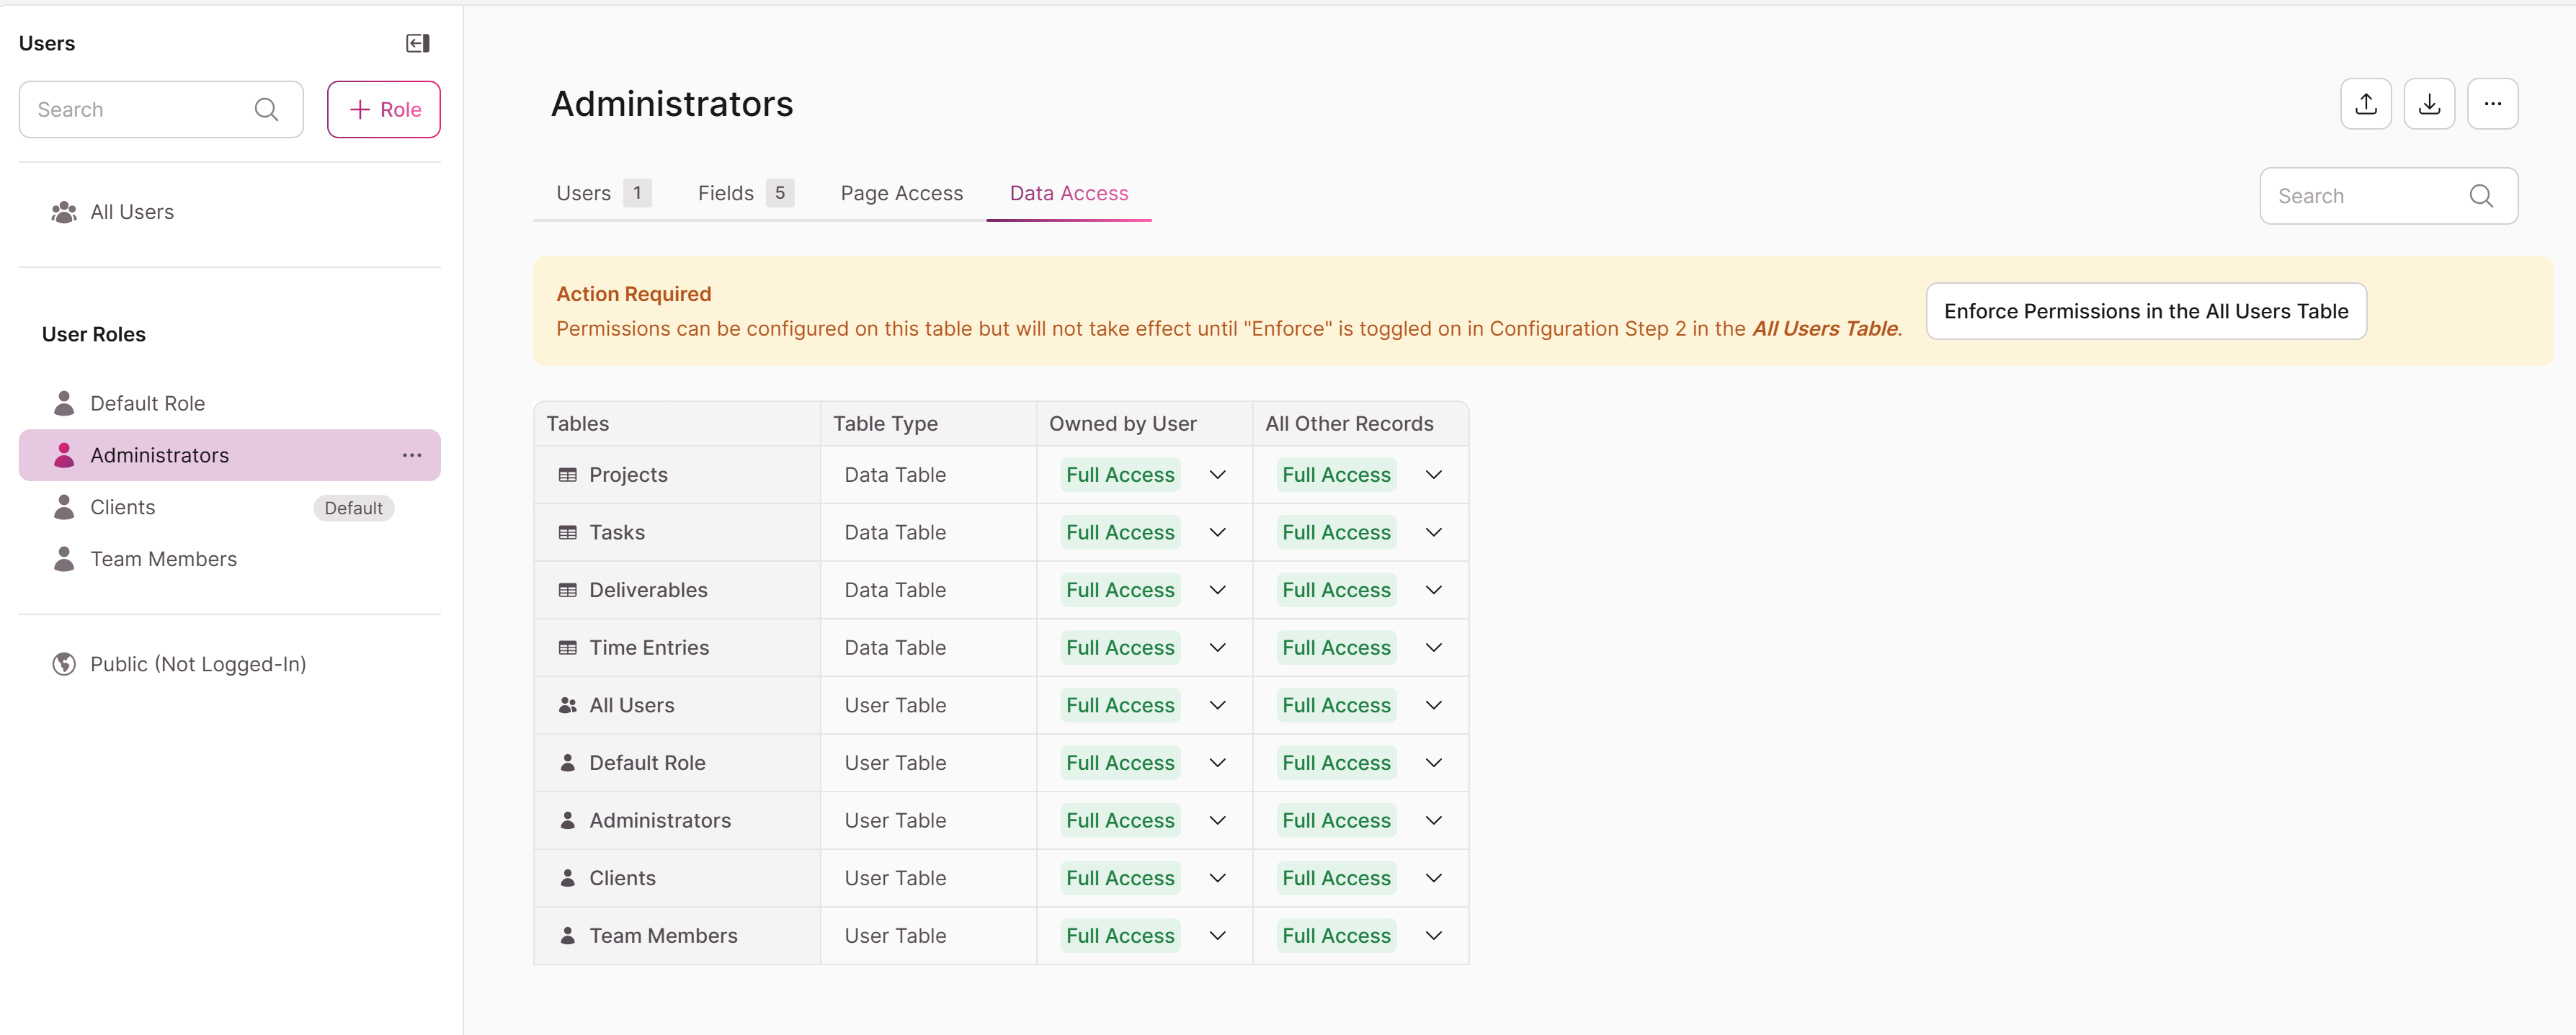
You can click the Enforce Permissions in the All Users Table button in the banner to navigate directly to the enforcement toggle.
When you are ready to go live with your rules:
- Navigate to Users > All Users > Data Access.
- In the Step 2: Apply box, toggle Enforce data access rules for App to ON.
Your rules are now active for all Live App users, in both Classic and Next-Gen.
Turning Off Data Access Rules
You can turn off enforcement at any time. When you toggle enforcement off, a confirmation modal appears:
Turn Off Data Access Rules
By turning off data access rules, all users in your Live App will be able to access records as if there are no access rules in place.
Your current data access configuration will continue to be saved, and can be enforced again at any time.
Click Turn Off to confirm, or Keep On to cancel. Your configured permissions are never deleted — they are simply paused and can be re-enforced whenever you are ready.
Sometimes a user needs to select a record from a table they don't have access to. For example, a user might need to pick a value from a connected field in a form, even if their role has No Access to the linked table.
Soon, we will have a new Connected Field Selection option, to handle this gracefully.
When enabled, users will be able to select values from a connected field even without access to the linked table. They will only see the display field in the dropdown and will be blocked from viewing or navigating to the full record.
Updated 25 days ago