Setting Up Knack Scheduling
Knack Scheduling provides a powerful, automated way to manage time-based appointments and resources directly within your app. Whether you are booking physical spaces, scheduling staff shifts, or allowing customers to reserve equipment, the Scheduling feature automatically creates the necessary database structure and provides a seamless booking experience for your users.
Knack Scheduling provides a powerful, automated way to manage time-based appointments and resources directly within your app. Whether you are booking staff, physical spaces, or equipment, Scheduling automatically creates the required database structure and provides a seamless booking experience for your Live App users.
This guide walks you through every step: enabling Scheduling, configuring your resources and availability, managing shifts and time off, and adding the Appointment Booking element to your pages.
1. Enabling the Scheduling Feature
- Enabling Scheduling
To get started, enable Scheduling in your Next-Gen Builder. This launches a three-step setup wizard that automatically generates all required tables and connections.
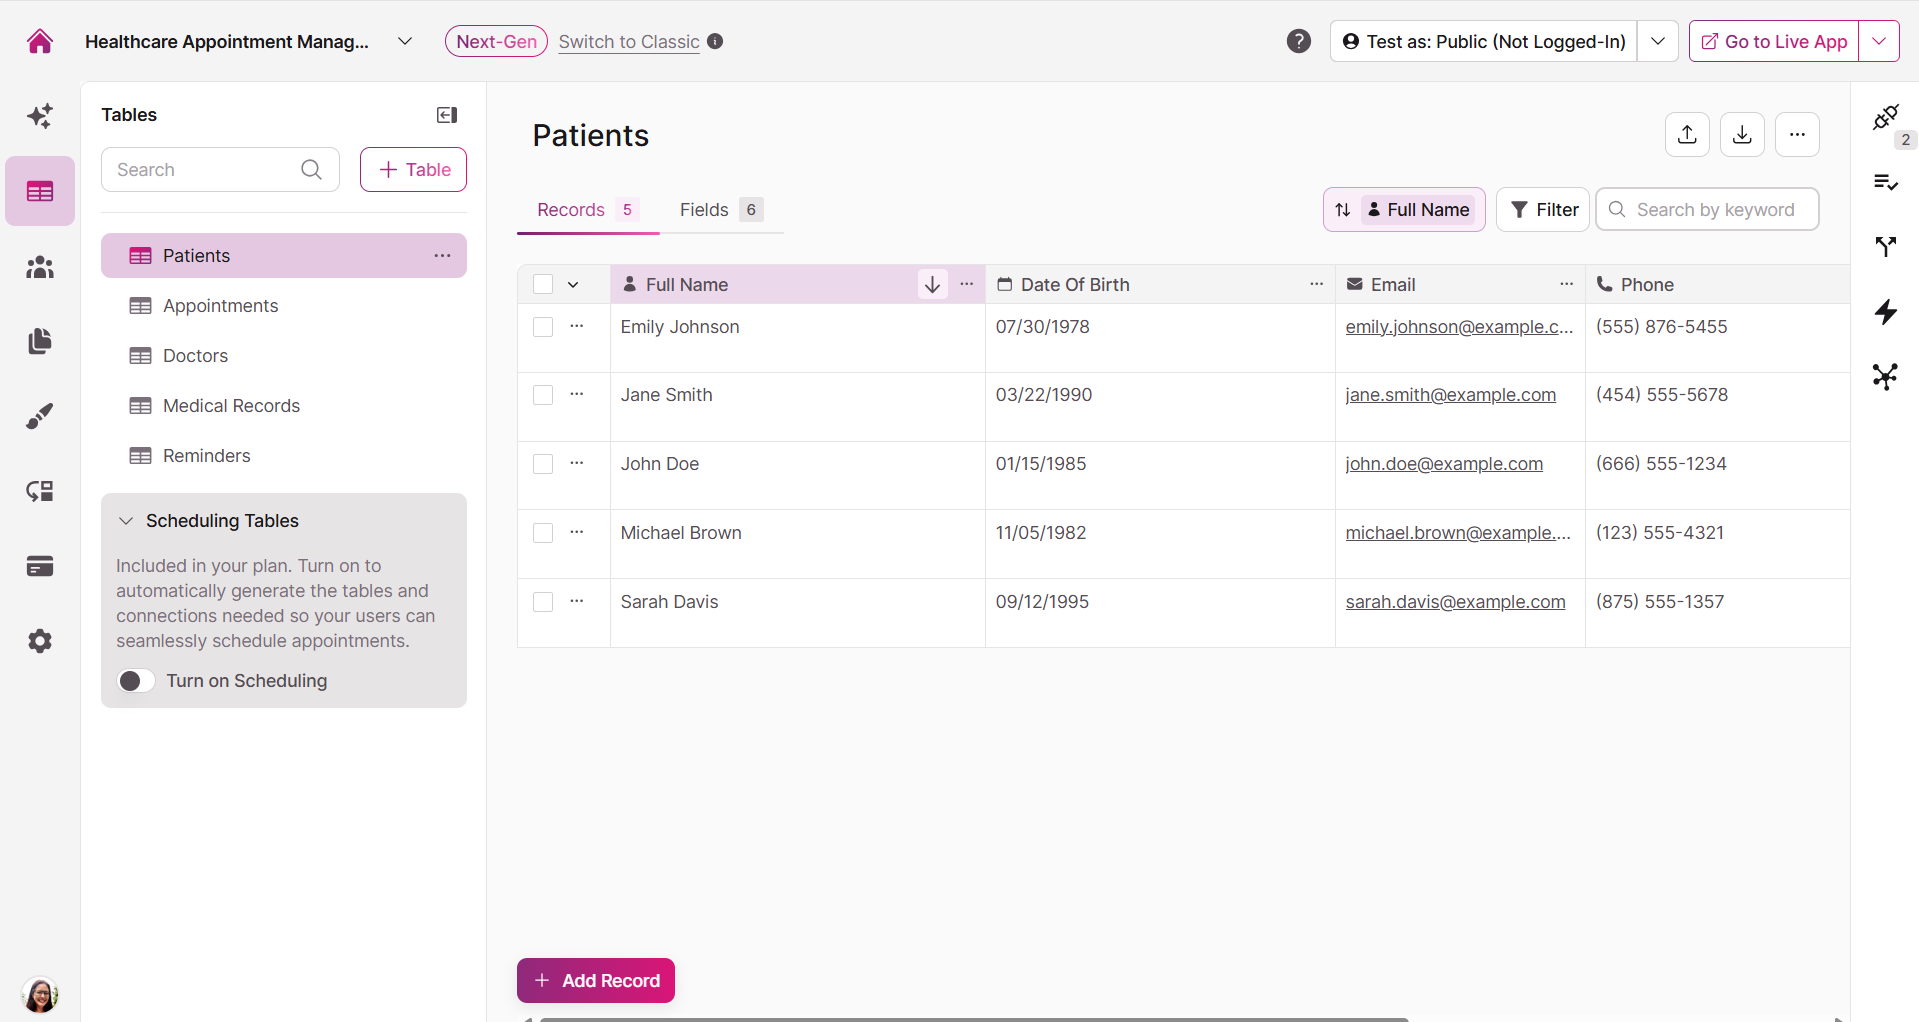
Navigate to your app's Tables area in the Builder.
Locate the Scheduling toggle and turn it on.
The Set Up Scheduling modal will appear.
Step 1: Review Tables to be Added
Knack will automatically create eight interconnected tables to power your scheduling engine. You do not need to build these manually — they are generated with the correct fields and connections already in place.
| Table group | Tables created |
|---|---|
| Appointment Details | Appointment Types, Appointments |
| Shifts | Shifts, Shift Segments |
| Time Off & Holidays | Time Off Calendar, Time Off Dates, Holiday Calendar, Holiday Dates |
Expand to see more details about the tables and fields.
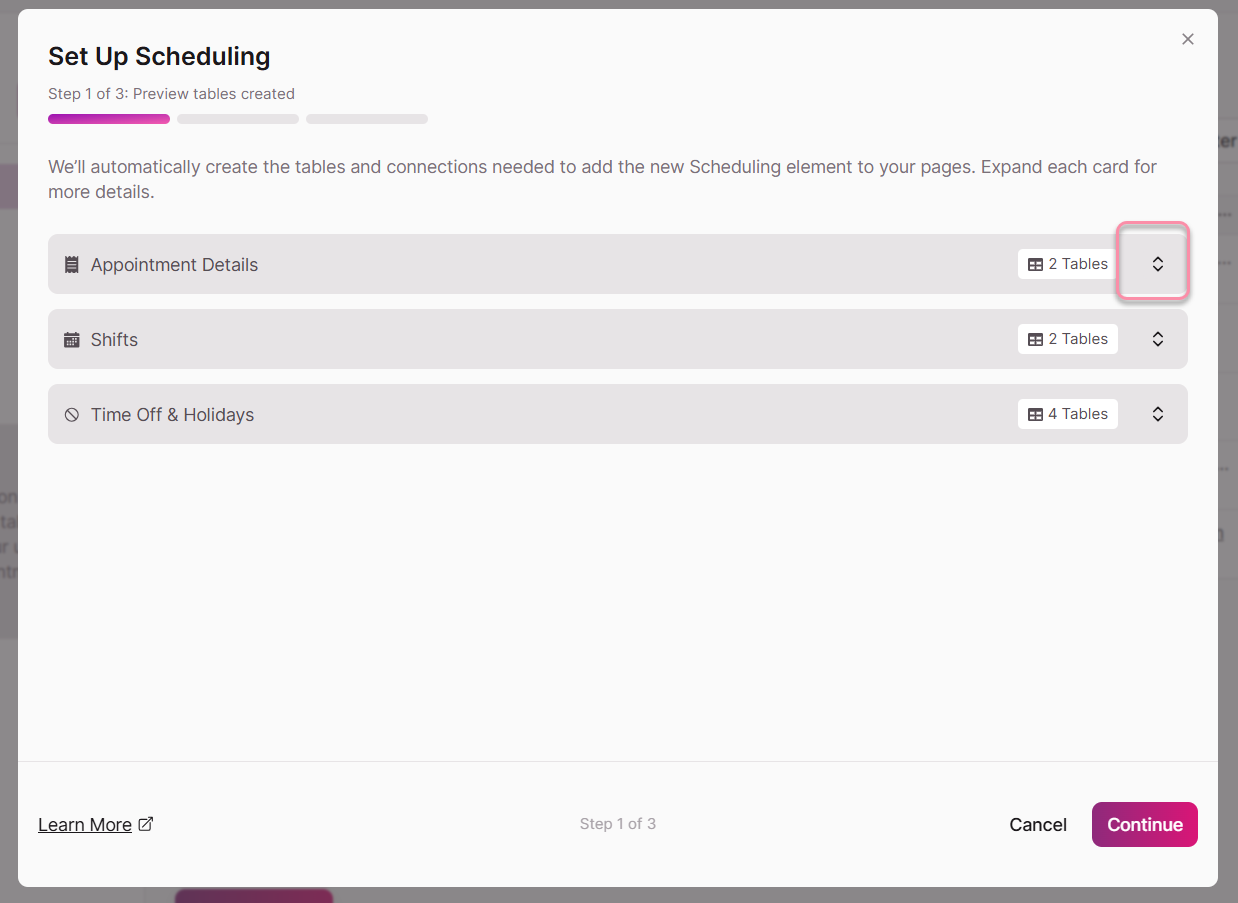
Review the descriptions of these tables and click Continue to proceed.
Step 2: Configure Bookable Resources
This step defines the core entities in your scheduling flow.
-
What are the resources to be booked?
Select the table that contains the people, places, or items that have availability and do the work — for example, a Doctors, Technicians, Rooms, or Equipment table. Knack will automatically create a connection field on the new Appointments table linking back to the table you select here.The Map Fields panel below the dropdown the display field that is currently set on the resource table. This is shown to your Live App end users. For your convenience, we've added an option to change the display field from the modal if you wish, or, you can do that at any other point from the table settings if necessary. As an example, if your resource table's Display Field is "Full Name" field, the Live App users see the doctor's or technician's name when selecting who to book their appointment with.
-
Related Table (optional)
Optionally select an existing table to connect each appointment to a related record — such as a job, treatment plan, or order. Knack creates a connection field on the Appointments table linking back to your selected table. After setup, you can configure a Record Action on the Add Appointment form to automatically create or update those records when an appointment is booked. See Forms Record Actions for instructions.
Tip: Bookable Resources vs. Related Tables
Always select the entity that has a schedule (like a person or room or piece of equipment) as your bookable resource. Do not select a table like "Services" or "Orders" here. You will define the actual services you offer (like "Routine Cleaning" or "Consultation") in the new automatically generated Appointment Types table.
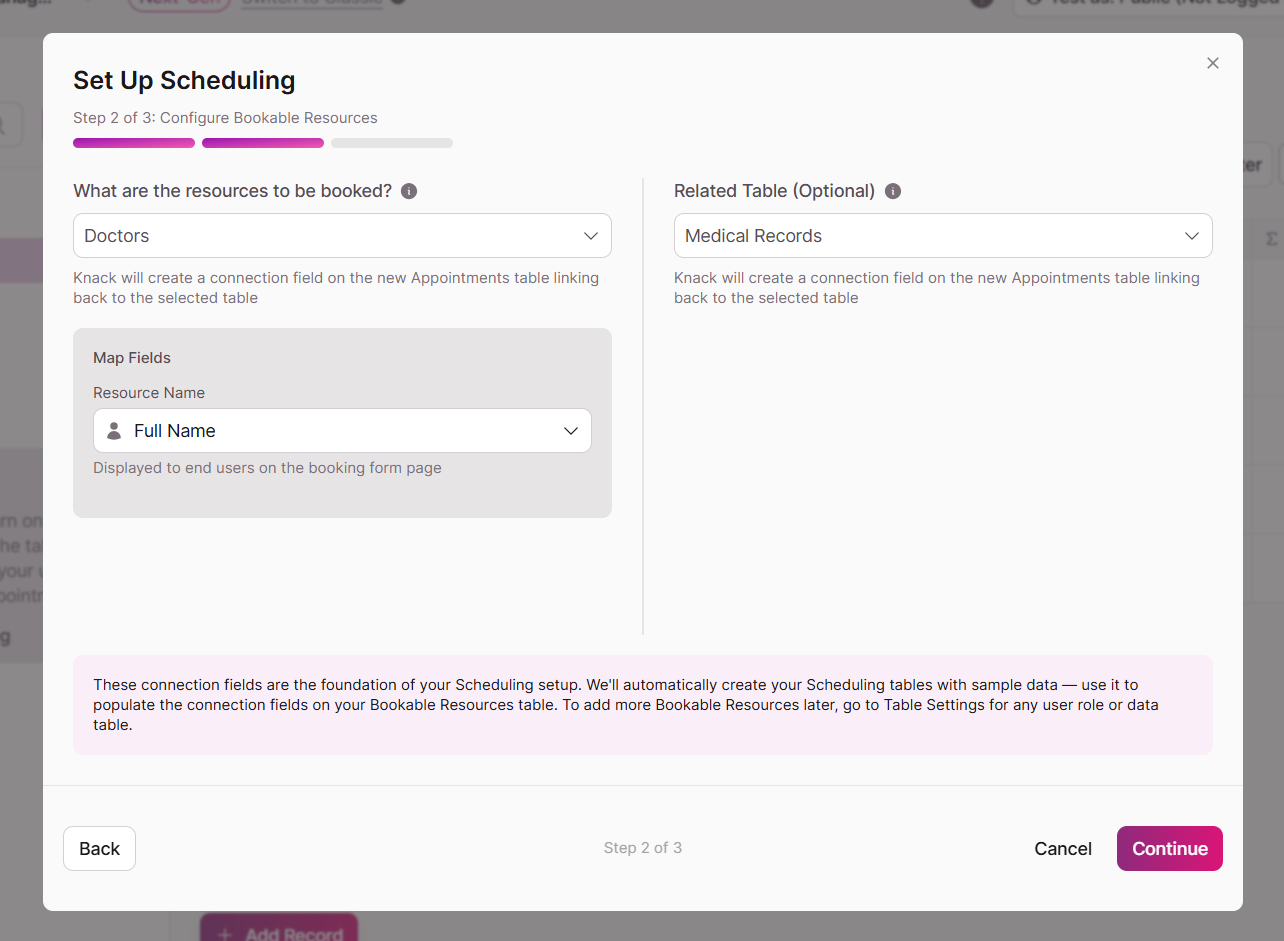
For example, a medical practice might select Doctors as the bookable resource and Medical Records as the related table. Each time a patient books an appointment, that appointment is connected to their medical record. From there, a Record Action can automatically update the record with appointment details — so your staff always has the full visit history tied to the right patient, without any manual data entry.
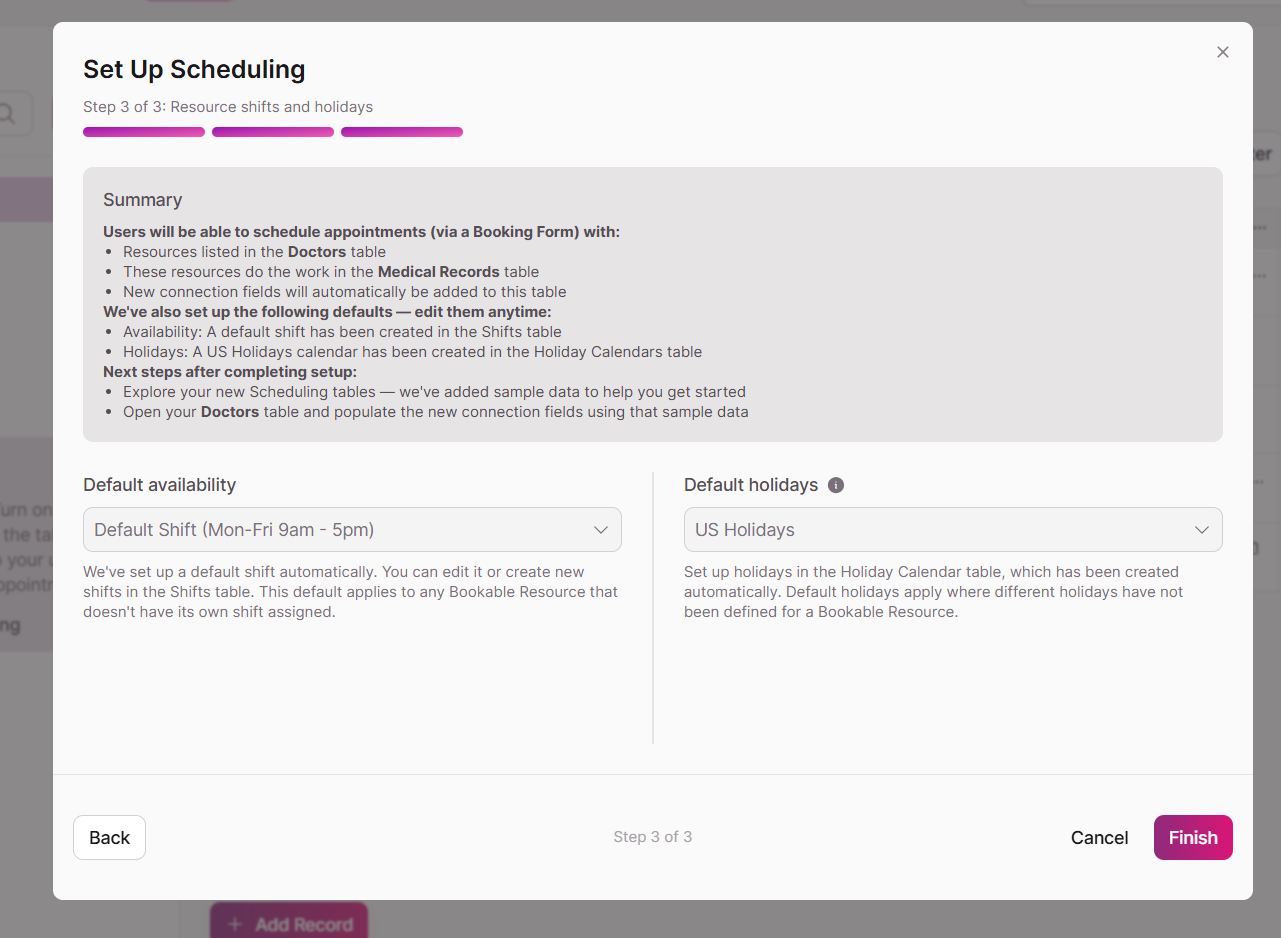
Step 3: Review and Finish Setup
The final step shows a summary of your configuration and defaults.
Summary panel
Review the tables and connections that will be created. If your app is in Single Timezone mode, a banner will appear in the Shifts table. See Scheduling and Timezones for detailed information and guidance on enabling Multi-Timezone support.
-
Default availability: Knack automatically sets standard working hours for your resources (e.g., 9:00 am to 5:00 pm). This default Shift that will apply to any bookable resource that does not have its own Shift assigned. You can use this default or create your own Shifts after setup and update this selection later.
-
Default holiday calendar: Knack automatically sets a standard holiday calendar (e.g., US Holidays) to automatically block off those dates. You can create custom Holiday Calendars after setup and update this selection later.
Sample data: Knack populates your new tables with sample records. This gives you a working example to understand how the tables connect.
Click Finish. Knack will display a loading screen while it builds your tables, creates sample data, and applies your settings.
Now, you can explore your new Scheduling tables — sample data has been added to many of them to help you understand how the tables connect.
Open your resource table (e.g., Doctors) and populate the new connection fields using the sample data provided or create real data in the Shifts and Shift Schedule tables as a guide. This is a necessary step before users can book an appointment.
2. Defining Appointment Types
The Appointment Types table is the foundation of your booking experience. It drives what end-users see and select when booking — every appointment must belong to a type.
After setup, Knack populates the Appointment Types table with sample records. You should edit these records to match your actual offerings and add new ones as needed.
To manage Appointment Types:
- In the Builder, navigate to the Data section.
- Select the Appointment Types table.
- Edit the sample records or add new records for each service or appointment you offer.
- Set the Duration for each type using the number and unit selector. Available units are: Minutes/Hours, Days, and Weeks.
Each Appointment Type record represents one bookable offering. The Display field of the Appointment Types table is what end-users see on the booking form.
Multi-Day Appointments
Knack supports appointment durations from a few minutes up to 365 days — useful for equipment rentals, overnight stays, multi-session programs, or any booking that spans more than a single day.
How availability is calculated for long appointments
For a time slot to appear as a valid start time, the resource must have completely uninterrupted availability for the full duration of the appointment. This is called continuous open time. If any gap falls within the appointment window — a nightly closure, a weekend, a holiday, existing time off, or an already-booked slot — that start time will not be offered.
| Resource availability | Can support multi-day bookings? |
|---|---|
| 24 hours a day, 7 days a week | Yes — no gaps to interrupt the span |
| Monday–Friday, 9am–5pm | No — nightly and weekend closures break the continuous stretch |
| Monday–Sunday, 8am–8pm | Only up to 12 hours — the overnight gap prevents anything longer |
Example: You offer a 3-day equipment rental. A resource configured as available 24/7 will show valid start times for that rental. A resource configured as available 9am–5pm will never show a valid start time for a 3-day rental, because the first overnight closure breaks the required continuous stretch.
Setting up resources for multi-day bookings
If you need to offer multi-day appointments, configure the relevant resource's Shift to cover the full span without gaps. For physical resources like equipment or rooms that are available around the clock, set the Shift to cover all 24 hours, 7 days a week.
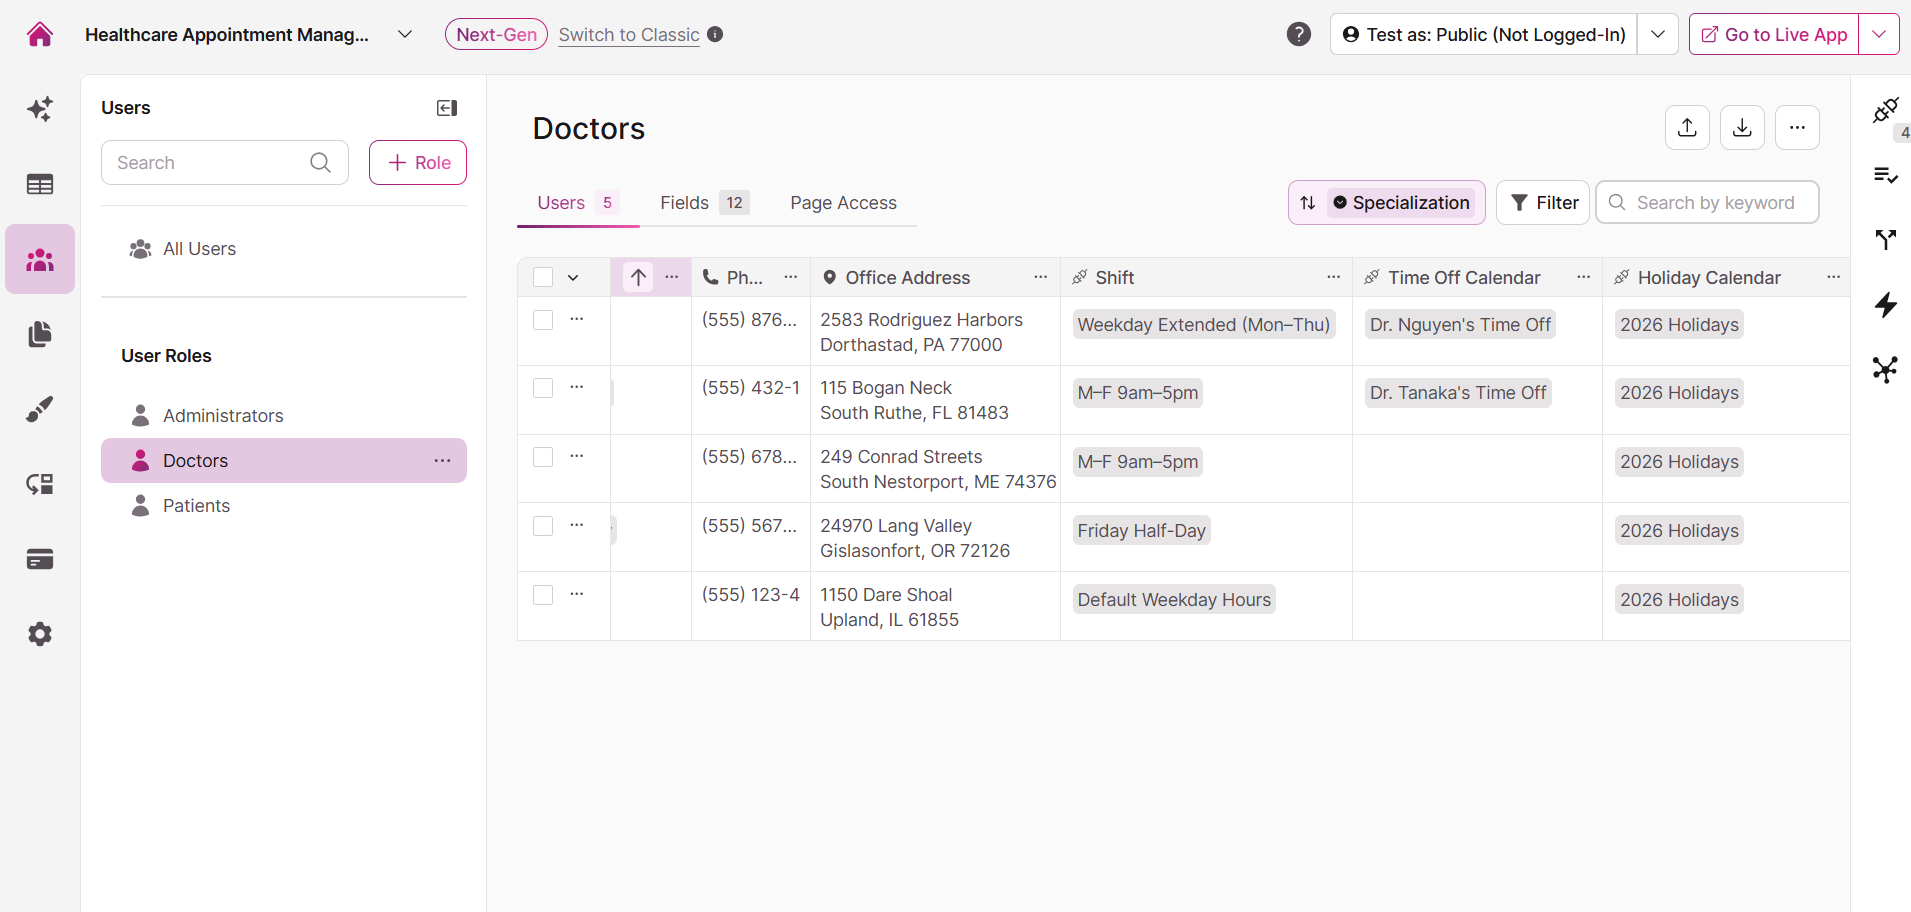
3. Configuring Resources
After the setup wizard runs, you need to configure each resource record before it can accept bookings. A resource with no Shift assigned will not appear as bookable.
To assign a Shift to a resource:
- In the Builder, navigate to the table you selected as your resource table (e.g., Doctors).
- Open a resource record.
- Locate the Shift connection field — this was automatically created during setup.
- Select the appropriate Shift from the dropdown. Only resources with a Shift assigned will be available for booking.
Managing Shifts
The Shifts table defines the recurring availability windows for your resources. Each Shift record has a Name, an optional Description, and a Timezone field that sets the timezone for that resource's availability. Learn more about the Timezone field here.
Knack populates the Shifts table with sample records during setup. You can edit these or create new Shifts as needed.
Shift Segments
A Shift is made up of one or more Shift Segments. Each Shift Segment defines a single continuous time block within the Shift, including:
- Days of Week - which days this segment applies to (e.g., Monday, Tuesday, Wednesday, Thursday, Friday)
- Start Time - when the segment begins
- Duration - how long the segment lasts
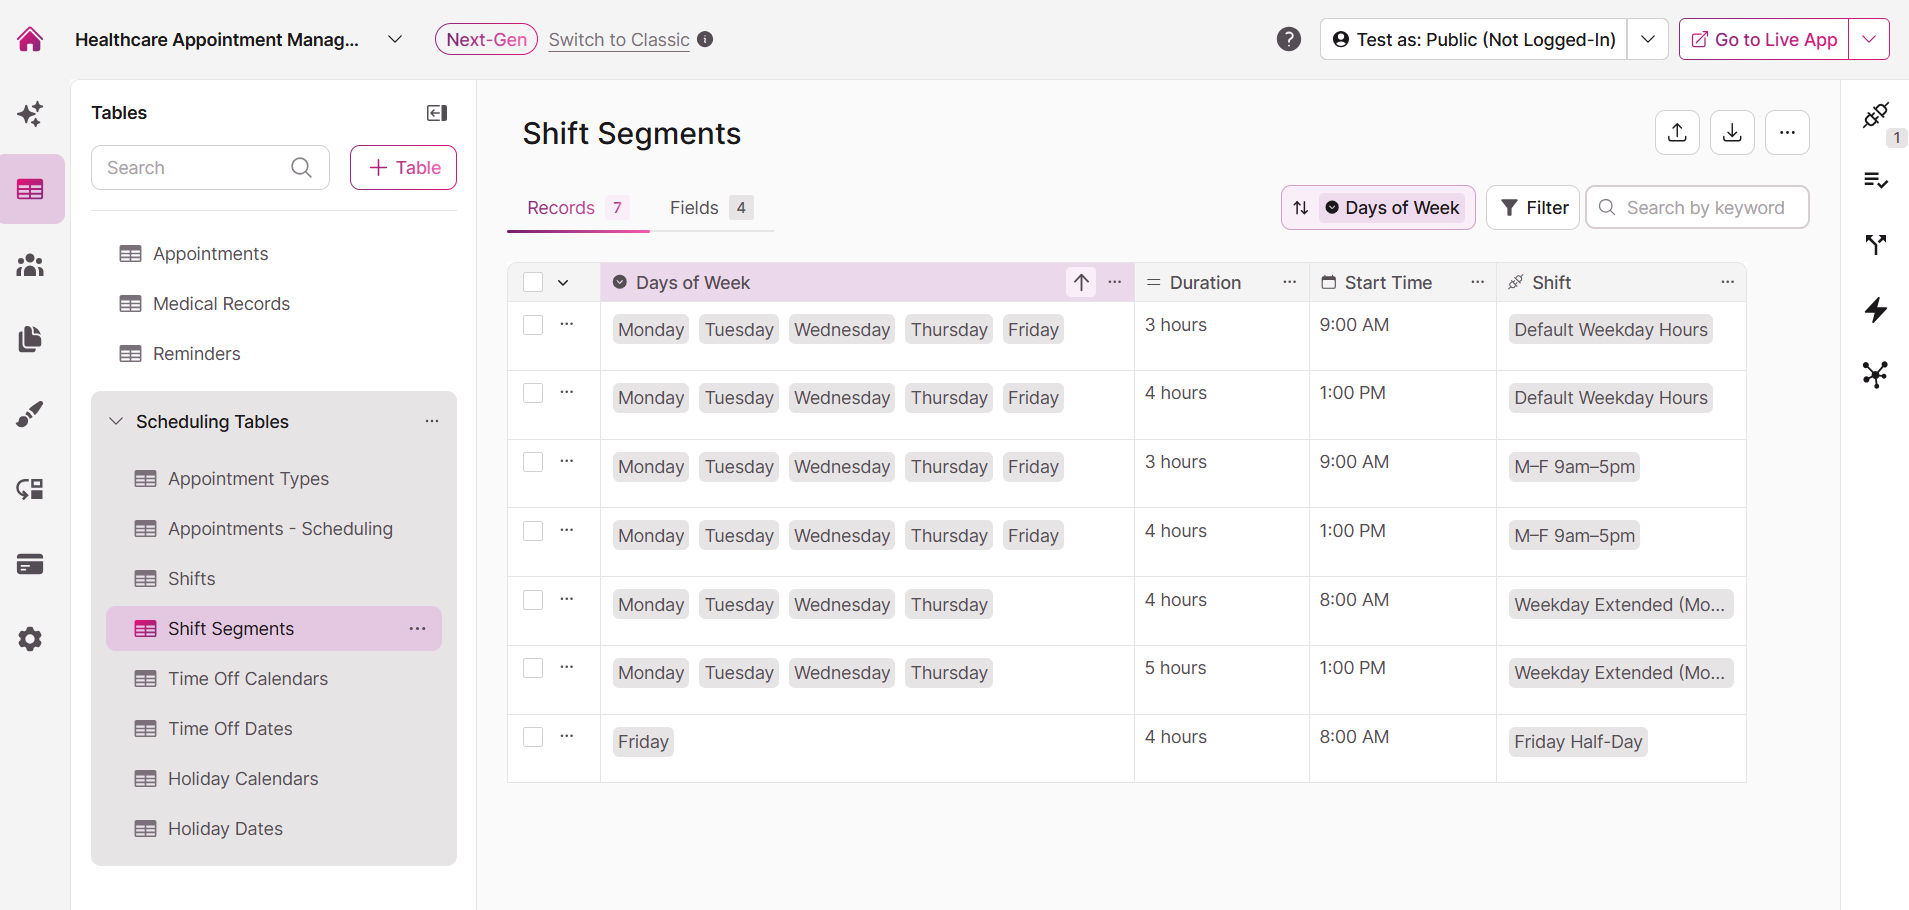
A Shift with a single Segment covers one unbroken block of time. If your resources have a break during the day, you need two Segments to represent that schedule.
Example: A resource works Monday–Friday, 9am–5pm, but takes a lunch break from 12pm–1pm each day. You would create two Shift Segments connected to the same Shift:
- Segment 1: Days: Mon–Fri | Start Time: 9:00 AM | Duration: 3 Hours
- Segment 2: Days: Mon–Fri | Start Time: 1:00 PM | Duration: 4 Hours
The scheduling engine treats the gap between 12pm and 1pm as unavailable, so no appointments will be offered that span the lunch break.
You can create as many Shifts and Shift Segments as your app requires. For example, you might create separate Shifts for full-time staff, part-time staff, and a 24/7 equipment pool.
4. Managing Time Off and Holidays
Beyond recurring Shifts, you can block specific dates and times for individual resources using Time Off and Holiday Calendars.
Time Off
The Time Off Calendar and Time Off Dates tables allow you to record one-off periods when a specific resource is unavailable, such as a vacation, sick day, or partial-day absence. A connection field is automatically set up on the resource table for you to easily select which Time Off Calendar should be applied to each resource.
Each Time Off Calendar should associated with a specific, individual resource (for example, each doctor can have their own Time Off Calendars). Time Off Dates are individual records within that calendar, each representing a date or time range when that resource cannot be booked.
To add time off for a resource:
- Navigate to the Time Off Calendar table in the Builder.
- Locate or create the calendar associated with the resource.
- Add a new record to the Time Off Dates table, connected to that calendar, with the relevant date and time range.
The scheduling engine automatically checks Time Off Dates when calculating available slots. Any slot that falls within a time off period will not be offered.
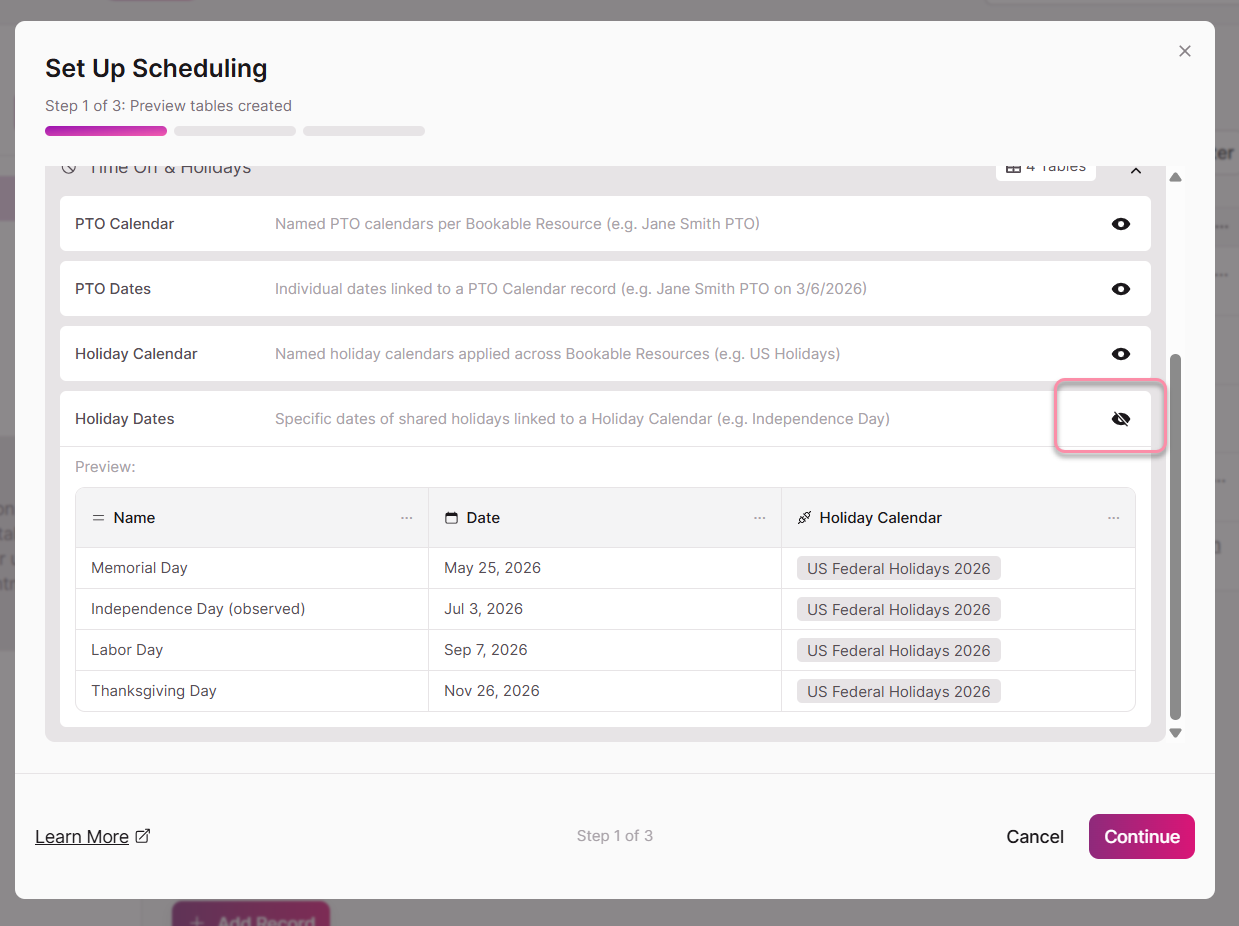
Holiday Calendars
The Holiday Calendar and Holiday Dates tables allow you to block full calendar days across one or more resources. Knack provides a pre-built US Holidays calendar, and you can create custom calendars for other regions or business-specific closures.
A connection field is automatically set up on the resource table for you to easily select which Holiday calendar should be applied to each resource.
A Holiday Calendar can be shared across multiple resources. The default Holiday Calendar (set during setup or updated in Edit Settings) applies to any resource that does not have its own calendar assigned.
To create a custom Holiday Calendar:
- Navigate to the Holiday Calendar table in the Builder.
- Add a new record with a name for your calendar (e.g., "UK Holidays" or "Company Closures").
- Navigate to the Holiday Dates table and add individual date records connected to your new calendar.
Timezone note: Holiday and time off dates are applied in the resource's own timezone, as set on the Shift record. See Scheduling and Timezones for details.
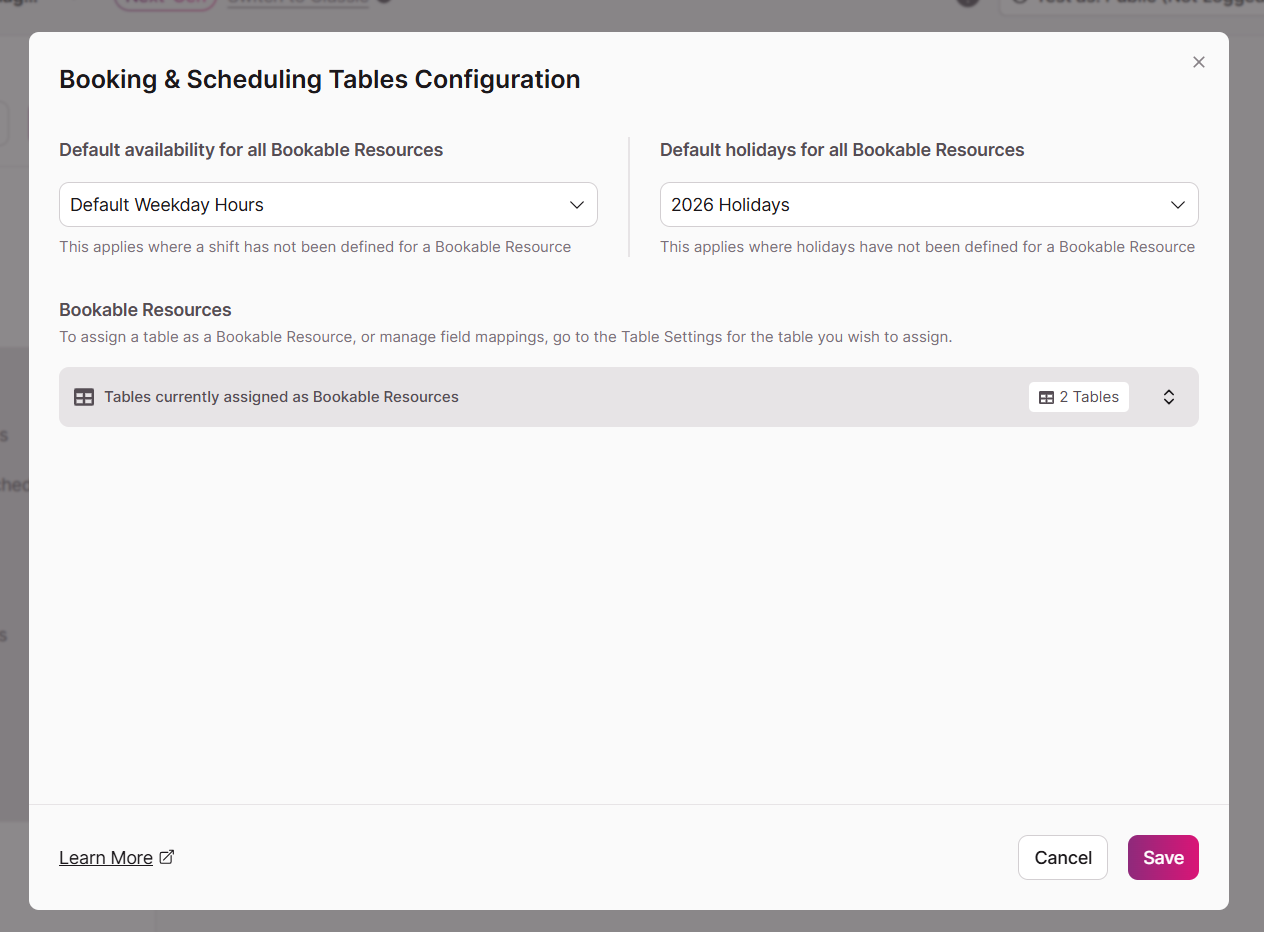
5. Updating Scheduling Defaults (Edit Settings)
After your initial setup, you can update your default Shift and default Holiday Calendar at any time — for example, after creating new Shifts or Holiday Calendars that better match your needs.
To access Edit Settings:
- In the Builder, locate the Scheduling Tables section in the left-hand data panel.
- Click the three-dot menu (⋯) to the right of the Scheduling Tables label.
- Select Edit Settings.
The Edit Settings panel allows you to:
- Change the default Shift — the Shift applied to any resource that does not have its own Shift assigned. At least one Shift must exist in your app for this setting to be valid.
- Change the default Holiday Calendar — the calendar applied to any resource that does not have its own calendar assigned. At least one Holiday Calendar must exist in your app for this setting to be valid.
- View your Bookable Resources and Related Tables — a read-only list of the resource tables currently configured in your app, along with a preview of the fields in each table. To make changes to a resource table, navigate to it directly in the Builder.

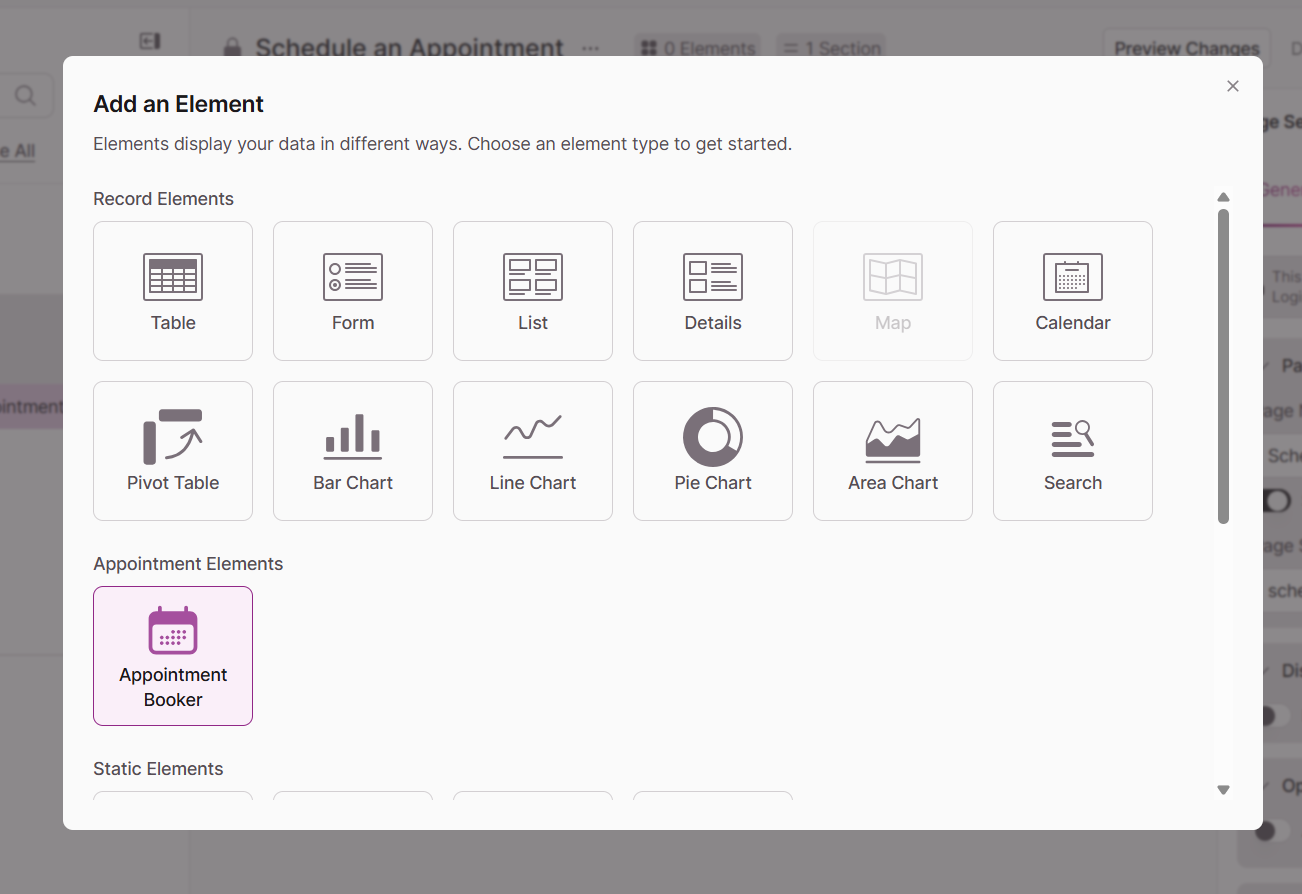
6. Adding the Appointment Booking Element
Once your data is configured, you can add the booking interface to your Live App pages.
- Navigate to the Pages section of the Builder.
- Select the page where you want users to book appointments.
- Click Add Element and select the Appointment Booking element.
Configuring the Booking Element
Once the element is on your page, use the right-hand settings panel to customize the experience:
Appointment Configuration
Choose which Appointment Types should be available through this specific booking element. You can limit a booking element to a subset of your types — for example, a page for new patients might only show introductory appointment types.
Appointment Limits
Set a Minimum booking notice to define how far in advance an appointment must be booked. This is configured as a number and a unit (Hours or Days). For example, setting this to 12 Hours means users cannot book any appointment starting within the next 12 hours.
Form Rules & Record Actions
The Appointment Booking element generates an Add Appointment form that you can configure just like any other form in Knack. Using a Record Action, you can automatically create or update a record in your Related Table whenever an appointment is booked. See Forms Record Actions for instructions on setting this up.
The Live App Booking Experience
When a user visits the page in the Live App, they will see a streamlined booking flow:
- They select an Appointment Type from the available options.
- They select a Resource (e.g., a specific doctor or technician). Only resources with an assigned Shift are available.
- A calendar displays only valid, conflict-free time slots based on the resource's Shift, Time Off, Holiday Calendar, and existing bookings.
- A timezone label at the bottom of the time slot picker confirms which timezone the times are shown in (e.g., "All times are shown in Pacific Time".
- They select a time slot and complete the required form fields.
- Upon submission, the appointment is confirmed and saved to the Appointments table.
If no valid slots are available for the selected resource and appointment type, the calendar will show an empty state and the user will not be able to proceed until they change their selection.
7. Managing Scheduling Tables and Fields
Adding Tables After Setup
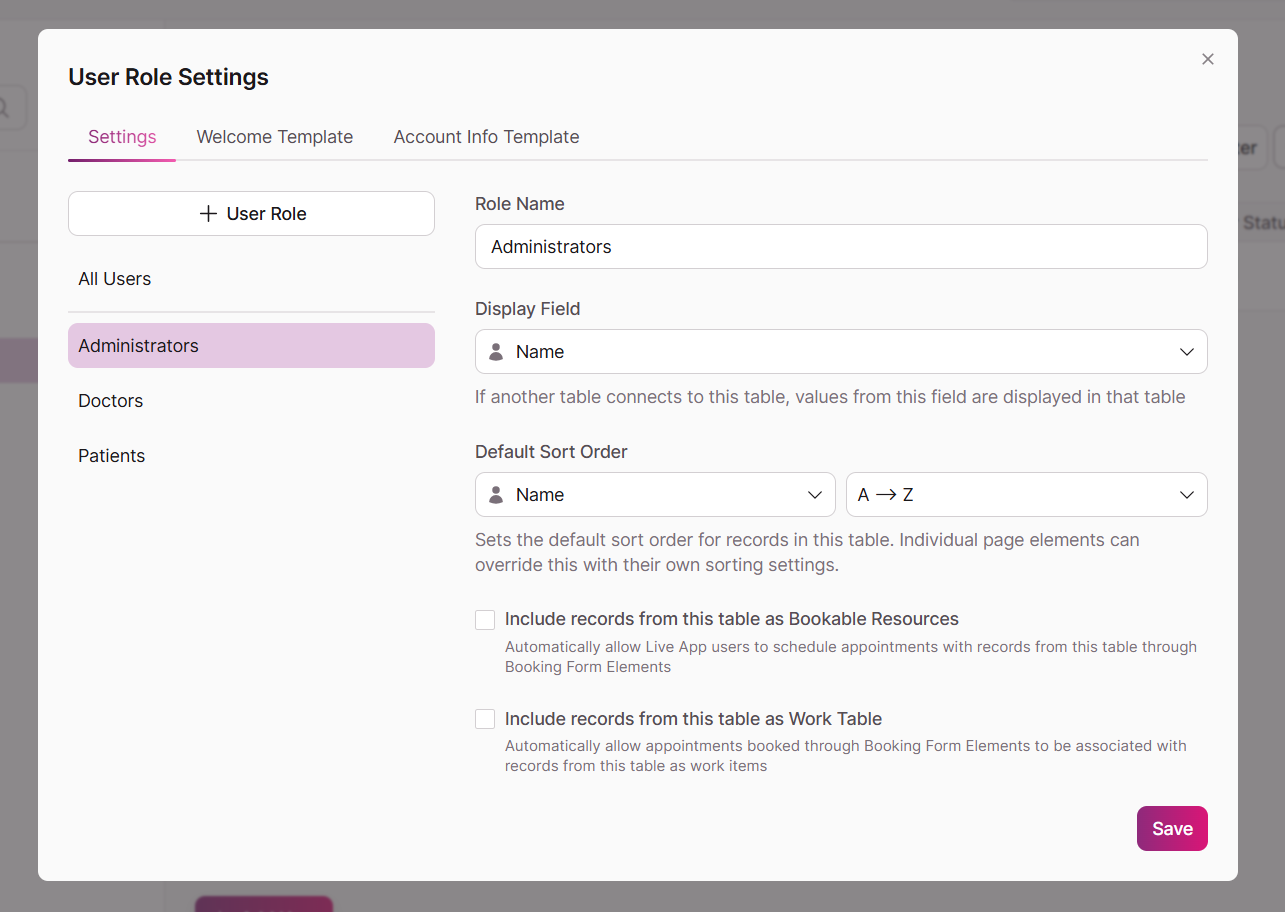
If you need to add a new resource table or related table after the initial setup wizard has run, you do not need to re-run the wizard. Instead:
- Navigate to the table you want to add in the Builder.
- Open Table Settings.
- Enable the appropriate checkbox:
- Include records from this table as Bookable Resources — makes records from this table available for booking through Booking Form Elements.
- Include records from this table as a Related Table — allows appointments to be associated with records from this table as related items.
Scheduling Tables and Fields Cannot Be Deleted
The eight tables created by the Scheduling setup wizard — and the fields within them — are core to the scheduling engine and cannot be deleted. Attempting to delete a scheduling table or a required scheduling field will not be permitted.
Similarly, certain records within the scheduling tables are required for the engine to function and cannot be deleted. Specifically:
- At least one Shift record must exist at all times, as it is required for the default Shift setting.
- At least one Holiday Calendar record must exist at all times, as it is required for the default Holiday Calendar setting.
If you attempt to delete the last remaining record of either type, the system will prevent the deletion.
Note: You can freely add, edit, and delete other records within the scheduling tables (such as individual Time Off Dates, Holiday Dates, or Appointment Types) as long as the minimum required records above are maintained.